Porsche 928 S4 Service
John Pirtle, September 8, 2002
http://members.rennlist.org/pirtle
Vacuum Actuators
The 928 essentially has two vacuum systems. One system is based on
the variable engine vacuum and includes the fuel pressure regulator, the
two fuel pressure dampers, and the automatic transmission. This vacuum
is provided from the intake manifold and a problem in this system will
create issues with idle, general performance, and harsh A/T shifting.
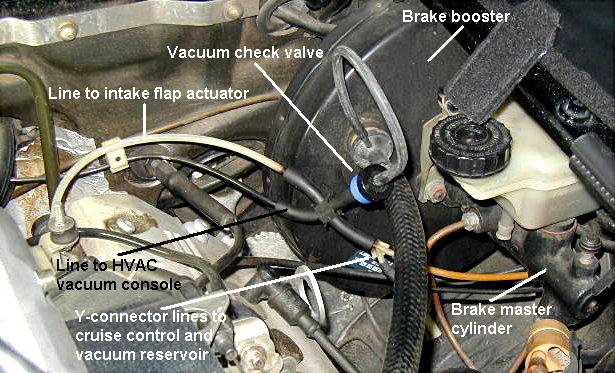
The other system receives constant vacuum from the brake booster
via a check valve. From a four-way tee two lines run into the front
fender to the cruise control vacuum servo and a vacuum reservoir. Another
line runs under the fuel rail to the intake flap control unit, and a
black line runs to the HVAC vacuum console under the center console.
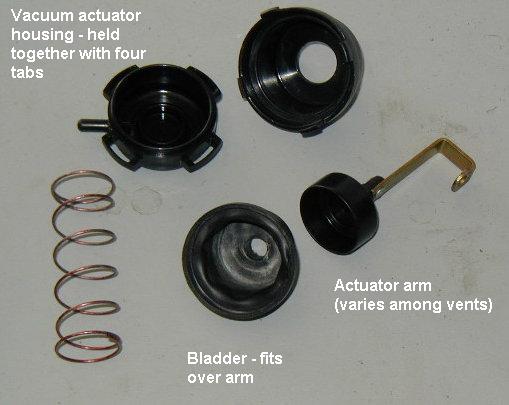
The intake flap, HVAC vents and heater valve use vacuum actators whose
thin rubber bladders are prone to tearing due to age, heat and use.
A leak in any of these actuators will provide the 928 owner with a number
of frustrating problems:
- The intake flap is computer-activated above
approximately 3700 RPM to permit better engine breathing, and a
non-functional actuator will decrease top-end performance.
- The heater valve shuts off
the hot-water/coolant flow through
the heater core. If the valve does not shut-off the A/C will feel warm.
- Above the passenger footwell is a flap which directs outside vs
interior air into the HVAC airbox. Interior air is perferred for
maximum A/C performance.
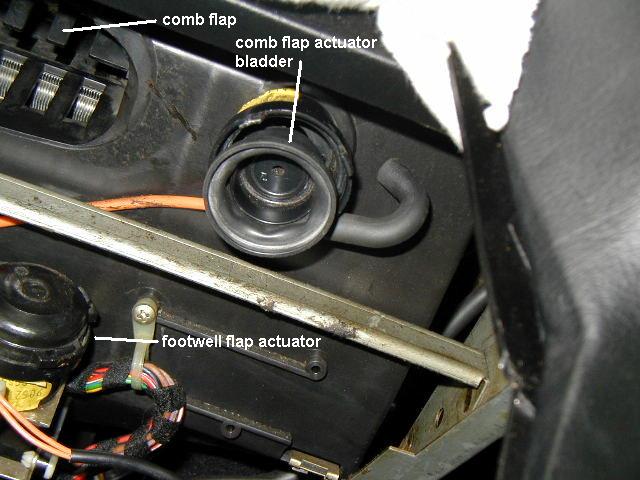
- A black plastic "comb" flap inside the center vent assists the
mixing of air for temperature control. An inoperative flap is closed
which does not allow maximum air flow for A/C cooling. A partially
working flap can also flutter making a chattering noise.
- Heating and cooling air may not flow from the correct vents.
A problem with any of these actuators will affect ALL the others.
I noticed that my A/C would become warm after running the engine over
4000 RPM - the intake flap controller switched vacuum to the intake
actuator (beneath the intake manifold) which had developed a leak.
Troubleshooting:
Obtain a vacuum hand pump. The
Mityvac brand is often found
in most auto parts stores.
- Start with the vacuum check valve under the hood next to the
brake booster. The black side should be to the booster; the blue
side to the four-way tee. Disconnect the check valve from the tee
and test that the valve holds vacuum by putting the vacuum pump to
the blue side.
- Next disconnect the Y-connector to the cruise control and reservoir
and test for vacuum. Due to the size of the reservoir your hand/arm
will start to ache by the time you draw 10 inches of vacuum (lots of
pumping).
- Pull the black line which runs through the firewall under the center
console to the HVAC vacuum console and test.
- Test the line to the intake flap control by pulling the white line.
- Locate the intake flap control (at top of driver-side cam belt cover, front of
the fuel rail) and remove the vacuum hose that runs under the intake manifold to
the actuator. You can also remove the round rubber cover on top of the manifold
and watch the flap spindle turn as you test. Should this vacuum test fail the
manifold will need to be removed to replace the actuator.
- Remove the engine air intake box and locate the heater valve. Verify
that the black side is oriented toward the engine (the valve is
uni-directional).
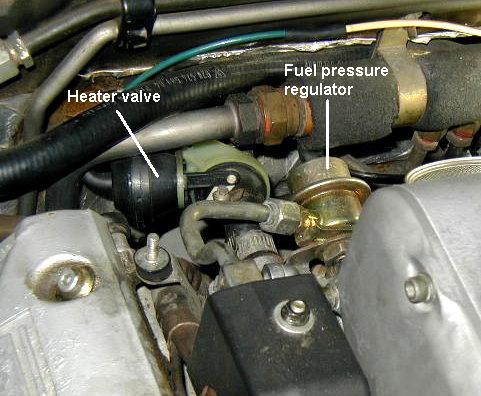
- Pull the vacuum line (white) from the heater valve and test the
valve directly for vacuum. You should see the arm move.
For more information see the
HVAC Heater valve article.
- If everything tests good, reconnect and go inside the car.
- Remove the two side panels from the
center console.
- On the driver's side you will find the vacuum lines for the HVAC
system.
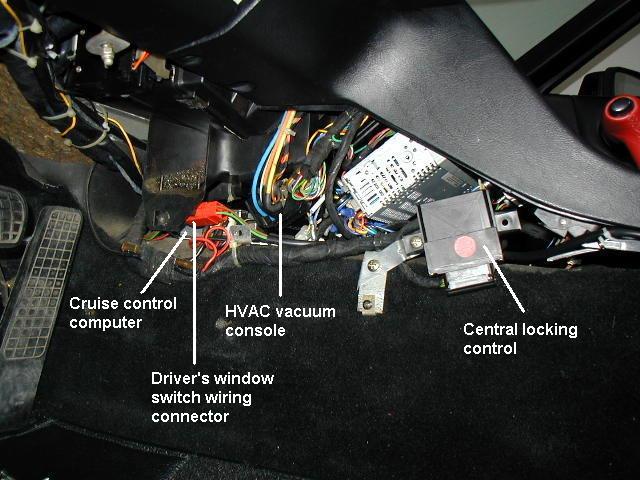
- Disconnect the HVAC vacuum console. There are two screws on each
side and a third in the rear (difficult to reach).
You may need to remove the cruise control
brain (from the passenger side) in order to reach the third screw.
- One by one remove each line and test.
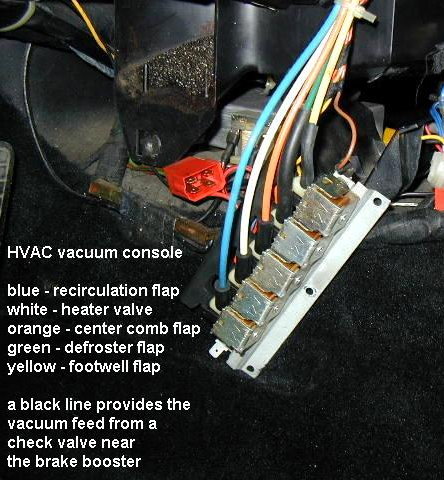
- The most often-used actuators are the best candidates for failure. When
testing the white line look under the hood at the heater valve arm for
movement (be aware that the heater valve may function properly but the
internal shutoff can warp allowing coolant flow). Two other common failures
are the orange and blue lines.
- The yellow line feeds the footwell flap (generally used to direct
heat to the floor). This actuator is located behind the HVAC control
head and removing the head should provide adequate access.
- The comb flap actuator (orange line) sits above the footwell flap
actuator and cannot be reached without removing the
center console.
A procedure for removing the center console
is here.
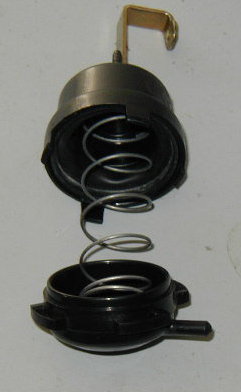
- The easiest way to repair the comb flap actuator is to replace the
bladder. Order a new actuator, disassemble it and the actuator in the
dash. When you pry the four tabs beware of the internal spring!
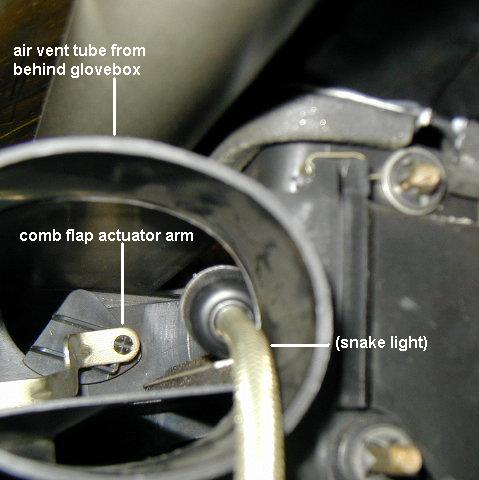
- Twist the comb flap bladder/arm to disconnect the arm from the
flap mounting inside the airbox.
- Position the new bladder and arm. Insert a long screw driver or
similar tool through the vent tube from the glove box and push the arm
onto the mounting pin.
- The recirculation flap actuator (blue line) operates a door above
the passenger storage tray. The
blower fan and flap housing must be
removed. Instructions are here.
- If the green line (defroster flap) fails to hold vacuum - Best of Luck!
928 S4 Home