Porsche 928 S4 Service
John Pirtle, September 11, 2002
http://members.rennlist.org/pirtle
Blower fan, resistor, and recirculation flap
"Magic Blower Syndrome" is a common problem in the 928 HVAC system -
the fan will run suddenly at full speed for several seconds. The problem
lies in the resistor overheating which some owners feel may be a flaw,
or at least in the original design. Replacement resistors (at $85) do
look different and seem to alleviate the problem. Short of purchasing the
expensive replacement a modification can be made.
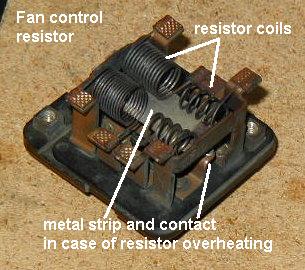
On top of the resistor are four coils which heat as electrical current
passes through them. Beneath the coils a metal strip bends in response to
the heat ultimately closing a contact that turns the blower fan on full
speed. The additional airflow cools the resistor and normal
operation resumes. This phenomenon occurs more often in hot weather,
and especially at very low speeds when there is little air flow.
Should any of the coils burn through on the resistor there is a loss
of one or all fan speeds and the resistor must be replaced.
The resistor can be easily modified by bending the four coils
upward 1-2mm to provide more elevation from the metal strip. This will
permit better cooling and locate the heat source further away.
The trick is getting the resistor out. :)
- Open the hood and remove the plastic tray from the base of the
windshield.

- On the passenger side is the blower fan and motor, held
in place with three screws. One screw is readily visible. The
second screw is inside the housing - pull back the rubber sleeve
between the blower and the air duct. The screw is on the bottom
of the housing.

- The third screw is inside the passenger footwell, above the storage
tray, in the middle front of the recirculation flap housing. Note the
angle of its position.

- With the blower fan loose you can maneuver it around to make room
for your arm to reach the resistor inside the air duct. Or, if you plan
to replace the ventilation flap actuator continue with the next
section and the blower assembly will be out of your way.
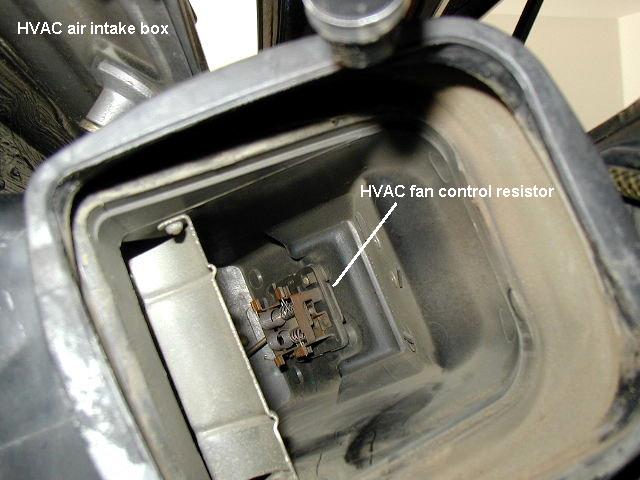
- The resistor is held in place with two screws on the outside of
the housing. Remove the electrical plug and screws and pull the
resistor out from the inside.

Having gone this far, you might as well replace the recirculation
flap vacuum actuator in the passenger footwell.
Recirculation flap and actuator
- Disconnect the battery ground strap in the rear hatch.
- Disconnect the blower fan electrical connection.
- In the passenger footwell, remove the storage tray. Removal
of the glovebox door can also help - there are three bolts across
the bottom of the hinge.

- Remove the wooden door covering the fuse panel.
- Remove the lower wooden door piece.
- Remove the eight nuts around the recirculation vent (see the
above photo). Two of the rear studs are also mounts
for the fuse panel brackets.
- Remove the bolts retaining the lower fuse panel brackets.
- Pull the fuse panel out and down off the upper studs.
- Remove the metal brace across the four rear studs of the
ventilation flap.
- Pull the ventilation housing down. The housing has been sealed with
a nice black goo so some careful prying may be necessary. Before pulling
it completely away locate the vacuum tube and disconnect it from the
actuator.
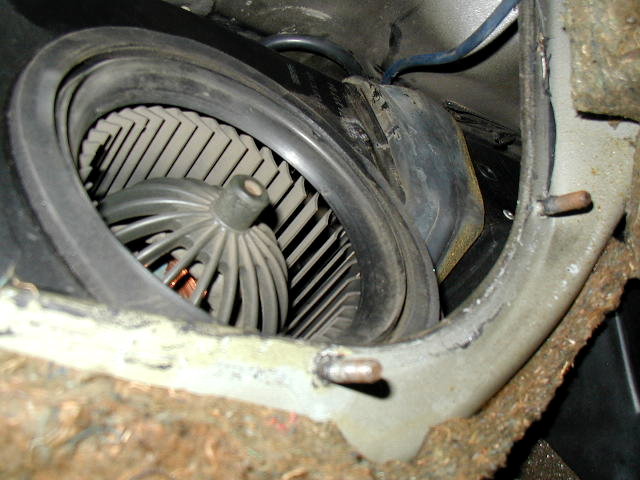
- Pull the blower fan assembly out the opening. Here is a view
up into the ventilation housing:
- The ventilation flap actuator is similar to the other HVAC
actuators. Pry open the four locking tabs to loosen the actuator
housing.

- Open the locking tab on the arm to separate the arm from
the actuator.

- Things button up without much trouble - don't forget to
reconnect the vacuum tube to the actuator. And don't drop a nut or
socket behind the fuse panel!
928 S4 Home