|
The Front - Camber & Caster |
|||||||||
 |
This is the top of the passenger side front strut. The solid mass of hardened black goop tells me that in 17 years & 62K miles, it had never been moved (unless somebody liked goop along the way???). So the factory alignment setting for camber & caster had never been changed. This also shows the car has not been in any nasties along the way on that side. An 8mm male Allen socket drive is great for these three bolts. | ||||||||
|
The
driver's side had been changed. Notice some of the the goop
has been chiseled away. But you have to get rid of it all to
make most changes. |
 |
||||||||
|
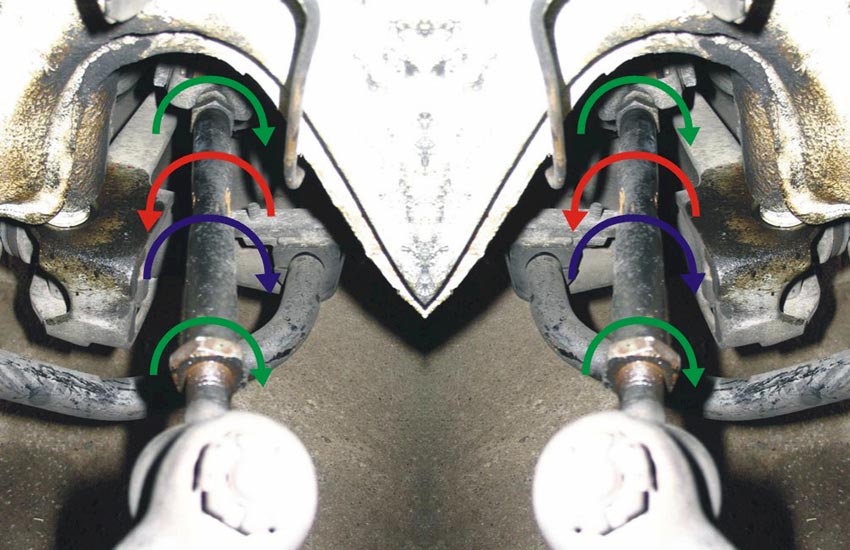
In case you don't know
the technique, you loosen the 3 Allen bolts & pry the strut - it
moves in the round opening - side to side for camber & front to
back for caster. Car up on
jack stands or
on the ground, whatever. A large screwdriver or a big dull
chisel work well as pry bars. Mark the current position with
masking tape so you know where you started. Pry out to
decrease & in to increase camber- it will flop in when you
loosen it initially which is why you need to mark your start
position before you loosen the bolts. To the front for
less caster & to the back for more. Reset the tape as
you fine tune it. You will have to drive it to settle
after any changes. Just rolling it doesn't seem to be
enough. If you've lowered it excessively (don't we all?) you
will probably find yourself unable to get 0º camber. It will
be something negative. Mine was minimum at - 0.693º or - 42'
(that's negative 42 minutes) as it should be expressed. Caster
I set - as expertly as possible - in the middle for now. |
|||||||||
|
The Front - Toe |
|||||||||
|
The only hard part about setting front toe is loosening the 'lock bolts' at each end of the tie rod. Which way do they turn? Will I screw up my ball joint if I reef on it too hard? Etc etc. Nobody tells you how it all works, they just say it's like a carbuncles (WTF?) & you will figure it out. Something about reversed threads & I was an idiot for driving around with those pieces of trash & that I should just get the turbo tie rods anyway. Gee, thanks everybody.
|
|||||||||
|
This adjustment is
incredibly easy once you've gone through the 2 or 3 attempts to do
it. The key is to print out the diagram above & have it
with you as you do the adjustments. Because they act
differently side to side (they're actually the same but your mind
tells you they should be different), you can get messed up
easily & dial in
1/2" of toe on one side & none on the other etc. You
can see the wheel moving (you did leave it on didn't you?) if
you watch carefully as you are doing it. Just set your strings
up accurately, measure carefully, loosen both sides, center steering
wheel & dial away. When you get this right, you feel it
instantly on your 'settling' drive. If you don't, do it again. |
|||||||||
|
The Rear - Toe & Camber & Toe & Camber . . . |
|||||||||
|
|
|||||||||
|
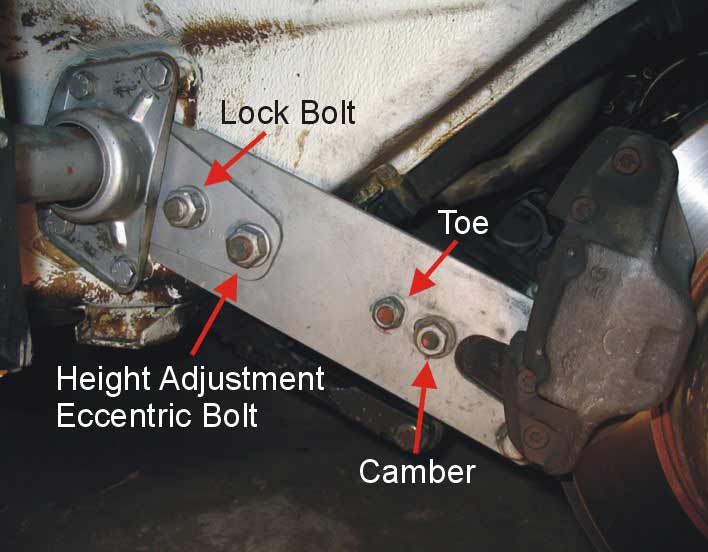
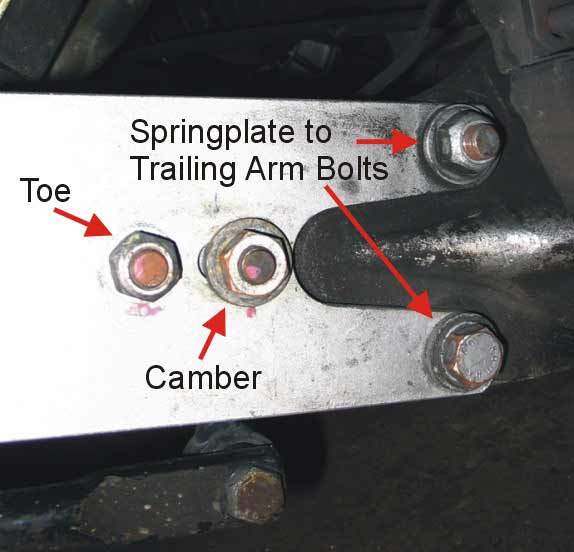
First thing to
remember: The spring plate is under tension & will whack
down if you undo & remove the 2 bolts on the trailing arm.
Ever seen a torsion bar? Well, the springplate - at rest - is
twisting that metal bar. So have some respect. Of
course, the bolts will bind anyway unless you support the
springplate with a jack. You can & you must loosen them to
allow the spring plate to move a little relative to the trailing
arm. That's what the toe & camber boltish-like things
do. They turn like cams & alter the angle of the spring plate
to trailing arm in different planes. The order of things:
Then follow Mr. Scruggs & adjust to your heart's content. Once again, you will have to raise & lower the car numerous times as you try to dial the figures you want which should be .5º (or 30') more than the front. You can feel & see the wheel hub/trailing arm moving as you adjust it. Last thing to remember: Follow the torque specs carefully. The eccentric & lock bolt require 181 ft/lbs or some crazy figure. Good luck doing that at home in that tight space. If it is not tight enough, it will fall to the lowest height position once you've run the car a bit. Not good. And it will throw your camber off on that wheel. Also not a good thing, so tighten them. Oh . . . and stop
pointing & laughing at my dirty car. I'm cleaning it bit
by bit, but some of that crap is tough! |
|||||||||
|
Weight Balancing - The Tripod Method |
|||||||||
| Pictures to follow | |||||||||
|
Now that you've eaten up countless hours of your free time playing with nuts rather than driving, it is time for the last hurtle: How to corner balance without a weigh scale? Well, you can't. But . . . you can do the next best thing - the tripod method. Note: My setup is so good at the moment, I don't want to screw with it. I'll get to the Tripod sooner or later, so check back in the fall . . . For info on the Tripod Method until this lazy-ass author gets off his butt & does it, see: Pelican Post: Home ride height and corner balance success story Another: Corner Balancing, Weight Jacking, Tripod Method Another: CORNER
balanced - numbers from this...and the weight |
|||||||||