|
The Maintenance Files |
|||||||
|
|||||||
|
Door Components |
|||||||
|
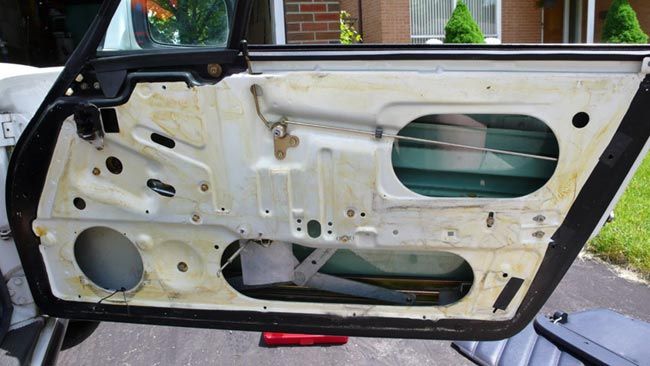
What's in the door, you may ask? Here you go. Remove the inner door panel. Make sure you write down the wiring code for the window switches before you disconnect them. Inside you'll find a vapor barrier of plastic that covers the innards. There's also a small plastic bucket that your POS Blaupunkt speaker screwed to. That's a rain shield. There's also a thick foam gasket to bridge the gap between the door panel & the door metal. Rip it all off & throw it all away. |
|||||||
|
|
|||||||
|
When you get to the raw door, you will see
a bunch of holes. That is Enemy #1 of good sound in a door.
You have to fill them all. Your goal is to create a damped, sealed
chamber for the mid/bass driver that is going in the door. Enemy #
2 is the door itself. It's made of metal & it will resonate
& vibrate at various audible frequencies. That's where the
dampening comes in. I used B-Tek's B-Quiet Ultimate dampening
material. See their website.
There are numerous choices: Dynamat, B-Quiet, Cascade Audio etc
but I chose the Ultimate because it is decent stuff - spec &
review-wise & it was shipped within Canada & didn't have to
cross the border & the wallet-vacuuming that happens when this
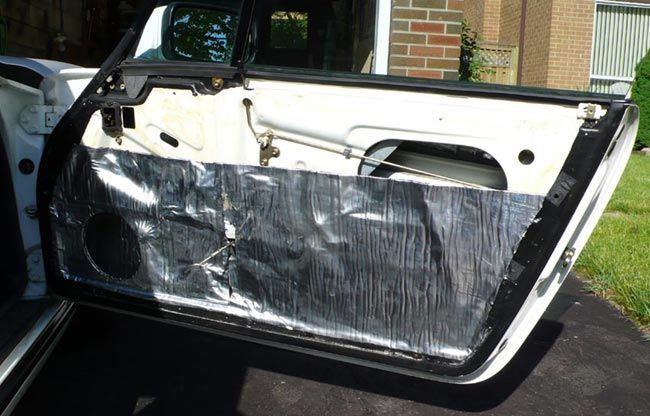
occurs. Put the window up. Of course, you disconnected everything & you can't because it's a power window. So, move the door panel into place & re-connect the window wires. You wrote down the wire colors & position, didn't you? And if you've already ripped the other door apart, you have to connect that one too. Part of the circuit is in series. With the window up, start applying your dampening material to the inner part of the outer door skin. Just reach in & put small pieces in place to the areas you can reach. That's only about 50% of the door but that will have to do. |
|||||||
|
|
|||||||
|
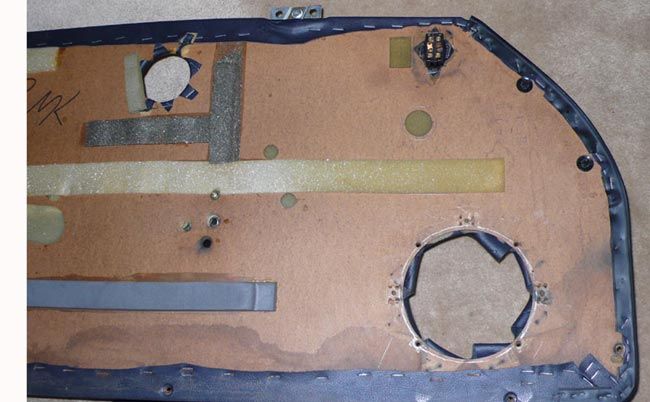
Now, you're ready for the outside - well,
actually inside . . . You need only one hole: where the door opener
rod comes through in the middle of the door - just in the upper left-hand
portion of the big oval in the lower portion of the door in the photo
above. The only trouble spot, is the door lock rod that you can see
disappearing into the top oval. Tape a plastic sheet (some of the
old vapor barrier perhaps) over the rod so it can still move after you put
sticky dampening over it. Also leave the thread & hole free on
the door lock mechanism & the door handle bolt holes should be free of
dampening so you can get the bolts on when you re-assemble the door.
I also left all of the door panel screw holes accessible. Btw the
foil backing makes an efficient vapor barrier, so you can skip replacing
it. |
|||||||
|
|
|||||||
|
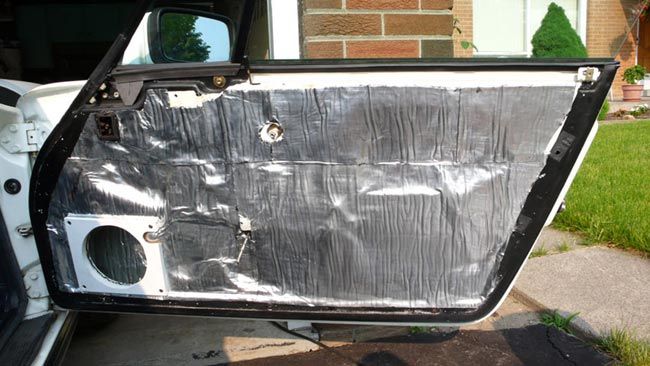
When finished, cut out the speaker hole in
preparation for the speaker spacer as per Peter Bull's great post on
Pelican Parts see Mounting
door speakers. You can see it in the photo below attached to the
speaker hole. This accomplishes 2 things. It lets you have the
initial speaker hole big enough for your 6.5" driver although the
door opening should also fit. It also rigidly fills in the space
that that lame foam gasket occupied, providing a flat screwable surface
for proper driver fixing. Finished door pictured below. |
|||||||
|
|
|||||||
|
|
|||||||
|
Peter Bull's drawing of the speaker spacer. The Dremel is your friend for the red parts. |
|||||||
|
|
|||||||
|
Dimensions of the speaker spacer. Peter suggested & I used 1/2" MDF from Home Depot |
|||||||
|
With the door finished, it's time to attack
the door panel. For the mid-bass driver, remove the rain bucket
& all screw fixings. That includes those embedded things that
will rip the board apart, so remove cautiously. Remove the staples on the vinyl & mark
out your required opening. Then Dremel it using one of the barrel
sanders. It won't take long. For the tweeter, mark your
diameter & Dremel the hole that was pre-punched in the door to the dimensions
of your tweeter. The tweeter hole corresponds with a depression in
the door, so depth should not be a problem. Then carefully cut back the vinyl & glue it
down for both openings. The trim rings on the drivers allow a little
leeway but not much. |
|||||||
|
|
|||||||
|
Crossover placement now rears its head.
I positioned the Focal x-over in the pocket under the door handle.
That way, I can reach in to get at the 3 position switch for different
frequency curves for the tweeter. The wires are routed back through
the door panel & through the dampening into the door cavity for
hookup. |
|||||||
|
|
|||||||
|
Mount your tweeter & connect it to the
crossover. Then use some dampening material to hold down the wires
so they won't rattle once you get them back in the door. |
|||||||
|
|
|||||||
|
The last job is to re-attach the door
panel. Before mounting your mid/bass driver, it's probably a good
idea to rewire the system. I used 14 gauge cable - big enough but
also small enough. Pull new speaker wire through to the cabin using
the existing wires as a pull. Just tape the new wire securely to the
old, lubricate with Vaseline & yank away. Attach the speaker
wires & fix the mid/bass driver in place. I also attached some plastic
sheet to cover the top of the drivers as a rain shield before I screwed it
down. You're done the door components. Well maybe not . . . see Tuning for the final install. |
|||||||
|
|