Home Surfing Porsche Track Events Personal For Sale
Special thanks go to:
Ross Martindale, who showed me how to do this mod and provided inspiration when he used words like guttural sounds , grinning like a hyena, and driving at redline, etc. while describing what this mod would be like.
John Dunkle, who has, once again, made it possible for an exchange of ideas between Porsche enthusiasts.
The Mod
It all started (innocently enough) with a Rennlist post from Ross Martindale. The next thing I know, I'm taking my muffler to my favorite local muffler shop to get holes cut in it and some more tailpipes. I really wanted to dyno the car before doing this exhaust-related mod but the local dyno shop was no longer in business when I went by there. Oh well. I can tell you that it feels faster but without hard data it just boils down to guessing. Ross said by driving my Porsche with this mod, I would be grinning but what actually happened was more like laughing. Maybe it was like a hyena laugh. The sound and feel of the flat six exhaust notes actually made me laugh and laugh repeatedly with much joy and fulfillment. That's how wonderful this mod is. I feel like I have a whole new car. Here's some photos I took while doing the mod in case it's of interest to anyone else. Thanks.


Muffler after removal from SSI's. I also removed my license plate and light to clean everything up
while I had the muffler out. I wanted to add another license plate light so I'd have one on each side.
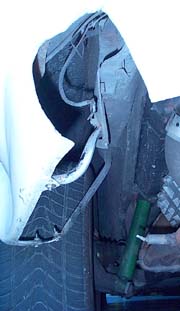
I took this opportunity to attach the support struts for the rear bumper which were never
hooked up after installing the fiberglass bumper in 1999.


I used a compass to mark the locations where I wanted the muffler shop to attach the new tailpipes.
That's a 2.5" diameter circle.


Here's the new license plate lights, new exhaust gaskets, and new stainless steel bolts for the muffler.
Photo on the right compares the new gaskets with the old ones.

![]()


These are thumbnails, click on them to see larger images of what the new mod looked like when I got it back from the shop
The last photo shows the ceramic (heat resistant) spray paint I used, good for up to 1,200 degrees F, supposedly.
That's one of the three caps I painted too.
![]()

![]()
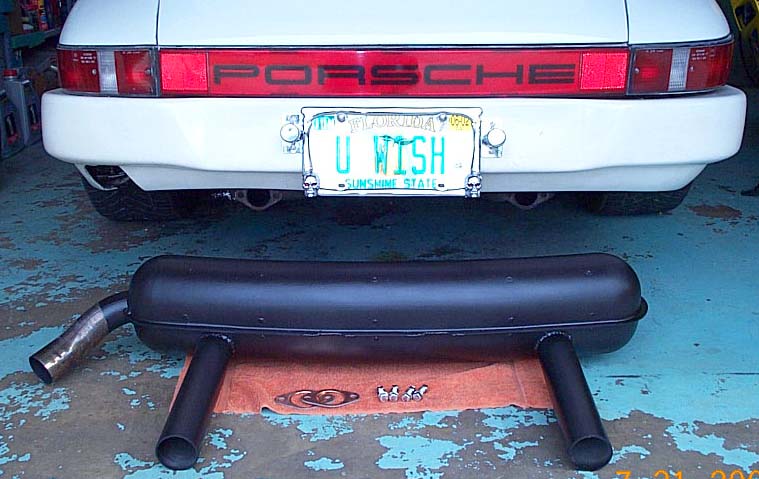
Here's two more thumbnails showing the muffler ready for painting after sanding and what it looks like with all three caps attached. The caps were just sections of the same pipe , but they were expanded by a hydraulic machine the muffler shop had and had ends welded on them. The idea is to run with either the one side cap on, or with the two rear caps on. Your choice.


Painting it with the heat resistant paint. I applied four coats over a 24 hour period.
Another thumbnail showing the muffler just before re-installation.
I laid it on a towel so it wouldn't get scratched. Sometimes I feel a little too anal, if you know what I mean :)
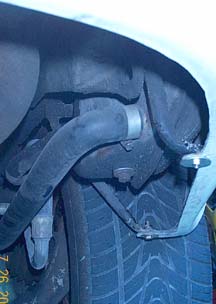
Oops.....the pipes are going to touch the bumper lip. But the tag lights worked out well and
I even brought back the old Pep Boys skull frame for this special occasion :)
I used three different types of saws to cut the openings. Fiberglass is basically very easy to work with.
That cable saw really works great - I used it to get the horizontal cut started.
Here's another saw that used a hacksaw blade. A little sanding to smooth the edges on the fiberglass and then time for the final installation.

The finished product with caps on (below) and without caps (above).
Of course, you'd never have all three caps all on while it was running.


This last photo shows how the caps are kept in place. I drilled holes through the bottoms of the caps while they were on the tailpipes and then used stainless steel wood screws to secure them.
This was a very fun and easy mod to do. It is a little noisy (with the twin pipes only open) when you get to about 3K RPM or if you get on it real hard, but it's just fine otherwise. Cost was only $100.00 for the muffler shop work and less than $25.00 for the other small stuff. Like I said before....it's like I have a new car all over. Can't wait to run at the track!
Feel free to contact me with questions or comments.
Click HERE to return to top of this page
or HERE to return to the Porsche Page.