Oil Thermostat Housing Seal Replacement
Copyright © 2004, Tom M’Guinness
This document can be freely copied in its original
form, for non-commercial purposes only.
All other rights reserved.
Return to my Homepage
It happens to all 944 owners eventually. While dutifully
checking your oil level, you see something funny, something dirty, inside the
coolant reservoir tank. On closer inspection, your heart drops as you confirm
the worst: oil in the coolant -- the automotive equivalent of coughing-up blood.
Oil in the coolant tank is the most obvious sign that the oil
and coolant are mixing. Mixing can go in both directions of course, so it is not
uncommon to find coolant in the oil when things go wrong. When it gets bad, the
oil will take on a chocolate brown milkshake look, but early signs also can be
seen as a brown or yellowish film in the oil filler cap. However it gets there,
coolant in the oil is bad for the friction surfaces of the motor, including in
particular the rod bearings. Porsche recommends replacing the rod bearings
anytime a motor is repaired for mixing. Legions of home mechanics have played
the odds and survived without new bearings, however, so you will not be alone if
you go that route.
Mixing of oil and coolant can usually be traced to either a
leaking head gasket or bad seals in the oil filter housing. A bad head gasket
can usually be diagnosed with a compression check and leak down test. A bad head
gaskets also tends to show other symptoms like overheating, steaming exhaust,
lumpy idle, one steam-cleaned spark plug, etc. Assuming your head gasket checks
out, it’s generally time to change the oil filter housing seals when the oil and
coolant start to mix. This article details the procedure for changing the seals
on a 944 turbo.
Before starting, be aware that this is a messy job. Anything
that can leak or ooze on your face, will. Goggles are a necessity to protect
your eyes from coolant, oil, power steering fluid, road grime, and the seemingly
endless supply of slurry that will ooze out as you do this job. Mess aside, the
job is well within the reach of the typical home mechanic. The biggest challenge
for the 944 turbo owner is just getting the right information about the parts
and procedures involved.
There are several reasons why this can be a challenge. Most
of the written procedures for doing this job are based on the non-turbo 944. On
the non-turbo cars, the housing holds an oil cooler, and has several other
internal parts that are not used on the turbo motors. This is why many 944 turbo
owners refer to it as an oil cooler housing, even though there is no cooler in
the housing. Instead, the housing on the turbo motor holds an oil thermostat and
fittings for an external cooler. When reading-up on this job, the turbo owner
typically has to ignore some steps specific to the non-turbo, and fill in a few
blanks only applicable to the turbo. Similarly, the re-sealing kit sold by
Porsche was made for the non-turbo motor and includes several parts that are not
used on the turbo motor.
To further complicate things, Porsche updated several parts
in this area throughout the production of the 944 turbo. Most significantly,
there were no fewer than four different oil pressure relief valves used on the
944 turbo. This valve screws into the oil thermostat housing, and must be
removed and replaced to change the housing seals. It is important to identify
which valve you have so that you can obtain the correct o-ring and installation
tool, as described below. The purpose of this article is to bring together all
of the information and part numbers needed to guide the 944 turbo owner through
the entire process. So, grab your socket set and read on for step-by-step
instructions specific to the 944 turbo.
1.
Put the Car on Jack Stands. Use great caution to
secure the car. You will need enough access to work under the front of
the car. Never work under the car supported by a hydraulic jack, and
always make sure your car is securely raised on jack stands. If you are
not comfortable getting the car up on jack stands safely, then this job
is probably best left for a professional mechanic.
2.
Remove Engine Trays. Remove the metal and plastic
trays under the engine, using a 10mm wrench and socket.
3.
Drain the Oil. Ideally, the motor should be warm
for this, but there will be plenty of time (and places) for cold oil to
drain, so warming the engine is not critical. The oil drain plug uses a
15mm socket, and can be tight. Save the aggravation and use a ½ inch
socket and breaker bar. Be sure to use a new crush ring when
re-installing the drain plug, and torque it to 36 ft. lbs.
4.
Remove Oil Filter. The filter should come off
without tools. It’s a mess every time, since the oil tends to leak
(pour) out the bottom of the filter when it unscrews. However, you will
have ample opportunity to clean up under the filter when doing the
seals.
5.
Drain the Coolant. Remove the reservoir cap
first, then remove the blue plastic plug at the bottom of the radiator.
Or, remove the bottom radiator hose. Both methods result in a mess, as
the water tends to hit the lower lip of the front air dam. Catch as much
as you can in a bucket, and dispose of properly. Be sure to keep it away
from pets and animals, as it can be lethal to them.
6.
Remove Power Steering Pump. Start by removing the
hydraulic lines. The lines have been updated, so you will either have
two banjo bolt fittings, or one banjo bolt and one hose-clamp. The banjo
bolts are removed with a 19mm open end or flare nut wrench, while the
hose clamps need only a screwdriver. Have a bucket handy to catch the
power steering fluid when you remove the lines. With the lines removes,
go up top and use a screwdriver to loosen the big band clamp holding the
power steering reservoir to the fender. Pulling the reservoir out of the
car gives you some additional working room you can use later, and
eliminates one of the many things that will otherwise drip on your face
while under the car.
Next, loosen the jam-nuts on the power steering
tensioner rod. The nut nearest the outside of the car is reverse
threaded, so with a 13mm wrench pushed onto the nuts from below, both
jamb-nuts are loosened by pushing the wrench toward the rear of the car.
Be sure to counter hold the tensioner with another 13mm open end wrench.
Turn the tensioner to loosen the pump enough so that the belt can be
removed. Pull the bolts holding the tensioner. Don’t be tricked into
trying to remove the nut. It is welded to the pump. The rear pivot point
it a 13mm bolt. The front is a m13mm nut. Once the nut is off, slide out
the black spacer, and the pump will come out. This picture shows
the spacer that needs to be removed in order to get the pump off the
bracket.
7.
Loosen and Lower Sway Bar Bracket. The sway bar
is anchored to the floorboard by two brackets, one on each end. Remove
the two 13mm bolts holding the brackets to the fllorboard (two per side,
four total). Spin the bracket on the oil filter side down to improve
access to the area. By removing the brackets on both sides, you will
give yourself some extra play with the sway bar itself, which will give
you more room when you need it.
8.
Remove the oil pressure sending unit. First,
remove the 2 electrical connectors. One is a spade connector that just
pulls off. The other requires that you remove an 8mm nut to get it off.
The unit itself is removed using a 24mm open-end wrench. If the sway bar
is in the way, you should be able to pull it down a bit (with the
brackets removes) to get a 24mm (15/16 inch) open end wrench on the
sender. If you are having access troubles with the big wrench, you can
also try a smaller adjustable end wrench, or spring for a ‘stubby’ 24mm
wrench from Sears.
9.
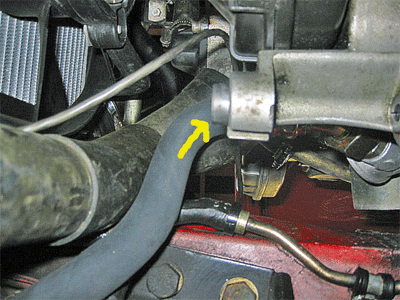
Remove the Oil Pressure Relief Valve. The valve should come out
without much problem, using with a 24mm (15/16") socket. Take note of
the type of valve you have, as it will impact the type o-ring (if any) you will need on re-assembly, as discussed below.
The yellow arrow points to the valve in the picture above.
10.
Remove the Oil Cooler Hoses. In theory, this is
done using 32mm (1 1/4") and 27mm (1 1/16") open end wrenches. Counter hold the 27mm
fitting on the oil filter housing with the 27mm, and loosen the 32mm
fitting on the hose. I could not get my oil cooler lines off on the
filter housing side, so I ended up cutting the lines off, where the
rubber meets the metal, using a razor blade. Needless to say, you will
need new oil hoses if you go this route. Once on the bench, it became
clear why I could not get the hoses off. They took a great deal of force
to remove, which was just not possible to apply in the cramped confines
of the engine compartment. (It may be worth soaking the fittings with PB
Blaster or Liquid Wrench if you have the time.) See step 15.b.
below for information about the official replacement pipes.
11.
Remove Heat Shield. Loosen the heat shield above
the oil housing (just under the header) by removing the two 10mm bolts
holding it onto the oil filter housing. The shield is actually three
separate pieces bolted together with three 10mm bolts. Two of the bolts
are visible and accessible from below. The third bolt is only visible
from above. You need to slide the heat shield around until the third
bolt is accessible between the header pipes. Don’t be fooled into trying
to loosen any of the nuts on the heat shield – they are welded in place.
Once you remove the third bolt, the heat shield will fall apart into
three pieces. Once in pieces, the separate pieces can be wiggled out of
the car from below. Removing the heat shield will provide the space
needed to get the oil filter housing out once unbolted. With the heat
shield in the car, it is very difficult to get the housing out of the
engine bay.
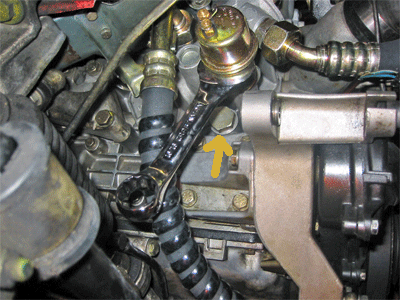
12. Remove the Oil Filter Housing (finally).
Remove the four 13mm bolts holding the housing to the block. Looking at
the side of the block, all but the upper right bolt is reasonably easy
to reach. The upper right bolt is just under the #4 header port. It is
not an easy bolt to reach, but it can be removed without removing the
header. One proven option is to use a 3/8" drive 13mm swivel socket, a
3/8" to 1/2" adapter, a short 1/2" extension, and a 1/2" ratchet. Here’s
a picture to show it can be done.
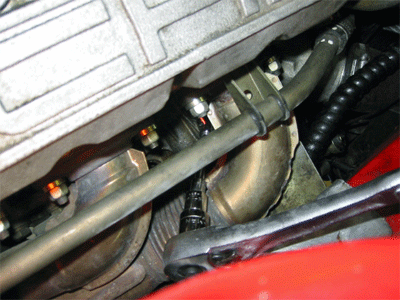
Once the four bolts are removed, it takes
some maneuvering to get the housing out, but it will come out as long as
the sway bar is unbolted and its bracket is out of the way. Here is the
housing freed from the engine bay.

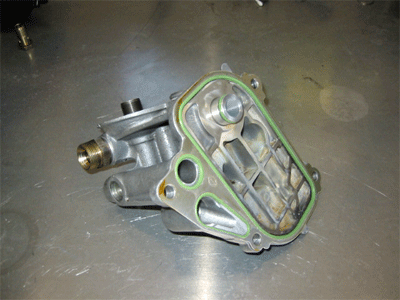
Here is the same housing after scrubbing for an hour with Simple
Green and a tooth brush.
13.
Install Gasket and O-rings on Housing. This is
the ultimate point of this job – replacing the large integral gasket
(944 107 147 03) on the face of the housing, and the two o-rings (999
707 043 40) on the oil connector pipe. The picture above shows the large
integral gasket installed on the housing. It only goes on one way, with
the thick green gasket material filling the groove around the perimeter
of the housing. The picture also shows the short connector pipe
(pointing toward the camera) that carries oil to the housing. This pipe
needs to be pulled out of the housing so that both o-rings can be
replaced. It should pull out by hand. If not, you can wrap a towel
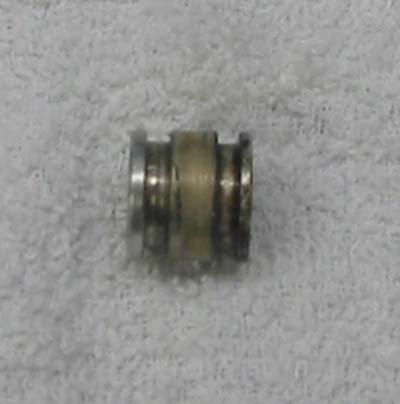
around it and gently grab it with pliers. The connector pipe has a
groove on both ends for o-rings.
Like so many other parts in this area, the connector
pipe was updated by Porsche. The original pipe is not symmetrical – the
o-ring grove is closer to the end on one side. With the updated part
(951 107 152 03), the o-ring groove is in the same location on both
ends. The part was updated because the o-ring would not always reach
into the housing deep enough for the o-ring to seal. To ensure this will
not be a problem, it is important to install the pipe all the way into
the housing. If you are using the old non-symmetrical pipe, the end with
the groove closer to the end should go in the housing. The other end
goes in the block. This allows the o-ring to get a good grip on the
housing. When installing the housing, be sure not to let the pipe pull
out of the housing. If you need to pull back on the housing once it is
plugged into the plug, be sure to pull it all the way out and fully
reseat the connector pipe into the housing. To be safe, it is probably
worthwhile ordering the updated connector pipe (which is all that
Porsche now sells), for added peace of mind. Also, there was a technical
service bulletin 19105, which suggests installing washer part 928 107
166 00 in the block port, using Locktite 638, if the port measured more
than 14.2mm deep. This was obviously another attempt to keep the
connector pipe seated deeply enough in the housing for the o-ring to
seal. Using the updated connector and taking care to ensure it remains
fully seated in the housing during installation appears to be sufficient
for a good seal, however.
Here is the original
pipe. You can see that the lip on the left end is thicker than the
lip on the right end. On the updated pipe, the lip is the same
width on both ends.
14.
Install Housing and Oil Pressure Relief Valve.
With the gasket in place and the o-rings and connector pipe fully seated
in the housing, re-attach the housing to the block by re-installing it
four 13mm bolts. Before tightening the housing bolts, insert the special
alignment tool (Porsche part 9215 for 1986 motors; Porsche part 9262/1
for 1987 and later motors) all the way into the oil pressure relief
valve port. It helps to put a light coat of oil on the alignment tool to
allow it to slide in and out easily. Slowly tighten the four mounting
bolts for the housing, making sure that the alignment tool continues to
slide in and out of the port easily as the bolts as tightened. Torque
the mounting bolts to 14 ft. lbs. Remove the alignment tool once the
housing bolts are fully tightened. Next, install the sealing washer
(Porsche part N 043 815 3) on the oil pressure relief valve. If using a
one-piece valve, also install the o-ring on the groove at the end of the
valve (Porsche part 944 107 935 11 or 999 707 145 40 for 1986 motors;
Porsche part 944 107 935 01 or 999 707 144 40 for 1987 and later
motors). Install the valve into its port on the oil thermostat housing
and torque to 33 ft. lbs.
There has been some
confusion about whether the OPRV takes one or two o-rings. According to
Porsche TSB 19017 (October 9, 1990), all of the one piece valves have
one external o-ring (visible on the tip of the OPRV) and one internal
o-ring (only accessible if you disassemble the OPRV). Typically,
when you pull the OPRV to do the seals, you will have no reason to
disassemble the valve and, accordingly, you will only replace the one
o-ring visible on the tip. Disassembling the OPRV is beyond the
scope of these instructions, but if you do end up disassembling the part
and need the second o-ring, the internal o-ring is part No. 999 107 146
40 for the 86 retrofit valve, and 999 107 144 40 for the '87 and later
valves.
15.
Button-Up Car. With the housing and oil pressure
gauge reinstalled, reassemble removed parts as follows:
a. Oil Sender. Reinstall oil pressure
sender and torque to 25 ft. lbs. Be sure to reattach both
electrical connectors on sensor, paying attention to get the
wires back on their original posts.
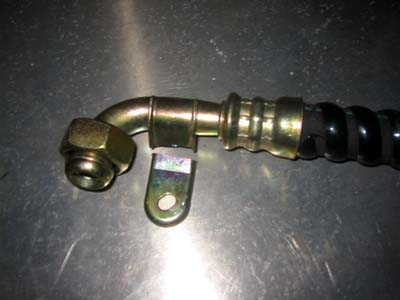
b. Oil Cooler Hoses. Reattach oil
cooler lines using a 32mm (1 1/4") open end wrench, counter-holding with
27mm (1 1/16") open end wrench. If you need new hoses, you
will see that the upper bracket comes with a bracket that is
intended to be bolted to the oil housing. However, on early oil
housings, there is no hole for the bracket to bolt to. If
you have an early housing, like the one pictured in these
instructions, you are supposed to leave the bracket unattached.
However, I found that the bracket obstructs access when you try
to tighten the oil line. As such, I decided to cut the
bracket off on my hose. When re-installing the oil hose,
it become evident why Porsche decided to add the bracket.
The oil line attaches to the housing via a brass fitting that
threads into the oil housing. When tightening the oil
line, it is difficult (impossible) to get a wrench on the brass
fitting to counter-hold it and, as a result, the brass fitting
tends to turn when you tighten the oil hose. The problem
with this is that the oil line tends to turn with the fitting,
jamming the oil line into other parts. So, if you have the
old oil housing without provisions for mounting the oil line
bracket, you are well-advised to tighten the brass fitting as
tight as possible without stripping anything. That way, you can
put solid torque on the oil hose without having the fitting
turn. (If you find it necessary to tighten the brass
fitting once the oil housing is back in the car, it can be done
using a 27mm (1 1/16) socket.)
Here is a picture
of the hose showing where I cut the bracket off.
c. Sway Bar Mounts. Reattach both sway
bar mounts – two 13mm bolts per side.
d. Re-install Power Steering Pump.
e. Re-install Power steering belt.
f. Re-install Power Steering Reservoir and
Hoses.
g. Re-attach Radiator Hose and/or Close
Drain.
h. Re-fill Coolant.
i. Install Oil Filter.
j. Re-fill Oil.
Parts List:
1. Housing Gasket: 944 107 147 03
2. Oil Connector Pipe O-rings (2 needed): 999 707 043 40
Note: Seal kit 944 107 165 98 includes items 1 and 2 above, plus unneeded
parts
3. Oil Pressure Relief Valve O-ring:
For original 3-piece valve: no o-ring needed
For retrofit one-piece in a 1986 motor: 944 107 935 11 or 999 707 145 40
For 1987 and later motors: 944 107 935 01 or 999 707 144 40
4. Oil Pressure Relief Valve Seal Washer (all): N 043 815 3
5. Oil Pressure Relief Valve Installation Tool:
For 1986 motors: 9215
For 1987 and later motors: 9262/1
6. Oil Connector Pipe (updated): 951 107 152 03
7. Oil Pressure Relief Valve (if needed):
For 1896 motors: 944 107 035 11
For 1897 and later motors: 944 107 035 01
8. Oil Cooler Hoses: 951 207 113 03 and 951 207 111 03
9. Seal washers for oil line fittings (2 needed): 900 123 011 30