1986 Porsche 951 Hood Shock R&R
Copyright © 2004, Tom M’Guinness
This document can be freely copied in its original
form, for non-commercial purposes only.
All other rights reserved.
Does your hood hold itself up, or does it tend to slide down on the back of your head at just the wrong moments? Maybe it is time to change your hood shocks! It can be done with only a small screwdriver and a pair of needle nose pliers. They are cheap too, at about $15 each.
It is much easier to do this job with a helper. Start by opening the hood as far as it will open (don’t force it beyond its normal range). Have your assistant hold the hood open. You will see the black shocks on both sides up near the hinges. The top (hood) end of the shock is held in place with a pin that slides through the bracket in the hood and the shock. A small metal folded clip slides into a groove in the pin and holds the pin in place. To remove the clip, pull/push it in towards its folded end, while pulling up on the upper flap of the clip. The bottom side of the clip (the side touching the bracket) is open ended on the non-folded side. Once the clip is off, the pin will slide out. You may need to tap it out.
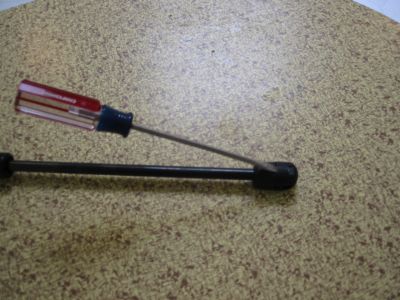
The lower end of the shock comes out easily once you understand how it works. This end clips onto a metal ball sticking out of the inner fender. The shock has a little socket the ball slides into, and is held in place with the round band-like clip in the black plastic end of the shock. If you play with the new shock before trying to remove the old one, it will become clear. You just need to slide a small screwdriver into the little pry space on the back side of the ball socket on the shock, like this:
If you pry just a bit, it opens the band up and let’s the socket slide on and off the metal ball on the car.
Putting the new shocks in can be a pain. The problem is that the new shocks come fully extended, and needs to be compressed a little bit in order to get both ends attached. It’s a good idea to practice compressing a shock on the bench, so you get a sense of how much force is needed (a lot!). This is when you assistant is most useful. Start by clipping the bottom end of the shock onto its ball socket. (You need to pull the band clip open just like when you removed the old one.) Now, with the hood all the way up, grab the shock and compress it a few inches. I found the easiest way is to grab it and lean into it with your body weight. Once it is compressed, position it into the bracket under the hood and have your assistant slide the pin in when the holes are lined up.
Once the shocks are in, the hood stays up by itself and actually pushes the hood up on its own once you get it about ¾ open -- much nicer than having it fall on your back as you slave over the engine.
I actually did the job alone, but it’s a pain. Several people have reported that they broke their windshields doing this job alone. Apparently, they tried to open the hood far enough to get the shock lined up. The corner of the hood apparently digs into the hood if it is opened too much, breaking the glass. Using towels to buffer the windshield would probably help, but the real solution is not to open the hood beyond its normal range!