1986 Porsche 951 Sway Bar (Front) Bushing R&R
Copyright © 2004, Tom M’Guinness
This document can be freely copied in its original
form, for non-commercial purposes only.
All other rights reserved.
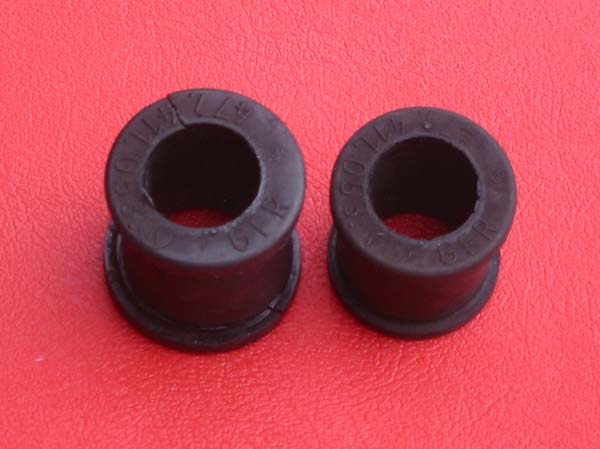
Sway bar bushings are often bad on the 944 turbo, particularly the bushing that sits under the power steering pump. That area is prone to leaks of all kinds, including power steering fluid from the pump, and oil from the oil filter housing, oil sender, cooler lines, etc. These leaking fluids can cause the bushings to swell and fail. The picture below shows two bushings that came out of my 86 944 turbo, both of which have been in service since the car was new. The bushing on the right is from the driver side, with nothing leaking on it. The one on the left is from the passenger side, where power steering and oil had leaked on it slowly over the course of several years. These started out as identical parts, and demonstrate just how much these things can swell.
The swollen bushing was also much too soft, and was starting to result in a pronounced "clunk" when turning and going over driveways. There are four bushings per side to replace -- one per side on the long center section of the bar, one per side on the far end of the bar, and two per side where the drop links connect to the control arms. The procedure I used to replace the bushings is described below. Parts numbers are shown below for the 1986 24mm sway bar -- other years have other bushings, so be sure to get the correct bushings for the year and sway bar you have. Also, there are a number of aftermarket and performance bushings available, which you may want to investigate before ordering the stock parts.
1. Raise front of Front End. My car was already on jack stands for other work, so I replaced my bushings with the car raised this way. Others have suggested driving the front up on ramps, instead of using jack stands, because this way the control arms remain level. Although I had no trouble getting my drop links reinstalled on jack stands, some say it is easier to get them installed when the control arms are level.
2. Remove Engine Under-Trays. Use a 10mm wrench and socket to remove the plastic and aluminum pans.
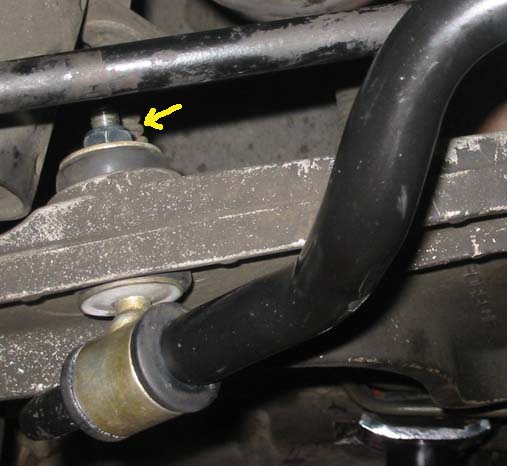
3. Remove Lock Nuts on Drop Links. Both ends of the sway bar are attached to the control arms via a drop link fastened above the control arm by a 17mm nylon nut. The strut is a bit too close to allow the use of a socket on the nut, so I used a 17mm open end wrench and had no problem removing the nuts. Below is a picture of the 17mm nut.
4. Remove Bracket Bolts. Next, remove the two 13mm bolts and nuts holding the sway bar support bushing bracket in place, as shown in the picture below.
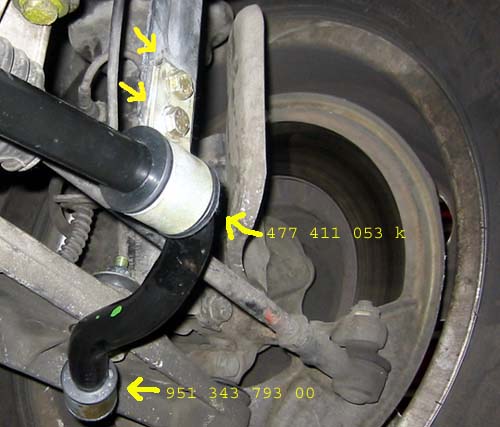
5. Remove Sway Bar. With the two 17mm nuts, and the four 13mm bracket bolts and nuts removed, the sway bar should drop down and out of the control arms. Be sure to save the washer clamps on the drop links -- there are four total, two on both drop links. The picture below shows how the bushings and washers stack on the drop link. Note the the washers are installed so that the triangular mfg. marks face the bushings.

6. Replace Bushings. The drop links should slide off the bar with a little twisting and pulling. The bushing inside the drop link (951 343 793 00) is easiest to remove by cutting one lip off with a straight sharp razor blade. With one lip off, the rest of the old bushing can be pushed out. To install the new bushings in the drop link, start by cleaning the drop link thoroughly inside and out with a Scrotch Brite and Simple Green or similar cleaner. If the drop link is dirty and rough inside, it can make it more difficult to install the bushing. Once the drop link is clean, secure it in a vice (without damaging the threads) and use plenty of water and dish washing soap to lube the bushing and drop link. If everything is clean and soapy wet, you can squish the bushing into the drop link and push on it until it pops out the other end fully installed. The other bushings on the drop link just slide on the drop link's stud -- the order from bottom to top is: washer, bushing, control arm, bushing, washer, lock nut. The lock nut on top of the drop link is an M10 1.5 nylon lock nut, which is available at local hardware stores. The bushings in the middle of the bar (477 411 053 k) can be removed by prying open the clip bracket surrounding it, and cutting the bushing off with a straight razor blade. To replace those bushings, it is important to clean the bar thoroughly, and even more important to soap up the bar and bushing with water and dish washing soap. Without soapy water, the bar will stick and drag and seem virtually impossible to push on. With soapy water, it will slide on with relative ease.
7. Re-install Sway Bar. Once the bushings are replaced, reinstalling the sway bar is the basic "reverse of removal." If your car is on jack stands, you can put a floor jack under the tire to level out the control arm, so that the drop link lines up a bit better. The torque spec on the 17mm lock nut is 18 ft. lbs. However, I could not get access for a torque wrench and had to use the "calibrated arm" technique. There are little cups in the control arm for the bushings, top and bottom. The bushings need to seat into these cups when tightening the lock nut. The torque spec for the 13mm bolts and nuts on the bracket is 17 ft. lbs. The 13mm nuts are mechanical lock nuts (aka pressure nuts), which are not typically available at local hardware stores. They are available from Porsche, of course, and from specialty hardware and from better Porsche parts vendors.