
John Pirtle, February 1, 2004
http://members.rennlist.org/pirtle
Subject: 1987 Porsche 928 S4 Automatic
Mileage: 119,177
VIN: WPOJBO928HS860179 (early build, August 1986)
Engine #: M28/42 - 81H05136
November 10-13, 2000
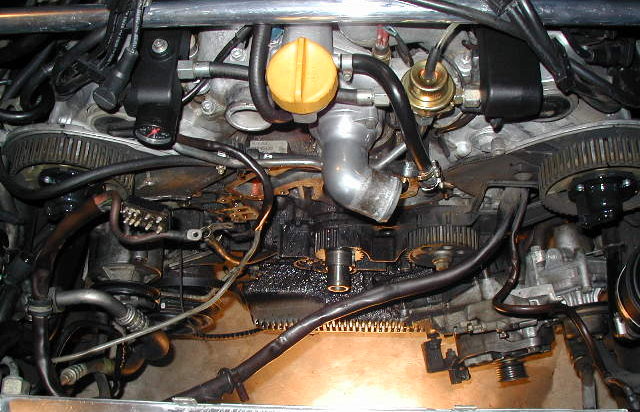
At 82½ inches long, the Porsche 928 timing-belt is one of the
longest ever used in a production automobile. Its purpose is to turn the
camshafts, thus driving the valve train in relation to the crankshaft. In all
but the very early 928's a snap of the belt allows the valves and pistons to
crash resulting in catastrophic engine (and financial) damage. Clearly the
function of the timing-belt and its related components is absolutely critical.
While Porsche specifies a service interval of 60,000 miles, most 928
specialists recommend a conservative 40-45,000 mile service. Due to its
location the water pump should be replaced. Additionally the belt tensioner
should be rebuilt and Tony Harkin has some excellent information
on his site at
http://members.rennlist.com/v1uhoh/. Common shop quotes for these services range from $700 to
$1200.
Due to the nature of the labor other items to consider servicing
include: accessory belts, spark plug wires, distributors, rotors, coils,
camshaft seals, crank seal, oil pump seals, flush and fill of fresh coolant,
upper and lower radiator hoses, and the forward coolant reservoir hose.
This procedure is a compilation of the Workshop Manual, Wally
Plumley's 928 Owners Club article, the
instructions accompanying Jay Kempf's "Aftermarket Belt Tension Tool", some emailed
encouragement from Greg Nichols and Kevin
Berez, Dave Roberts' recommendations (928
Specialists), emails from other Rennlisters, and my own experience. As a
rookie moving carefully I took about 22 hours to complete this job. Having the
experience I now estimate it could be done in less than half that time.
The basic steps are:
1 - I called Dave Roberts at 928 Specialists and asked, "What do I need?" Here's what he sold me:
2 - I called 928 International
and Jim Bailey sold me:
3 - I already had 2-3 gallons of Krogers distilled water, but I went
to Walmart, Lowes, and Discount Auto Parts and bought:
4 - Other items I already had:
In keeping with Porsche convention, the
LEFT is the driver's side. The RIGHT is the passenger's
side.
1 - Start with a cold engine.
2 - Disconnect the battery ground strap behind the tool tray. I tend to
blow fuse #24 (interior lights) on the reconnect, so I pull that too.
3 - Raise front of car. I have yet to build some good ramps so I put
it on jack stands. (Wally has a good idea about jacking the rear point and
putting a jack stand under the front point. Then put the jack under the lower
control arm rear support to raise the jack stand higher at the front
point.)

4 - Open the hood and set out the service covers. What?? NO service
covers? Are you just going to scratch your fenders up?? Put them on your
shopping list! 928 Specialists
!!
5 - Remove engine belly pans (if you have them!).
6 - Loosen coolant reservoir cap.
7 - Loosen the radiator drain cock (flathead screwdriver) and drain
the radiator. You will catch about 2½ gallons.
8 - Remove left and right side engine block drain plugs (13mm) and
drain the block. Be careful, these are usually very tight and
could strip easily. You should catch about 1½ gallons.
9 - Remove the air cleaner intake hoses.

10 - Remove the upper and lower radiator hoses. My clamps were all
10mm, except the bottom lower hose was 8mm (must not be original
Porsche).
11 - Replace and snug radiator drain cock.
12 - Replace the two engine block drain plugs. You might use some
teflon tape to make insure the seal.
13 - Unplug the electrical connectors on each fan, and remove the
wiring from the clips on the fan shroud. This is more easily done from
underneath.
14 - Remove the jumper post cover (right sidewall).
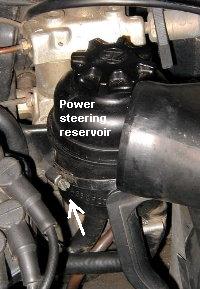
15 - Loosen or remove the clamp on the power steering reservoir to
allow clearance. Mine was 7mm.
16 - Loosen the air pump hose to the filter. Mine was 6.5mm. Tie
back out of the way.
17 - Remove the two 10mm screwbolts on top of the fan
shroud.
18 - Attempt with much conviction to remove the fan shroud.
You may need to loosen the oil cooler line. This is on the top left of the
radiator, next to the power steering reservoir. I used a 1-1/4" (32mm) wrench
on the nut,
 and a 1-1/16" (27mm) wrench to counterhold the fitting.
A little oil may drip. Be careful to counterhold because the radiator side
tanks are plastic.
and a 1-1/16" (27mm) wrench to counterhold the fitting.
A little oil may drip. Be careful to counterhold because the radiator side
tanks are plastic.
19 - If you loosened the oil cooling line, snug it back
together. Later when you hand-crank the engine you could pump enough oil up to
spill. (I know!).

20 - Loosen the
alternator lockdown bolt with a 17mm open-end wrench. Use a 6mm hex key on the
adjuster. You may also want to loosen the 17mm pivot bolt. Remove the
belt.
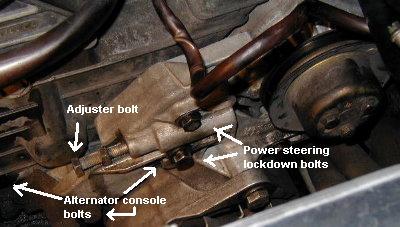
21 - Loosen the three 13mm bolts for the power steering pump, and
use a 13mm socket on the adjuster. Remove the belt and mark it
"PS".
22 - Loosen the air pump 13mm lockdown bolt, and loosen
the 13mm adjuster nut. I had trouble getting it to full loose, so I added
another nut (M8-1.25) to the adjuster and tightened it to full loose. Remove
the belt and mark it "AP".

23 - The A/C
compressor belt was difficult to fully loosen as well, so I added another
M8-1.25 nut to its adjuster. The lockdown bolt is 17mm, and the adjuster nut(s)
are 13mm.
24 - Remove the oil dipstick.
25 - Mark the spark plug wires. I put tape across
the distributor beneath the wires and wrote the plug cylinder numbers there.
Later I saw that the cylinder numbers are already marked on the timing belt
cover. Also my Beru wires have the cylinder number on them.

26 - Unplug all the wires (and the coil wire on
the bottom) and lay back on the engine. Use a 4mm hex key on the plug wire loom
at front/center of engine. Lay this section across the front of the intake
manifold.
27 - Loosen the three screws (8mm socket or flathead) from each
distributor and lay them aside. Note which is left vs. right.

28 - Disconnect the belt
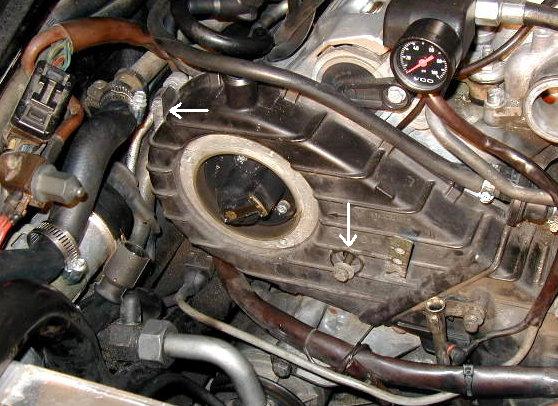
tension sensor from the front of the right timing belt cover.
29 - Detach the oil dipstick guide from the timing-belt
cover.
30 - Remove both timing belt covers with a 10mm socket. The left side
has three bolts. There are two bolts on the right cover and disconnect the
tensioner sensor. Lay the covers aside, with their bolts in the proper
holes.
31 - For 5-speed cars (from the Workshop Manual p.15-105):
"Remove clutch slave cylinder. Take off clamp on clutch hose holder and remove
push rod. Let cylinder with connected line hang down." The two bolts are
13mm.
"Note
Never operate clutch pedal after removing the slave
cylinder."
1 - Use a 27mm (or 1-1/16") socket on the crank bolt. (Wally recommends
a 3/4" drive.) Turn crank clockwise to the top dead center 0º mark on the
crank pulley. Never turn the engine counter-clockwise. (You *might* consider
removing the sparkplugs to make the engine turn easier.)
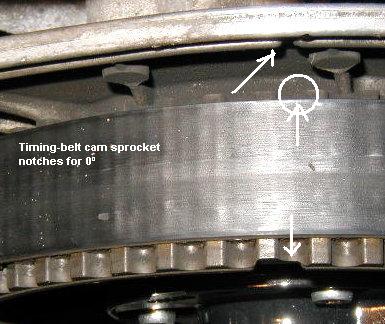
2 - With the crank at 0º check
that the notches on the back of the camshaft sprockets are aligned with the
notches in the backing plates.
3 - Turn crank (always clockwise) to the 45º mark.
4 - Add marks to each camshaft pulley for the 45º alignment (I
used some touch-up paint). According to the Workshop Manual p.15-106,
"Camshafts may be turned without damaging the valves after aligning the
45º mark."
5 - Pull the engine two additional turns to ensure that the added
45º marks continue to align.

6 - Mount the Flywheel Lock (Special
Tool 9161/1) with original 13mm bolts to hold the crankshaft. The tool mounts
where the clutch slave cylinder was installed. On the automatic cars there is
simply a cover plate. The two bolts are short so leave the washers off to snug
up the flywheel lock.
7 - Remove the crankshaft bolt. It should be torqued to 218
ft/lbs. My bolt was tight but it came loose without too much effort - I did not
need the pipe!
8 - Remove the pulleys, and wiggle the vibration damper. The
damper will move in very small increments and may take several minutes of
wiggling. Also remove the collar.

9 - Loosen console with
alternator from engine - two 13mm and one 17mm bolt. This is to provide
room to remove the center timing-belt cover. The "console" is a mount/spacer
between the engine block and the alternator and power steering pump.
10 - Observe the wiring harness that runs across the
front of the engine. This harness comes from the alternator and starter between
the left timing-belt cover and the center timing-belt cover, has a smaller
split to the connector by the left headlight, and runs back under the right
timing-belt cover and up and forward to the jump point. Follow this harness and
note the bracket behind the right timing-belt cover.
11 - There is also a wire running from the harness under the right
fuel rail and connecting under the right timing-belt cover. Disconnect
this.
12 - Disconnect the signal wire running to the A/C compressor.
13 - Disconnect the harness wire that splits to the left headlight
connector. Replace that screw so it is not lost.
14 - Disconnect the end of the harness wire at the jump point.
Replace the screw/jump contact so that it is not lost.
15 - The end of the harness also feeds into a small rectangle
connector. Use a screwdriver to carefully pry it in half.
16 - Now comes the most difficult part of this entire project:
removing the screwbolt that holds the harness bracket to the right-side engine
lift point. A right-angled screwdriver might help - there are simply a lot of
lines and hoses there. Put this screwbolt in a safe place.
17 - With the harness free, carefully thread it out to the front of
the block.
18 - Clean around the guide tube for the oil dipstick, and then
remove it. Some sort of a plug for the hole would be a good idea.

19 - Remove center timing-belt
cover - one 13mm bolt that goes into the belt tensioner, and three 10mm bolts
(one is long). Be careful to disconnect the timing-belt tension sensor on the
inside. Set the cover aside with the bolts in their proper holes.

20 - Slacken the timing-belt by
loosening the tensioner lock nut (13mm), and turning the adjusting screw (17mm)
counter-clockwise.
21 - Unscrew (Philips head) the metal tensioner sensor strip that
runs up the roller bracket. Snug the screw back into place.
22 - Unbolt (4mm hex key) and remove the tensioning roller bracket.
This is the arm with two rollers at each end. Be careful not to lose or mangle
the sensor strip or spring, etc.
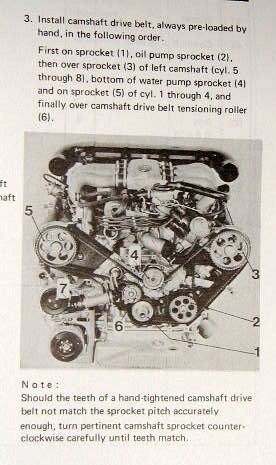
23 - Remove toothed-belt from right-hand side over cylinder
1-4 camshaft sprocket, water-pump sprocket, cylinder 5-8 camshaft sprocket,
oil-pump sprocket and crankshaft sprocket. (p.15-107)
24 - Remove the timing-belt.
25 - With timing-belt in hand high above head, do the 928 Victory
Dance. :)

1 - Temporarily replace the oil dipstick guide tube, but turn it so that
it swings away from the water pump. This is to help prevent any spilling
coolant from getting into the oil pan.
2 - Remove the tensioner idler spindle from the water pump. This is
a 19mm nut that threads into the pump - it does not hold the pump onto the
block but it does open into the water-jacket, so some coolant may drip.
3 - Place the *new* Porsche-rebuilt water pump next to you.
4 - Remove the timing pointer from the old pump (two flathead
screws) and transfer to the new pump.
5 - Remove the fourteen 10mm water pump bolts (one may have been removed
previously when removing the lower center cover). First loosen each of
them - they are often over-torqued and could shear. Then go back and remove
them. As you remove each bolt place it into the corresponding hole of the new
pump.
6 - The old pump may be held fast to the block by the gasket - do
NOT pry it loose. You don't want to gouge an aluminum block around the water
pump! A good rap with the wood-handle end of a hammer should do it.
7 - Clean off any remaining gasket material from the block.
8 - Again remove the oil dipstick tube for room to work.

1 - See the manual pp.15-23 - 15-25 for a good
picture.
2 - The tensioner is held to the block by four bolts. One bolt has
already been removed as part of the upper timing-belt cover. First remove the
13mm bolt that is the pivot for the air pump. I have a rigid A/C line running
behind this bolt which was quite an obstacle.
3 - Next remove the remaining three 13mm bolts (two above and one
below) that attach the tensioner cylinder to the engine block.
4 - Again, the tensioner may be stuck to the block - do NOT pry!
Chances are it will fall off with that last bolt!
5 - Carefully note where the bolts came from and lay them
aside.

6 -
Remove the old rubber boot and clamp (or what's left of it - mine was hardened,
brittle, and in pieces).
7 - I did not open the tensioner and clean the inside where the
tensioning rod and washers are - I simply forgot all about it! Someone will
have to clarify, but I believe you pull the plunger out. When reassembling, use
the new rubber O-ring.
8 - Install the new boot and clamp. I used a flathead screwdriver to
pry up on the ends of the clamp "pincher" to get a good grip with the
pliers.
9 - I replaced both the tension roller and the smaller idler. Remove
the roller with the bolt (10mm). Use a 10mm box-end wrench on the other
end.

10 - The smaller idler is a press fit held on by a
C-clip. A proper C-clip tool would be ideal, but some careful pointy
needle-nosed pliers will work.
11 - I used a hammer and knocked the old idler off. :) Do not try
the same method for pressing the new one on! It *might* work for you, but I
whacked the bearing right out of the roller! I used a C-clamp and managed to
press it back in - whew! (how embarrassing it would be: "Uh, Jeannie - don't
tell Dave but I need another...") Use a clamp or vise or some sort of
appropriate tool.
12 - With the idler in place, transfer the C-clip from the old roller
to the new one, and bolt the new roller on.
13 - Turn the tensioner screwbolt counter-clockwise to full
loose.
14 - Clean the block and the tensioner of any remaining gasket
material from the tensioner.
15 - Use a light coating of gasket sealant on the gasket and mate to
the tensioner.
16 - Attach the tensioner to the block by first fitting the upper
arms to the pivot of the air pump. Good luck with that A/C line if it is
blocking your way. Do not tighten yet so that the air pump can still swing
freely.
17 - Clean and mount the two 13mm bolts through the tensioner to the
block. Check that they are snug.
 1 - Hold the new water pump up with the screws in their
holes. Inspect the rear making sure that all the screws extend the same
distance from the pump.
1 - Hold the new water pump up with the screws in their
holes. Inspect the rear making sure that all the screws extend the same
distance from the pump.
2 - Lay the old water pump next to the new pump.
Transfer the bolts back to the old pump, cleaning each bolt and spraying with
WD-40 as you go.
 3 - Use a light coating of gasket sealant
on the gasket and mate it to the pump.
3 - Use a light coating of gasket sealant
on the gasket and mate it to the pump.
4 - Use a light coating of gasket sealant on the block side.
5 - Transfer the bolts from the far left and far right side of the
old pump to the new water pump, and attach it to the block. Finger-tighten the
two bolts.
6 - Transfer the other bolts to the new pump and
finger-tighten.
7 - Snug each bolt. Count each bolt to be sure you snug all
fourteen!
8 - Snug each bolt a little tighter and check, check, check.
 1 - According to the Workshop Manuals p.15-107,
"Installation of toothed-belt is the reverse of the above sequence." (Ha Ha - I
just had to throw that in....)
1 - According to the Workshop Manuals p.15-107,
"Installation of toothed-belt is the reverse of the above sequence." (Ha Ha - I
just had to throw that in....)
2 - Start the new timing belt at the crankshaft pulley. Pull it over
the oil pump, the left cam sprocket, around the water pump, and over the right
cam sprocket. (p.15-14 has a nice photo and instructions.) Turn/adjust the
camshafts counter-clockwise as necessary for the 45º marks to line up when
installing the belt (it is normal for the valve spring pressure to turn the cam
sprockets).
3 - Check that ALL slack in the belt is at the tensioner.
4 - Install the tensioner arm (4mm hex key). Be careful with the
spring and sensor strip. This can be a little tricky getting the sensor into
the tensioner arm dimple.
5 - Screw (Philips head) the tensioner sensor strip into the
tensioner arm.
6 - Check that ALL slack in the belt is between the right cam
sprocket and the tensioner.
7 - Use a 17mm open-end wrench and turn the tensioner clockwise to
tighten the belt.
8 - Again check that ALL belt slack is at the tensioner.
9 - Install the center timing-belt cover. One 13mm bolt goes into
the tensioner, plus three 10mm bolts (one is long). Be careful to not over
tighten the bolts because the cover is plastic.
10 - Install the crank collar and damper. I used a large socket on
the damper and lightly tapped it in.
11 - Finger tighten the crank bolt and washer.
12 - Temporarily remove the flywheel lock.
13 - Turn the engine to TDC 0º while watching the timing-belt
and all movements.
14 - Check timing marks on camshaft sprockets.
15 - Turn the engine two turns and re-check all timing
marks.

16 - Using the belt tension tool of
your choice, check the belt tension with engine at 0º TDC. Place the tool
midway between the right cam sprocket and the tensioner idler (smaller roller).
Tighten the belt by turning adjusting the tensioner screw clockwise.
17 - Turn the engine two more turns and re-check the tension. Engine
must always be at TDC 0º when checking. The correct value for factory tool
9201 is 5.0 + 0.3.
18 - Turn engine and re-check the belt tension several times.
19 - Refill the tensioner with 90-weight gear oil by loosening the
fill (left) and bleed (right) screws (4mm). The gear oil I bought had a nozzle
tip and I was able to feed it into a 3/16" clear tube. The clear tube fit
snuggly over the fill screw. By squeezing the oil container I was able to
pressure the oil into the tensioner. It took about ten solid minutes to move
100mL (3+ ounces) into the tensioner before the bleed screw dripped. Tighten
both bleed screws.
1 - Insert the oil dipstick tube. I used some gasket sealer. Some
diagrams in the Workshop Manual (p.17-6b) show the tube with a tightening nut.
Mine was simply in a fitting.
2 - Plug in the connecting wire for the timing-belt tension
sensor.
3 - Attach the upper part of the dipstick tube to the center timing-belt
cover.
4 - Install the console mount for the alternator - two 13mm and one
17 mm bolt.
5 - Again install the flywheel lock.
6 - Remove the crank bolt and washer.
7 - Install the pulleys with the belts in place. From back to front the
order is A/C belt (large single pulley), power steering belt, air pump belt,
and alternator (thick, ribbed belt).
8 - Tighten the crank bolt (with thick washer) to 218 lbs. torque.
Again, a 3/4" drive and socket are recommended - check with a local parts store
for an available loan or rental.
9 - Remove the flywheel lock and replace access cover (on automatics) or
clutch slave cylinder (on 5-speeds). Remember the washers with the two 10mm
bolts.
10 - Replace the upper timing-belt covers. The right side has one short
and one long 10mm bolt. The left cover has three short 10mm bolts.
11 - Thread the wiring harness across the front of the engine, under the
right timing-belt cover and up and forward to the jump point and reconnect the
cable and the rectangle connector (clean it first).
12 - Reconnect the harness split to the connector near the left
headlight.
13 - Reattach the harness bracket to the right engine lift
point.
14 - Reconnect the wire running from the right fuel rail harness to the
connector underneath the right timing-belt cover.
15 - Tighten the A/C compressor belt and pivot bolt.
16 - Tighten the power steering belt with the13mm adjuster nut. Tighten
the two 13mm lockdown nuts and the 13mm pivot bolt.
17 - Tighten the air pump belt with the 13mm adjuster nut, 17mm lockdown
bolt, and 13mm pivot bolt.
18 - Tighten the alternator using the 6mm hex key adjuster and the 17mm
lockdown bolt. Do not forget to tighten the pivot bolt if you loosened
it.
19 - Use a piece of sandpaper and clean the rotor and the contacts
inside the distributor.
20 - Attach each distributor to its timing-belt cover with a flathead
screwdriver or an 8mm socket.
21 - Connect the spark plug and coil wires.
22 - Attach the front spark plug wire loom to the water pump (4mm hex
key).
23 - Tie the wiring harness to the spark plug wire loom.
24 - Start with cylinder #1 and check that its wire goes to the
distributor terminal #1. Continue with #2 and so on until all eight are
confirmed.
25 - Check the spark plug coil wires.
26 - Disconnect the oil cooling line and loosely replace the fan
shroud.
27 - Reconnect and tighten the oil cooling lines (1-1/4" or 32mm and
1-1/16" or 27mm wrenches) remembering that the side tanks are plastic.
28 - From underneath, fit the three tabs at the bottom of the shroud
into place, and connect the fan wiring and clips.
29 - Tighten the two 10mm screwbolts on top of the shroud.
30 - Reattach the air pump filter hose.
31 - Tighten the power steering reservoir clamp.
32 - Replace the jump point cover.
33 - Replace the oil dipstick.
34 - Reattach the coolant reservoir hose.
35 - Attach the lower radiator hose to the radiator.
36 - Attach the upper radiator hose to the water manifold.
37 - Fill the engine block with a coolant mix through the upper radiator
hose and then connect the hose to the radiator. The mix should be approximately
50/50% aluminum-friendly coolant and distilled water (adjust the ratio to your
climate).
38 - Fill the radiator through the lower radiator hose and then connect
the hose to the water manifold.
39 - Fill the coolant reservoir.
40 - Check accessory belt tension.
41 - Check spark plug wire connections.
42 - Test upper, lower, and coolant reservoir hose clamps.
43 - Remove tools, lights, etc. from the engine bay.
44 - Reconnect the battery ground strap.
45 - Cross fingers, insert ignition key and turn. VROOooomm!
46 - Set heater to full HOT and fan on maximum.
47 - Check engine for leaks and bad noises.
48 - When coolant reaches operating temperature the thermostat will open
and the lower radiator hose will begin to warm. At that point periodically
squeeze the lower radiator hose to help move air out of the system.
49 - After the engine has fully warmed, shut it off.
50 - Check accessory belt tension.
51 - Check radiator hose clamps.
52 - Watch for leaks.
53 - Add coolant to the coolant reservoir and tighten the cap.
54 - Lower car off jack stands, etc.
55 - Go for a nervous drive! Listen for odd noises.
56 - Check for leaks.
57 - Check accessory belt tension.
58 - After engine cools, add coolant.
59 - Replace engine belly pans.
60 - Wash car.
1 - Continually check for leaks and listen for odd noises.
2 - Periodically check accessory belt tension and reservoir coolant
level.
3 - Check and re-tension the timing-belt after 1500-2000 miles, and
then every 15,000 miles.
928 S4 Page
John Pirtle
February 16, 2011