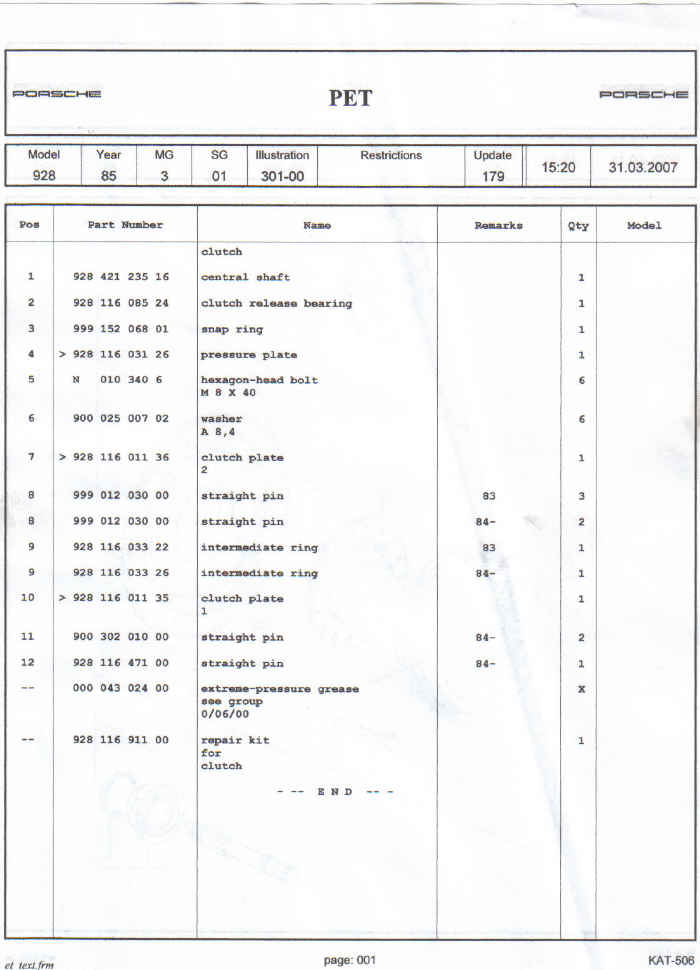
Removing the clutch in a
1985 928 (for beginners)
END OF OPTIONAL STEP 5
This tutorial is based on my own
experience the first time I changed out the clutch in my 928. I
haven't changed a clutch in anything in almost 20 years, and this one
is MUCH different. There are several write-ups that explain it
very well, and it's really not a complicated procedure at all.
One write-up says it should only take 2 hours on a lift if you've done
it before. I think this is possible, but I don't have a lift, and
I've only done it once.
So basically, I'm going to explain what I did and what I learned. I'm sure there are other ways to do it and some may be faster or easier. I've tried to include photos wherever possible. I'm a visual person and it makes it easier for me to learn this way.
What I was expecting to do was this: Remove the clutch, replace the pilot bearing, replace the release (or throwout) bearing and check the clutch disc while I was in there. I also planned to replace the release ball cup (or bushing) because it's cheap and easy to do while everything else is out.
Well, that was my plan. It didn't exactly go according to plan, but thanks to a lot of help and moral support from Rennlist, I was able to get through it. I hope this write-up helps you avoid some of the mistakes I made and makes it easier for you than it was for me.
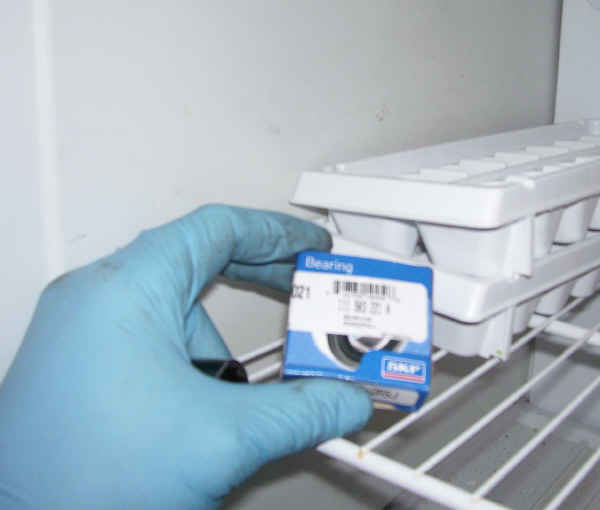
First, when you get your parts, put the pilot bearing in the freezer. It will be easier to put in if it's been chilling for a while.
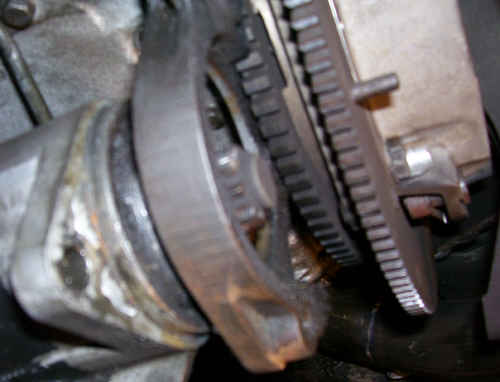
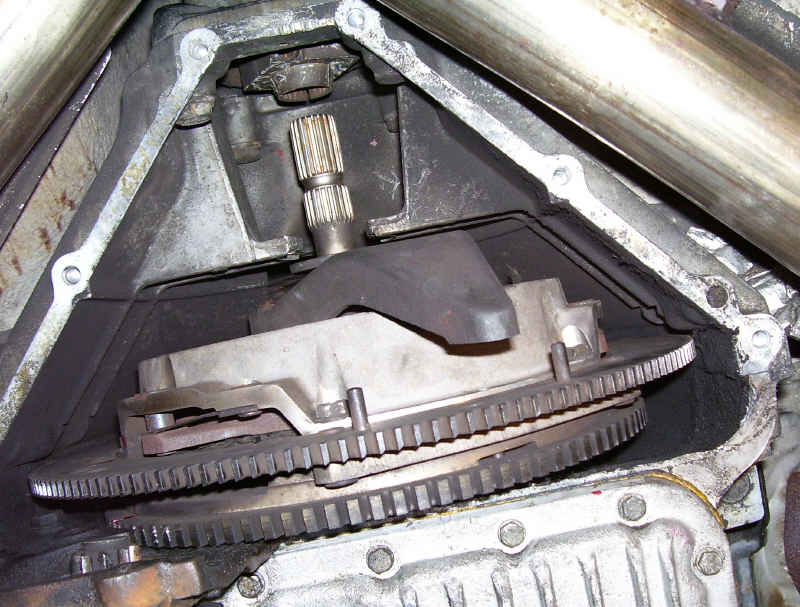
Pic shows bell housing pulled back 3/4" and pressure plate
unbolted. (also copper wire shim shown on right of pressure plate)So basically, I'm going to explain what I did and what I learned. I'm sure there are other ways to do it and some may be faster or easier. I've tried to include photos wherever possible. I'm a visual person and it makes it easier for me to learn this way.
What I was expecting to do was this: Remove the clutch, replace the pilot bearing, replace the release (or throwout) bearing and check the clutch disc while I was in there. I also planned to replace the release ball cup (or bushing) because it's cheap and easy to do while everything else is out.
Well, that was my plan. It didn't exactly go according to plan, but thanks to a lot of help and moral support from Rennlist, I was able to get through it. I hope this write-up helps you avoid some of the mistakes I made and makes it easier for you than it was for me.
First, when you get your parts, put the pilot bearing in the freezer. It will be easier to put in if it's been chilling for a while.
(I told you I was a visual guy)
Next, carefully jack up the car and put
it on four jackstand, (unless you're fortunate enough to own a lift) it
should be high enough for you to get underneath the entire car, front
and back. Make sure the car is secure, please follow safe work
practices with regard to jackstands. NEVER work under a car with
the car on just a jack.
***Put car in neutral once it's up there, so that when you pull the clutch slave later, or rotate the engine you won't have to rotate the tranny.
OK, enough preaching. Also, you should wear goggles while you're doing this, because lots of stuff is going to be knocked loose while you're working, and some of it will land on your face.
Next, disconnect the battery under the spare tire in the back. (It's probably easier to disconnect the ground strap behind the tool kit, but make sure the ground strap is totally isolated from the body). I usually just disco the positive terminal.
Step 1: Using a 5mm allen-head socket, remove the bolts that hold the two sensors (TDC sensor and speed/reference mark sensor) in the top of the bellhousing. These are not easy to get to. Once you get the bolts started though, it's easy to wiggle your hand in there and get the bolt and washer for each one. Just turn them each a little and wiggle them up and out. You might want to get in there with a rag and clean them off too. Some people skip this step. Sharkmeister85 (Glenn) from Rennlist can attest to the fact that sometimes it will be stuck in there so badly that the only way to remove it is to break it. And if you damage one, the car won't turn over until it's replaced. SO you gotta ask yourself, do I feel lucky? Actually if it's not coming loose from up top, just be aware of it later on so you don't push anything up into it during disassembly or reassembly.

Step 2: Slide under the car and remove the six 17mm bolts that hold the lower bellhousing cover on. If you have the stock exhaust, you'll have to remove it to get to the back two, as well as to remove the rear coupling bolt through the inspection hole.
"After you unbolt the exhaust from the manifold, and loosen the clamps that hold the cat section to the rear exhaust, I've found it is easiest to work it off by twisting the cat section around it's axis."- Bill Ball (Thanks again Bill)
Some people either leave the back two bellhousing bolts out or loosen them down to the exhaust pipes then cut them off so that they're shorter than the rest so they don't have to mess with the exhaust system the next time. I have aftermarket crossovers from 928 Motorsports and they don't interfere with any of the bolts.
Step 3: Remove the starter bolts (2x8mm allen?) and slide the starter forward so it's not sticking through the bellhousing. Also remove the two 13 mm hex head clutch slave cylinder bolts, as well as the 2 10mm hex pan gasket bolts that hold the clutch hydraulic line bracket secured to the bottom of the oil pan next to the starter. Move the clutch slave forward out of the way. Now the bottom of the bellhousing should be clear and you should see the entire work area.
***Put car in neutral once it's up there, so that when you pull the clutch slave later, or rotate the engine you won't have to rotate the tranny.
OK, enough preaching. Also, you should wear goggles while you're doing this, because lots of stuff is going to be knocked loose while you're working, and some of it will land on your face.
Next, disconnect the battery under the spare tire in the back. (It's probably easier to disconnect the ground strap behind the tool kit, but make sure the ground strap is totally isolated from the body). I usually just disco the positive terminal.
Step 1: Using a 5mm allen-head socket, remove the bolts that hold the two sensors (TDC sensor and speed/reference mark sensor) in the top of the bellhousing. These are not easy to get to. Once you get the bolts started though, it's easy to wiggle your hand in there and get the bolt and washer for each one. Just turn them each a little and wiggle them up and out. You might want to get in there with a rag and clean them off too. Some people skip this step. Sharkmeister85 (Glenn) from Rennlist can attest to the fact that sometimes it will be stuck in there so badly that the only way to remove it is to break it. And if you damage one, the car won't turn over until it's replaced. SO you gotta ask yourself, do I feel lucky? Actually if it's not coming loose from up top, just be aware of it later on so you don't push anything up into it during disassembly or reassembly.
Step 2: Slide under the car and remove the six 17mm bolts that hold the lower bellhousing cover on. If you have the stock exhaust, you'll have to remove it to get to the back two, as well as to remove the rear coupling bolt through the inspection hole.
"After you unbolt the exhaust from the manifold, and loosen the clamps that hold the cat section to the rear exhaust, I've found it is easiest to work it off by twisting the cat section around it's axis."- Bill Ball (Thanks again Bill)
Some people either leave the back two bellhousing bolts out or loosen them down to the exhaust pipes then cut them off so that they're shorter than the rest so they don't have to mess with the exhaust system the next time. I have aftermarket crossovers from 928 Motorsports and they don't interfere with any of the bolts.
Step 3: Remove the starter bolts (2x8mm allen?) and slide the starter forward so it's not sticking through the bellhousing. Also remove the two 13 mm hex head clutch slave cylinder bolts, as well as the 2 10mm hex pan gasket bolts that hold the clutch hydraulic line bracket secured to the bottom of the oil pan next to the starter. Move the clutch slave forward out of the way. Now the bottom of the bellhousing should be clear and you should see the entire work area.
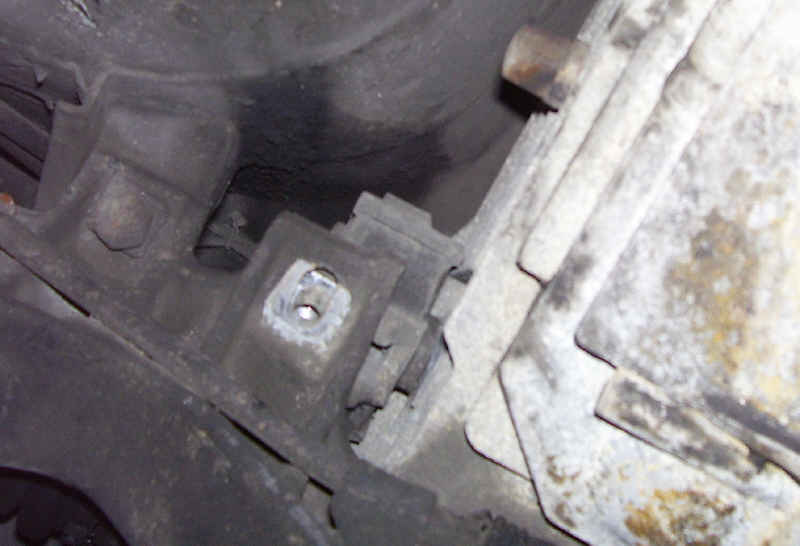
Starter moved forward supported on
sway bar (you don't have to disco the wiring).
Clutch slave is also loose and pushed forward.
Clutch slave is also loose and pushed forward.
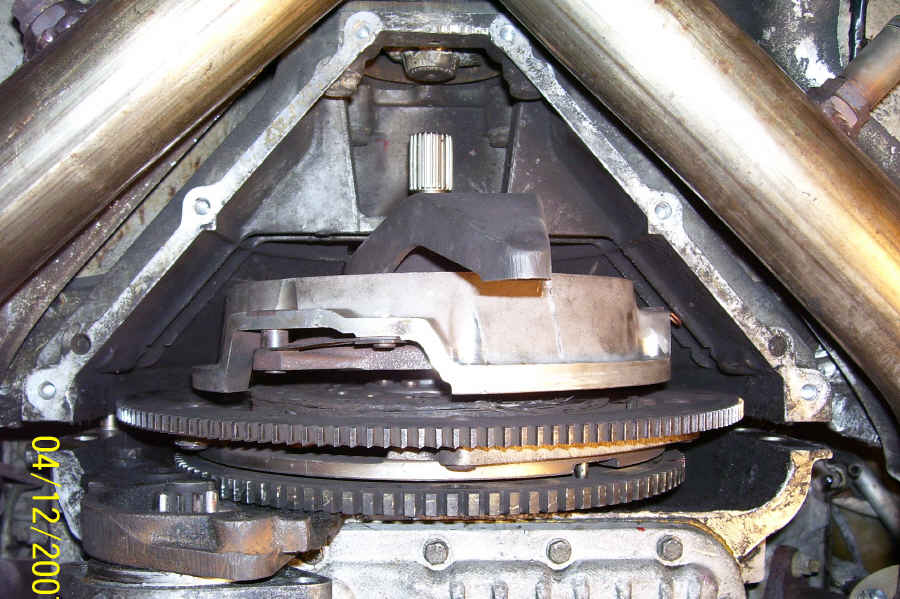
Step 4:
Next, you want to look up
through the little hole behind where the lower bellhousing came
from. There's a viewing hole that will allow you to see and line
up the rear bolt for the intermediate shaft coupling. You need to
get an (8mm?) allen socket up in there and loosen the bolt on the
coupling. If it's not visible, you'll have to rotate the engine
by hand.
You can rotate the engine using one of many techniques. Some are smarter than others. The way I did it was to use a large flat blade screwdriver on the (car's) left hand side of the bell housing and pry the starter ring gear (the larger one with the smaller teeth) so that the engine rotates clockwise as seen from standing at the bumper facing into the engine (from underneath, you can pry on the left side or driver's side in the US, which has to go down, while the right side goes back up into the bellhousing). This is not the recommended way to do it, you should find a way to use the flywheel teeth since they're less likely to break, but I couldn't get any leverage on these, so I used the starter ring gear.
It's not good for the cam timing chains to rotate in the wrong direction, it can screw things up. Also, when rotating go slowly. If, for some reason, you have to rotate the engine the wrong way, do it only a few degrees per minute and then turn it in the right direction every few turns. Before starting the car make sure you turn it through several complete turns in the right direction so the tension is on the correct side of all of the timing chains and belts.
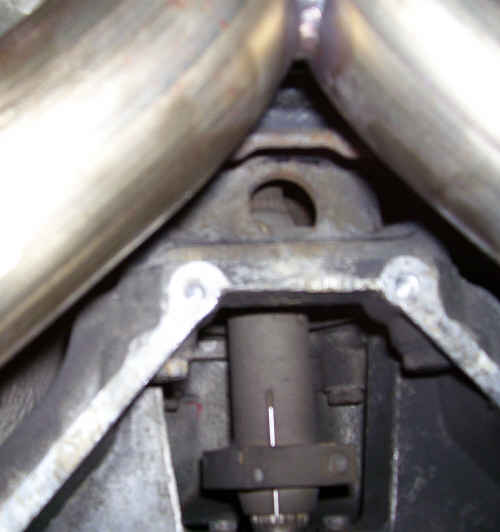
I-shaft coupling.
You'll have to completely remove the
bolts on the coupling because they go up through a groove in the
i-shaft (intermediate shaft) and main shaft. If you don't
completely remove the bolts,
the coupling won't move.
Once you've got both bolts out, pry or slide the coupling back toward the rear of the car into the torque tube until it's flush with the main shaft. There should be a gap of about an inch between the main shaft and the i-shaft (which is the steel shaft coming from the engine side).
Also remove the two bolts that hold the release bearing sleeve in place on the bellhousing. Mark the flywheel, pressure plate and starter ring gear (aka intermediate plate) so you can align them all later. I used some red touch up paint in the picture below, you can see it if you look closely on the left. Actually, marking these may not be necessary either, as the pins are set up in such a way as to make reassembly only possible in one orientation, but the WSM says to mark them, so I'm putting it in here.
I had to slide the coupling back and
forth a few times before it went all the way back in.
You can skip step 5 for the 'standard' technique. Step 5 is not in the manual, but it's what I did to make more room in there.
You can skip step 5 for the 'standard' technique. Step 5 is not in the manual, but it's what I did to make more room in there.
Step 5:
Ok, so this is where I screwed
up. The WSM (work shop manual) says to tap two of the three
locator pins through from the front of the flywheel (smaller gear with
larger teeth shown above) out toward the starter ring gear (larger gear
with smaller teeth) from front to back, and the third locator pin
(which is 'stepped' and goes from 6mm on one end to 8mm on the other)
should be tapped out completely. Once this is done, you can move
on to the shims and removing the bolts. My next suggested step
would be to make some room for yourself. Thanks to Ted (I'm sorry
I don't know your last name) on Rennlist I found a simple way to open
things up a
bit and avoid some major headaches with the pins. What I would
suggest you do is locate the four engine-to-bellhousing 17mm bolts, and
remove the bottom two (right at
the sides of the bellhousing) and back
off the top two (these are by the sensors you pulled out earlier
and
are a PITA to get to).
I used a 17mm flex head gear wrench as suggested by Bill Ball on his web site (thanks Bill). This did the trick. So when the bottoms are out and the tops are backed out about an inch, you can slide under the rear of the car and remove the two 19mm hex bolts that secure the tranny up to the frame.
I used a 17mm flex head gear wrench as suggested by Bill Ball on his web site (thanks Bill). This did the trick. So when the bottoms are out and the tops are backed out about an inch, you can slide under the rear of the car and remove the two 19mm hex bolts that secure the tranny up to the frame.
Once these two are removed (the
driver's side one is a PITA because the exhaust is in the way, but just
push it aside a little).
Use a lever or prybar to slide the
tranny back about an inch.
END OF OPTIONAL STEP 5
Step 6:
(or wherever we are) you need to
get some spacers or shims to put in between the heads of the 3 little
tee
shaped
pieces of metal on the pressure plate before removing the pressure
plate. The picture
above shows a piece of 12 guage copper wire that I used (right side of
pressure plate). 10 guage might have been better, but I didn't
have any. The purpose of this is so that when you start loosening
the
bolts, the springs in the pressure plate will relax and take up the
slack. If the spacers are there, the pressure plate will remain
'pre-loaded' and enable you to remove the throw-out bearing and take
off the release arm and possibly
re-use the pressure plate or release bearing. If you forget or
skip this part don't worry, we can fix it on the bench with a big
c-clamp.
Step 7: While rotating the engine, remove the 13mm bolts holding the pressure plate and clutch to the flywheel. BE CAREFUL once these are out, there may be nothing holding the clutch pack up there. I say 'may be' because on mine the locator pins were holding it in and required some persuasion by tapping the whole assembly as I rotated it to get it off of the locator pins. At this point, all you have to do is reach up and hold the i-shaft, pull it toward the back of the car and voila, the clutch will drop on your head! Seriously be careful. I got a tip from a 'lister that used a board on his chest while working on the creeper and he just lowered the clutch onto the board. It's HEAVY and it has sharp teeth. Be careful!
GOTCHAS: One thing that can happen is that the pilot bearing which is located in the flywheel and accepts the front of the i-shaft has dried out and/or seized. If this is the case, you may have trouble getting the i-shaft to come free. Persuade it any way you can. If the pilot bearing is toast, the i-shaft probably is too, so don't be shy with the vice-grips or whatever else it takes. (NOTE: someone from Rennlist said that a bad or seized pilot bearing doesn't necessarily mean the i-shaft is bad, so don't damage the splines if you can help it. Another thing that can happen is that the release arm can get wedged on the pressure plate as you turn it and it can damage other stuff and/or get jammed in so tight you can't turn it any further in the correct direction. Be careful to keep it free while you rotate the engine around.
Thanks to everyone on Rennlist that helped me get through this the first time. I hope this helps someone else get through this job in less time and less stress than it took me.
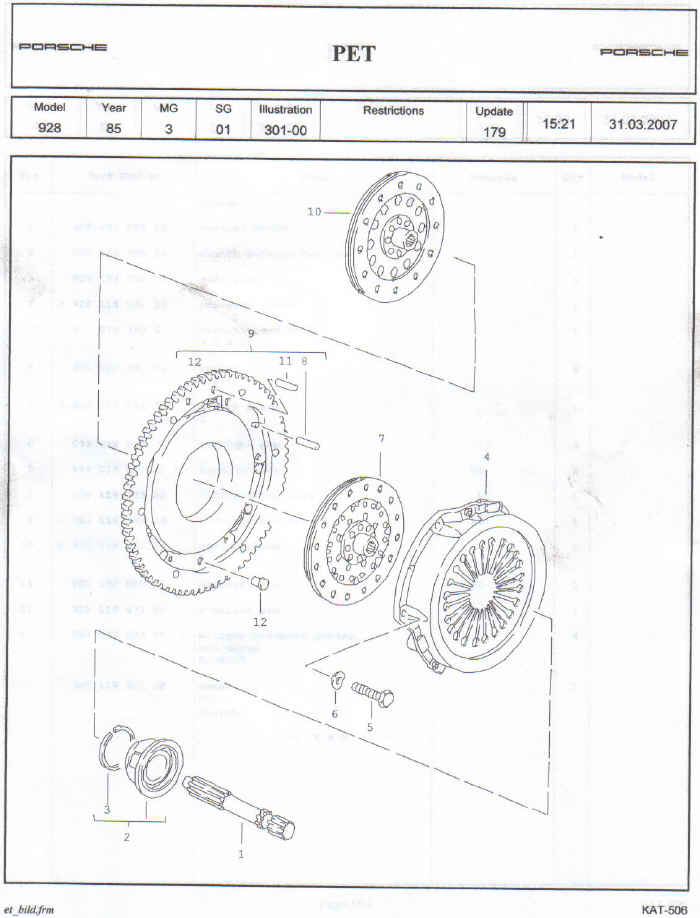
In this image from the WSM, number 1
is listed as the central shaft. It's also called the intermediate
shaft or i-shaft. HTH