 This
is your objective! Tight quarters huh! The mount is shown in the
center of the picture. You can see 2 of the 4 bolts that anchor
it to the block.
This
is your objective! Tight quarters huh! The mount is shown in the
center of the picture. You can see 2 of the 4 bolts that anchor
it to the block.ENGINE MOUNTS
The fluid filled mounts on the 928's engine are prone to fail over a period of time. Seems most fail in the 70,000mi plus range. An indication that you have bad engine mounts is when you pick up a noticable vibration in the 1500rpm range. Vibrations are present at other times as well but I found mine were more pronounced at appx 1500rpm. The mounts on the 87s4 are a fluid filled. I guess the best way i can described them is like a diapraghm or a bellows sealed and filled with a dampening fluid. Over a period of time the rubber fails, cracks, and the fluid leaks out noticeably reducing the efectiveness of the mount. They arent the easiest thing to replace, but like everything else so far on this car, they are well with in the scope of the home mechanic. If you had bad mounts, with the new mounts installed you will find that they will probably be the sinlge best improvement to the "ride" in your car. Many of the little vibrations that were there will also disappear. They did for me, a remarkable difference.
In a nut shell to replace the mounts you have to remove the x-brace, aircleaner assembly, get under the car, drop the steering rack, lift then support the motor (via the oil pan or a hoist), lower the crossmember and replace the mounts.
Below are some of the pictures i took of the procedure and notes i have about it.
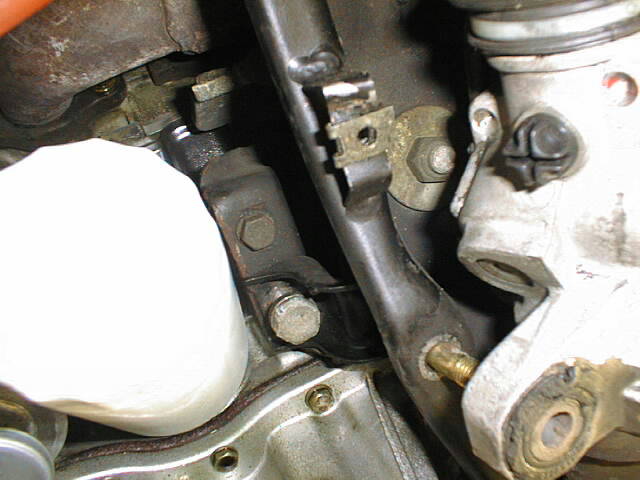
This
is your objective! Tight quarters huh! The mount is shown in the
center of the picture. You can see 2 of the 4 bolts that anchor
it to the block.
I placed the car on ramps and raised the rear end about 5 inches. I chocked it and supported it with solid wooden blocks.
I disconnected the battery.....removed the starter as i was doing the oil pan gasket and GTS baffle as well (thats another web page)
Drain the oil and removed the filter (made it easier to get the mount out on that side)..plus an oil change was due.
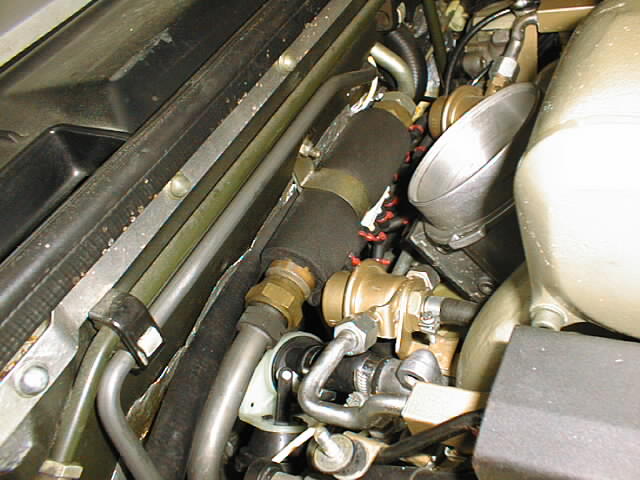 Remove
the air cleaner assembley as you may damage it or the fuel cooler
when the motor is raised. This aleady shows the motor in the
raised postion, not much room back there!!!
Remove
the air cleaner assembley as you may damage it or the fuel cooler
when the motor is raised. This aleady shows the motor in the
raised postion, not much room back there!!!
I removed the crossbrace.
I loosened the clamp that secures the power steering hose to the inside of the fender well on the drivers side. This will allow the rack to drop just a little bit more. (dont forget to tighten it when your done) (sorry, no picture of that....its a bit tough to get a wrench on)
 I
lowered the steering rack by removing the steering rack plate on
the bottom. There are a series of bolts that hold it and the rack
in place. The two bolts on either end (the bigger ones) will have
to be counter held on the other side (the top)... It is a pain to
get a socket in there to do it as well!!
I
lowered the steering rack by removing the steering rack plate on
the bottom. There are a series of bolts that hold it and the rack
in place. The two bolts on either end (the bigger ones) will have
to be counter held on the other side (the top)... It is a pain to
get a socket in there to do it as well!!
I also removed the 4 bolts that hold the sway bar in place and pulled the bar as far as i could out of the way. It gave me a bit more room to work with.
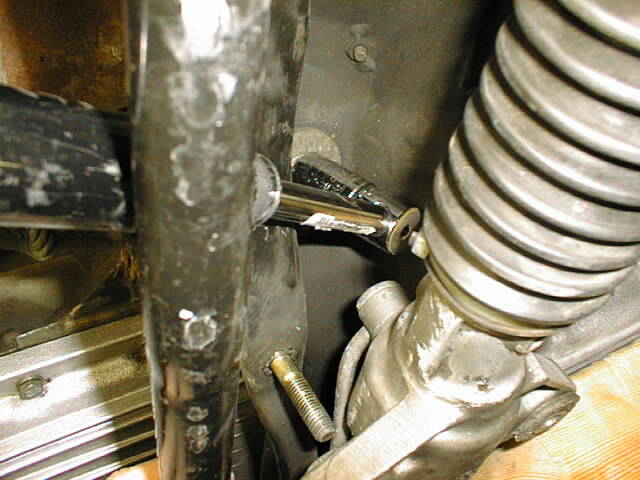
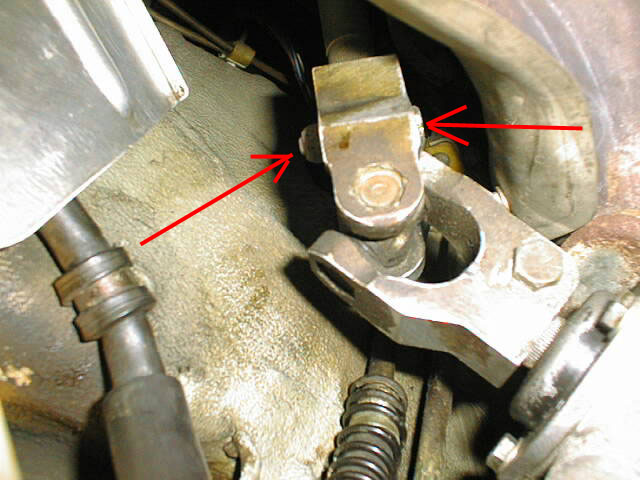 I
lossened the pinch collar bolt on the steering shaft(the upper
one) The shaft never came out of the collar when the rack was
lowered, it just allowed the shaft to slide freely in the collar.
I marked the shaft and the collar, just in case it did pop out.
The two pipes behind the U joint here are the ones that feed the
steering rack, if you follow them, they run up the side of the
engine compartment and are secured by the clamp that i mentioned
above...it is just barely in view in this picture. (below arrow
on the right side).
I
lossened the pinch collar bolt on the steering shaft(the upper
one) The shaft never came out of the collar when the rack was
lowered, it just allowed the shaft to slide freely in the collar.
I marked the shaft and the collar, just in case it did pop out.
The two pipes behind the U joint here are the ones that feed the
steering rack, if you follow them, they run up the side of the
engine compartment and are secured by the clamp that i mentioned
above...it is just barely in view in this picture. (below arrow
on the right side).
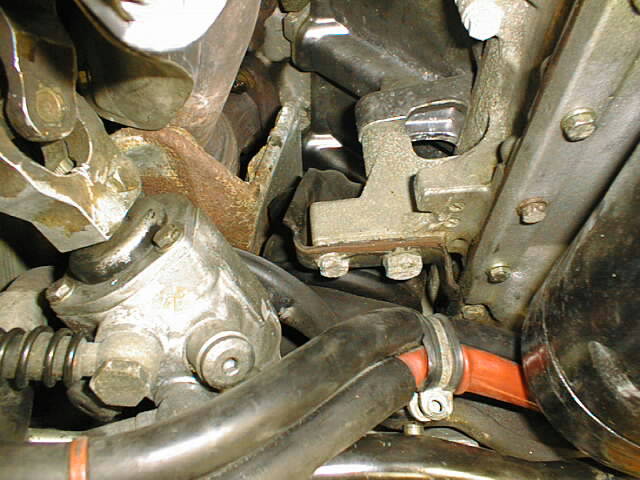
 I
then gently pulled down on the steering rack exposing enough room
to get a socket on the lower engine mount bolts. You will notice
that when you pull the rack down that your wheels may move a
bit....not to worry as you havent touched the tie rods or
adjusted anything. When you put the rack back in place, your
alignment should still be fine. There is one big bolt on either
side that anchors the mount to the crossmember ..this is what i
removed . Odds are they havent been touched in 13yrs...THEY WERE
VERY TIGHT, i had to use a cheater bar. In this picture, you can
also see 2 of the 4 bolts on each side that anchor the mount to
the block. These will be removed as well. I also removed the oil
filter for better access to the mount later. (i was doing an oil
change as well anyway)
I
then gently pulled down on the steering rack exposing enough room
to get a socket on the lower engine mount bolts. You will notice
that when you pull the rack down that your wheels may move a
bit....not to worry as you havent touched the tie rods or
adjusted anything. When you put the rack back in place, your
alignment should still be fine. There is one big bolt on either
side that anchors the mount to the crossmember ..this is what i
removed . Odds are they havent been touched in 13yrs...THEY WERE
VERY TIGHT, i had to use a cheater bar. In this picture, you can
also see 2 of the 4 bolts on each side that anchor the mount to
the block. These will be removed as well. I also removed the oil
filter for better access to the mount later. (i was doing an oil
change as well anyway)
 loosening the bolt that anchors the mount to the crossmember.
Note the cheater bar, it was tight and awkward under there trying
to get leverage. As you can see i have pulled the sway bar down
and out of the way a bit....the more room you create for yourself
the more tolerable of a job it will become.
loosening the bolt that anchors the mount to the crossmember.
Note the cheater bar, it was tight and awkward under there trying
to get leverage. As you can see i have pulled the sway bar down
and out of the way a bit....the more room you create for yourself
the more tolerable of a job it will become.
I then removed the 4 bolts on each mount that attach them to the engine. (seen above) At this point the engine is resting on the mounts, which are sitting on the crossmember. The mounts just arent bolted down.
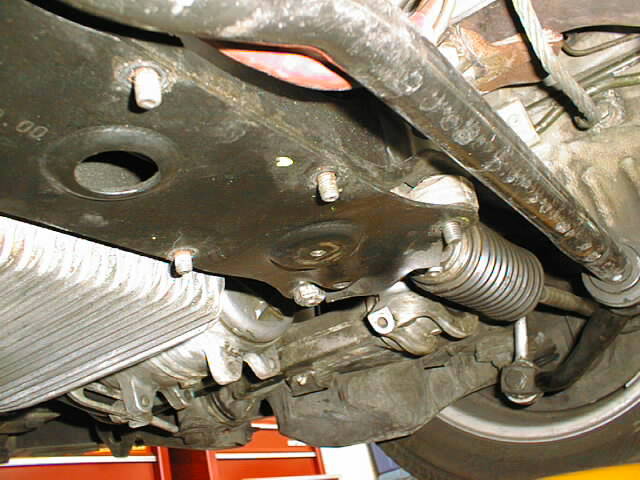
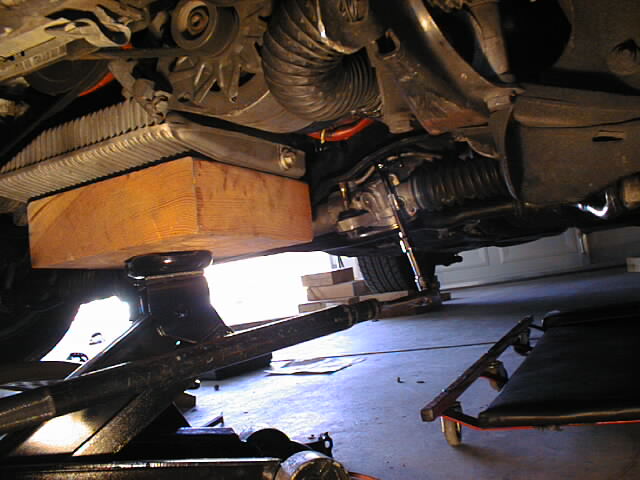 Next
i took my floor jack and a a wide flat piece of wood and
supported the engine via the oil pan. Once in place i slowly
lifted the engine....just a bit at time, checking now and then
for clearances in the engine compartment. At this point the weight of the engine
is off the mounts and the lower crossmember.
This picture also shows the room i had to work underneath as well
as the cheater bar i used on the main mount bolt on the
crossmember.
Next
i took my floor jack and a a wide flat piece of wood and
supported the engine via the oil pan. Once in place i slowly
lifted the engine....just a bit at time, checking now and then
for clearances in the engine compartment. At this point the weight of the engine
is off the mounts and the lower crossmember.
This picture also shows the room i had to work underneath as well
as the cheater bar i used on the main mount bolt on the
crossmember.
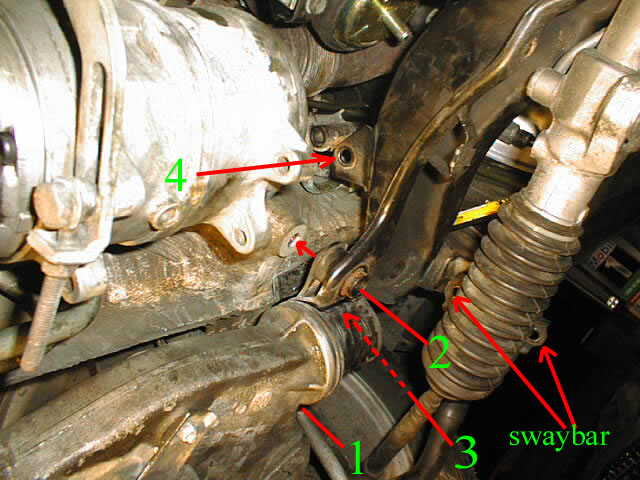
Next thing is to lower the crossmember out of the way( the engine is now supported by the jack), This will give you the room you need to manipulate the mounts out from the engine compartment. There are 8 bolts total (4 a side basically)......... 2 of the bolts will be on the aft part of the lower control arm and thread vertically into the car. # 1 and #2 above).... 1 more bolt, one a side...#3 (which is out of view in the picture) that also threads vertically into the cars frame assembly. The last one could be easily missed (#4). It sits on top of the crossmember near the inside lower part of the fender wall. This bolt is threaded in a horizontal direction and when loosened will have to be tapped out.
 The
weight of the engine is still on the jack and the crossmember
should be able to be pulled down a few inches. This will free up
the mounts so they can be removed.
The
weight of the engine is still on the jack and the crossmember
should be able to be pulled down a few inches. This will free up
the mounts so they can be removed.
The next thing i did was remove the heatsheilds next to the exhaust headers. The bolts were a bit tough to get at but it allowed me a lot more room to manuever the mounts in and out. Each shield has 2- 10mm bolts. You may or may not have to remove it.
With all this accomplished and a fair bit of manipulation a manged to get the old mounts out.
"one of our engine mounts has been secretly replaced by a NEW one, can you guess which one?" : )
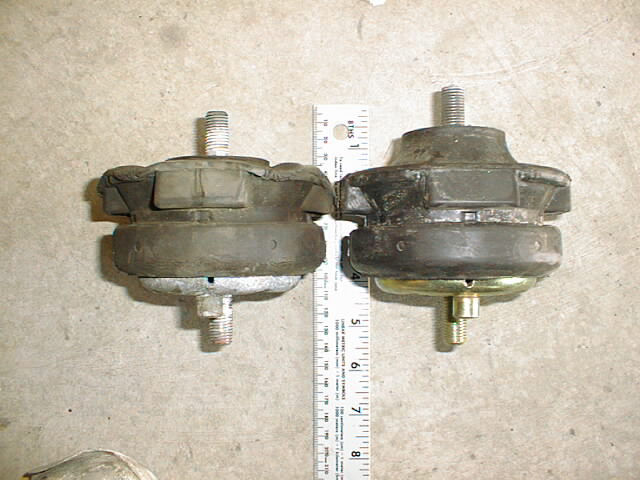
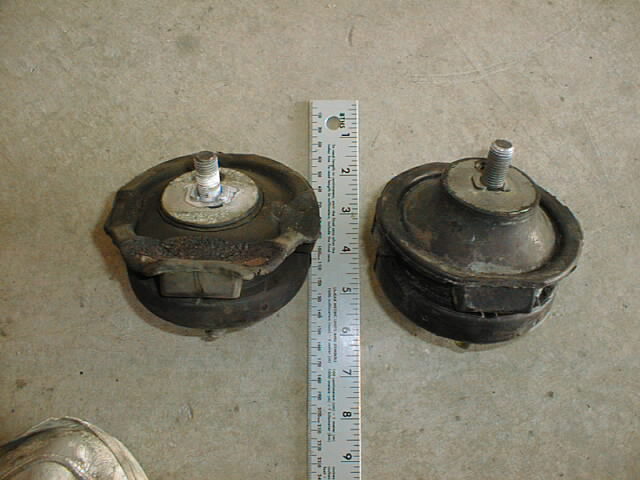
 as
you can see, there is a SIGNIFICANT difference in the amount of
dampening availble with the new mount!!!!!! The old ones were
shot, the mount frame was embedded in the rubber and i had to pry
them apart!!
as
you can see, there is a SIGNIFICANT difference in the amount of
dampening availble with the new mount!!!!!! The old ones were
shot, the mount frame was embedded in the rubber and i had to pry
them apart!!
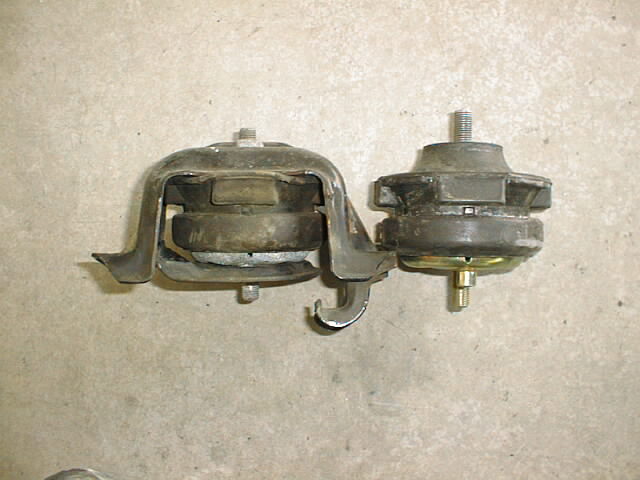
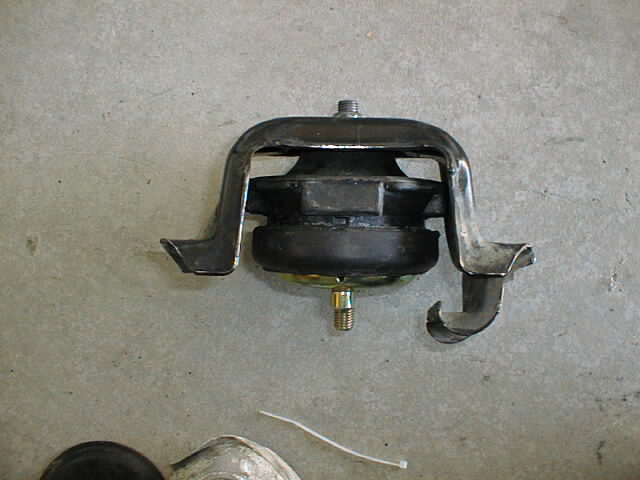 I
removed the old mounts from there frame work and installed the
new ones and again, with a bit of manipulation , I
"shoehorned" them in.
I
removed the old mounts from there frame work and installed the
new ones and again, with a bit of manipulation , I
"shoehorned" them in.
The rest of the installation is basically reversing the process.
A few tips:
Where safety goggles if you take off the heatshields..they are old and LOTS of rust will fall the second you touch them!
I used a jack to help push the lower control arms back up into postion and to a point where i could get the threads started on the bolts when putting it all back together.
I also found it easier after installing the mounts to first bolt them to the crossmember (not the engine) then get the crossmember reattatched to the car..then lower the engine onto the mounts/crossmember and line up the remaining 4 bolts that anchor the mount to the block. You will find that the new mounts are a bit flexible and should give you enough play to line up the holes. It wasnt easy but it worked!
The results: A marked improvement in the feel of my car, at all RPMS!! especially around 1500 and idle. After hooking up the battery, it was bizzare looking in the engine compartment and watching the engine rock as the car idled. As you know it will idle a bit rough at first. The engine NEVER moved before with the old mounts! All the rocking, vibration was being transmitted into the rest of the car.
All in all, it was a simple job in principle, but a pain in the butt considering the room you have to work with under the car and in the engine compartment......definitley worth while though!
I hope the pictures help.
Click the logo for parts by....
![]()