Well, my main objective in removing the intake manifold was to fix my FLAPPY VALVE (it wasnt even hooked up!!). The fix quickly became one of those "while you have it off and are in there fixes". With the intake off and looking at the valve cover condition i decided to have a go at them as well.....and......the rear camshaft seals/cam plugs, oil check valves....and since the valve cover paint needed to match the intake, a new paint job. Below are pictures and documention I have of the refinishing of these parts.
The paint was bubbling and flaking badly on both my intake and valve covers (87s4). After removal of the parts from the engine I started with ZIP STRIP...(thinking i could strip the paint myself) brushed it on nice and thick...left it all night....then the next day ran a high pressure water hose on it......a good share of it did come off but I tell ya what, the covering/paint that PORSCHE uses was very tough and very thick (the thickness maybe why it was flaking badly). Later in the process i found an area in a nook and cranny that had well over 3/8th of an inch of paint on it!!! For the remainder of the removal i had the parts bead blasted (glass beads) at "The Strip Center" here in Las Vegas (no snide remarks either guys : ) ) The parts came out with a nice bare metal finish but the guy that did the work said some areas were VERY tough to remove.
I had debated wether or not to strip the underside of my valve covers and the inside of my intakes....well...i did. The reason being that there was enough corrosion in the metal castings that some of the paint was flaking out of site...in areas that have direct access to the inner workings of the engine.
After I had sanded a good share of the BAD pitting away in the metal with a vibrating sander and some elbow grease, I filled in the remaining smaller pitted areas with filler (TIP----WEAR A MASK TO KEEP FROM INHALING THE METAL DUST). I actually used a "bondo" type filler. After a finish sanding and scuffing the surface up for better Primer adhersion, I gave all the parts an "acid wash". This was after reading a few other website postings on the process. The stuff I used was PPG DX-533....an aluminum prep/cleaner (the mailings I read said its a DUPONT product..but the guy at the paint shop said it was PPG.??) Anyway, the stuff definitely seems to work!!!! I diluted it per the instructions, 3-1 with water ( I had distilled...couldnt find "demineralized") and filled a spray bottle. I then sprayed the solution on the parts. Within seconds it started to foam and bubble, turning the fresh, shiny, sanded finish of the parts a dull grey color. I then let them sit for a few minutes and rinsed it all off with distilled water. WEAR RUBBER GLOVES.....EYE PROTECTION......AND DONT SPRAY THE ACID SOLUTION IN THE WIND!!!! The finish left behind was dark grey and very "dry" looking.
After the parts were rinsed and dry, I remembered the talk about "outgassing and powder coating" ....well....I wasnt powder coating my parts but I thought what the heck, wouldnt hurt to bake them a bit. From what I had read, I had an understanding of what OUTGASSING was. My "other half" just happened to be away and, yes, I had the oven to myself : ) ...I placed the parts in and baked them at about 300 degrees for 1/2 hr. When I pulled them out I was amazed to see that what I had thought were stripped clean parts were covered in small "blotches" of oil!!!!! The heat...and I guess the principle of outgassing ( i believe this is what i was accomplishing ..haha) actually caused old oil to surface from the pores of the metal. In POWDER COATING i can now see why proper outgassing of the metal is important!! With oven mits and a rag I wiped the areas clean and baked them again. Well........uh..hmmmm.....of cousre when oil burns off.....it smells a bit.....but of cousre SHE will never know i used the oven for such a task...will she????
Anyway, the parts came out of the oven clean, dry and as far as i can tell, "outgassed"..to a point. Once again, I AM NOT AN EXPERT AT ALL THIS., but the fact is that i managed to draw some entrapped oil out of the metal and this may help my paint job be more resiliant! Anyway....thats what i did and after this i acid washed the parts again to be sure the surface oil residue was gone.
ABOVE ALL....I believe the key in all this is PREP...PATIENCE...and PLANNING....the paint on the outside is only as good as the preperatiuon underneath....time will tell!
One TIP for sure........ DURING THIS WHOLE PROCESS, COVER THE OPENINGS TO THE ROLLER BEARINGS THAT HOUSE THE SHAFT OF THE FLAPPY VALVE!!!! You dont want to contaminate these bearings and cause your flappy to stick after all this work!
Some of the things that I would recomend..if not require!!!!
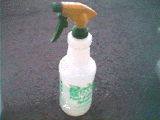
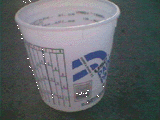
Dealing with an acid solution you must have SAFTEY GLASSES and GLOVES. I used a regular plant sprayer to apply the acid wash and a graduated container from a paint shop to get the acid solution to a 3-1 ratio (3 parts water).I collected the runoff in a large tupperwere type container.
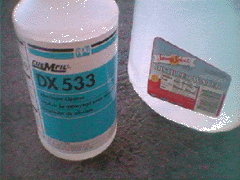 This is the product I used from reading
all the other helpful sites and posts out there. Its is PPG
(product brand) DX-533.....$9.50 a quart by the way....but dont
worry a quart is MORE than enough after you dilute a small
amount. Like i said, I had read many places that it was made by
DUPONT? But the guy at the paint shop said PPG? Anyway the water
jug contains distilled water ( i used about 8 gallons as a
rinse??), i couldnt find any de-mineralized water. The principle
being that RINSE THE PARTS WELL when your done!!
This is the product I used from reading
all the other helpful sites and posts out there. Its is PPG
(product brand) DX-533.....$9.50 a quart by the way....but dont
worry a quart is MORE than enough after you dilute a small
amount. Like i said, I had read many places that it was made by
DUPONT? But the guy at the paint shop said PPG? Anyway the water
jug contains distilled water ( i used about 8 gallons as a
rinse??), i couldnt find any de-mineralized water. The principle
being that RINSE THE PARTS WELL when your done!!
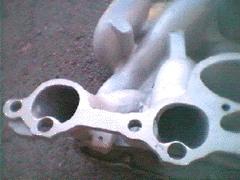
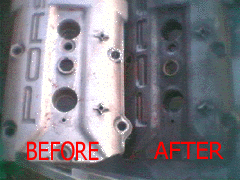
The pictures above simply show what the parts looked like before i "washed" them, they were freshly bead blasted and sanded in some areas. To clean out the 13years of CRUD caked to the inside of the intake tubes i used everything i could from ZIP STRIP to CARB CLEANER, WIRE BRUSHES and a HONING TOOL.. With some patience and some elbow grease i ended up getting them very clean!
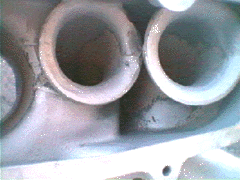
 This picture shows what the DX533 did
to the finish. Before, it was freshly sanded and bright. After,
the metal turned a dull grey color and was very dry looking. Once
i sprayed the soltution it, it immediatley began to foam up. I
sprayed the parts over a big plastic "tupperware"
container so as the solution ran off it was caught. I let the
solution sit a few minutes untill the white foaming stopped and
then rinsed the parts with water. I did this twice to each part.
This picture shows what the DX533 did
to the finish. Before, it was freshly sanded and bright. After,
the metal turned a dull grey color and was very dry looking. Once
i sprayed the soltution it, it immediatley began to foam up. I
sprayed the parts over a big plastic "tupperware"
container so as the solution ran off it was caught. I let the
solution sit a few minutes untill the white foaming stopped and
then rinsed the parts with water. I did this twice to each part.
Now for the painting!! You can either do it your self like i did...or just take it to a paint shop and say "heres my $$$ and this is what i want done"
For priming i used "HIGH HEAT" enamel engine primer. You can find it at PEPBOYS..etc. I primed all the bare metal spots i could reach, this included both INSIDE and UNDER the intake manifold and valve covers.
The next step was to choose a color. This was the hardest part...... Do i stay original ???? or as Monty Python says "now for something completely different"??? I began by using some file pictures i had of S4 engines and "ran" the photos through PHOTOSHOP and edited the colors via "hand coloring" What a great tool this was, it really helped me get a good idea of what things may look like!!!
Below are a few of my creations, feel free to use them as well.........
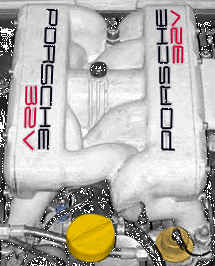
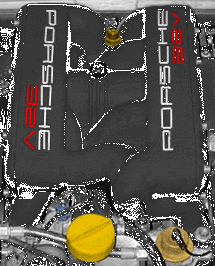
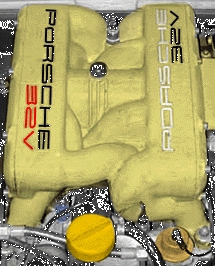
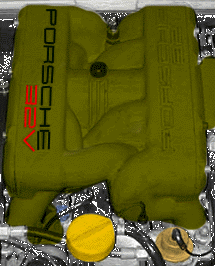
SIVER..........................................DARK GREY..............................GOLDish (as close as i could get to original)
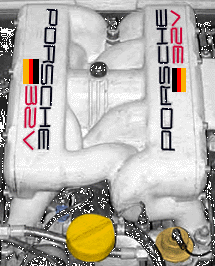
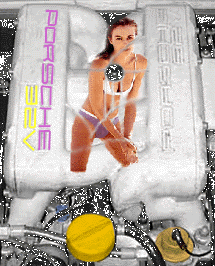
Olive drab...................Silver with the "flag of heritage"..........Limited edition Liz Hurely intake : )...How did that get in here???

ALL done..cleaned up and ready to BWAAAAAAHHHHHHH!!!
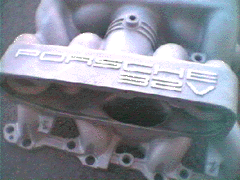
Well, i ended up choosing a silver/goldishcolor as the LIZ HURLEY scheme was beyond my painting abilities.... : ). The Exact color i used was PLASTI-KOTE #5317 a regular spray can automotive paint. Its is actually a HONDA color!. I sprayed both the intakes and valve covers with this...underneath, and in every nook and cranny i could. In my mind the color looked really sharp. After the paint was dry i then tried to figure out how i could paint the raised and resessed letter on the parts.."PORSCHE.....32V". I wasnt too kean on brushing it on or masking the parts off and spraying. Then it occured to me while i was in HOBBYTOWN!!! Paint Pens!! I bought 2 TESTORS paint pens, one RED and one BLACK. Turned out that the felt tip on the pens is a PERFECT match to the width of the lettering used on the parts. With some patients and a steady hand the paint went on flawlessly. For those that just want a quick way to "spruce" up your engine this may be a good idea (also works great on center caps...web page to follow). After all the parts were dry, i again applied "HIGH HEAT" engine enamal CLEAR COAT every where i could to protect the finish.
Once again, i stripped all my parts to the bare metal, both inside and under the intake and valve covers. Some of your parts maybe in better shape than mine. I was concerned about the considerable falking that was going on "out of sight". The only real question left in the whole process is durability, especially under the vavle covers where the paint will be exposed to the high heat splashing of engine oil. I plan on pulling one of the valve covers in the next 3000 miles or so to see what the finish looks like after being exposed to the engine environment. In the long run though, i felt that refinishing was a better option for me than letting the underside of the vavle covers to continue to corrode (if i left them bare) or having chunks of paint flakeoff that was originally applied at the factory. Once again, Im NO PAINT PRO but this is how i went about things and so far the enigne bay looks 100% better!!.
As you can see my "flappy valve" project eventually became quite an extensive one, but it was all worth while , very easy to do and i learned a heck of a lot more about the car!.