Well this little project started as a result of my radiator having a very slow leak. As you may know the radiator on these cars is aluminum but is mated to plastic end caps on either end. The rubber seal that sits between the aluminum and plastic is apparently a common failing point. My car had been running a little bit warmer than usual and the higher temps I think made for higher internal pressures in the cooling system. It was these higher pressures that focused themselves on the weak link in the radiator, the rubber seals and plastic ends. My theory was that if i can get the car to run cooler i may be able to "buy" myself some time and not have to fix the radiator at this point...$$$$$$$. Another reason for the flush and T-stat was that i had NO idea when it was done last by the PO. Below are some pics and descriptions of what i did in an sunny afternoons work.........................
As a reminder im not a PORSCHE MECHANIC, just a person with average mechanical ability, perhaps others may have other ways of doing this but all this worked for me!!
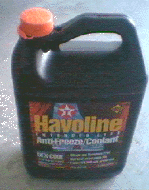
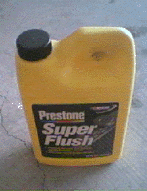
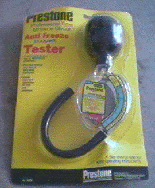
The first step in the process it to get the needed parts which, for me, was simply a new 83 degree Thermostat from 928International (MAKE SURE YOU HAVE A NEW O-RING!!!) While your doing this job check the integrity of all your coolant hoses as this would be a good time to change them as well. Knowing i had the part i needed i then ran over to PEPBOYS and bought some PRESTONE RADIATOR FLUSH , 2 gals of Havoline/texaco DEXCOOL radiator fluid ( the orange stuff), a coolant tester ,and on the way back home picked up 3 gallons of DISTILLED WATER from the grocery store.
silicate and phosphate free DEXCOOL.....flush solution....and a handy tester!
I drove the car up on my ramps to get access to the underside and chocked it. I then rouned up a small garbage pail and a tupperwere container to catch the fluid as i drained it. The 928 will hold about 4 gals according to the OWNERS MANUAL. The car had only been started to drive it on the ramps so it wasnt HOT.
Next step was to drain the coolant.
1). Take off the cap on the expansion tank.
2). Place the garbage pale under the drain on the radiator (pics below) and remove the BLUE drain plug
3) Slide under the car and undo the DRAIN PLUGS (13mm bolts) on either side of the block allowing the coolant to fall into the larger tupperwere conatiner. DO THIS WHEN THE ENGINE IS COOL OR WARM....NOT WHEN ITS HOT...OUCH!!!
From what i had researched earlier i had read that the bolts on the block could be cause for a lot of trouble (fused solid, stripped, broken off etc) so i was apprehensive about even touching them. I placed my 13mm wrench on them and then with the aid of a hammer ...GENTLEY.....GENTLEY tapped the end of the wrench (same principle as an impact driver i guess) each tap i hit it just a bit harder until it gave. Suprisingly mine werent in that bad of shape, however, when the bolt finally broke free it made one heck of a horrible snapping sound and i thought OH NO!! I broke it!!! Like i said it was the sound of it breaking free and I actually unthreaded it the rest of the way with my fingers!!
Once the plugs were all removed the coolant drained freely. Any extra that spilled i just washed away and diluted with the garden hose. Once i saw the coolant i was glad i was doing a flush, it was green, but looked like it had been in there for ages!
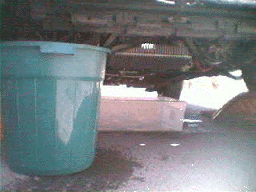 ...the setup
i used to catch the coolant....
...the setup
i used to catch the coolant....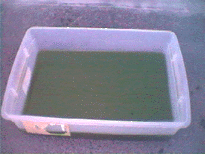
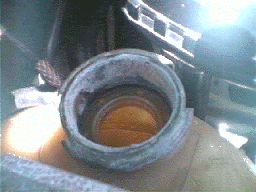 Cap removed from
the expansion tank
Cap removed from
the expansion tank
 Lower
passenger side of radiator, drain plug.
Lower
passenger side of radiator, drain plug.
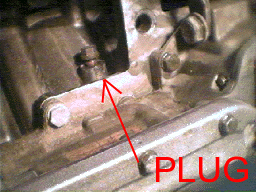 Engine block
drain plug. 13mm ...and can be very tight.....be careful and
patient when "unsticking it!!!" This is the one on the
passneger side, the other one is in similar location on the other
side of the block. In this picture the plug/bolt is partailly
removed. The bright silver part at the bottom is the oil pan for
reference. Think about cleaning the threads with a wire brush and
using some anti-sieze compound when you reinstall them.
Engine block
drain plug. 13mm ...and can be very tight.....be careful and
patient when "unsticking it!!!" This is the one on the
passneger side, the other one is in similar location on the other
side of the block. In this picture the plug/bolt is partailly
removed. The bright silver part at the bottom is the oil pan for
reference. Think about cleaning the threads with a wire brush and
using some anti-sieze compound when you reinstall them.
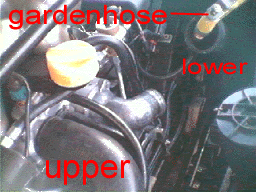
With all the coolant drained i first flushed the system out with the garden hose and straight water pressure. I placed the hose in the expansion tank and let her rip. A few seconds later water was gushing out of the drain holes in the block.
Now......I wasnt too sure on the "routing" or the direction of flow of the 928 cooling system so i started undoing the upper and lower radiator hoses next to be sure that the radiator got completely flushed. With them both off and the drain plug installed, I pinched the lower radiator hose around the garden hose and let the water fly. Once again the water shot out of the upper hose carrying a few little pieces of crud with it.
The next angle i "attacked " this job was by capping off the expansion tank, keeping the drain plug in the radiator, leaving the engine block plugs OUT then reattaching the UPPER radiator hose. The only hose not hooked up now in the system was the lower radiator hose and this is where i placed the garden hose next. Squezzing the radiator hose around it for a better seal, I again sprayed the water and few seconds later the water gushed out from the 2 engine drain holes.
Feeling pretty certain that i sprayed water down every posibble cooling passage i buttoned the system up and filled the expansion tank with water and the PRESTONE FLUSH. I followed the directions on the container and ran the car at idle for 10-15 minutes with the heater on to let the FLUSH solution do its job. When you do this i recomend keeping an eye on the TEMP GAUGE as well, just in case. As an added measure, call it overkill i suppose, i ZIP TIED down the hood switch that shuts of the cooling fans when the hood is open. CAUTION..THE FANS SLICE... THEY DICE ...THEY CHOP!!! Atleast this way i had another indication of when things are getting hot.
After the allotted time i shut the motor down let it cool a bit and drained the FLUSH solution. ( took off expansion cap, radiator and engine plugs) The water that came out was VERY WARM /HOT and actually quite clean which was somewhat reassuring, however i did see a few flakes of crud and stuff flow out now and then.
After the engine cooled a bit more i filled it back up with regular water again.....flushing out the flush solution i guess (thats what the instructions said to do). Having operated many aircraft engines I am well aware of the principle of SHOCK COOLING so i was a little cautious about adding cold water to the engine right away. With horrible images of cracked blocks, warped head etc etc.... i let the engine cool quite a bit. Perhaps my thinking is off a bit but the last thing i wanted to hear was CRRRRRRRRRRRRRACK..DRIP...DRIP....after adding cold water to a recently ran, hot engine! The time went by and the engine was flushed clean with water and allowed to drain. I then reinstalled all the drain plugs and moved on to the next task.....REPLACING THE THERMOSTAT. (TIP...perhaps place a little anti seize compound on the block plugs...you never want to be in the postion of stripping those bolts!)
Living in Las Vegas and daily 100'F + days in the summer i wanted my cooling system working as well and as efficiently as it could. Prior to this job the needle would at time slowly creep well above the last white mark on the guage and many times trigger the MASTER WARNING and TEMP WARNING!! .....other times it ran perfect, right at the horizontal postion on the temp guage. This isnt good, especially when the car hasnt even seen a 90"F day in Vegas yet! My conclusion was that the Thermostat was sticking or just plain old!!
I ordered a replacement from 928Intl. It was and 83degree T-Stat and came with a NEW O RING. If the car continues to run warm in the summer i may go to a cooler on...75 degree i believe? The part itself is easy to get at and would take under an hour to change if everything was in good shape.
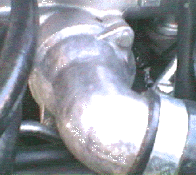
The T-Stat sits on the front of the engine in the "L shape" pipe/housing that comes of the cooling manifold (thats what i call it). The pipe is held on by two 10mm bolts. This job is made easier if you can remove all the cooling hoses that are in the way. I read a few postings that the metal fuel line had to be removed to gain access to the lower10mm bolt?? I didnt have to do that and with a bit of patience and an offeset wrench i managed to get the lower bolt out with out any hassle at all!!!
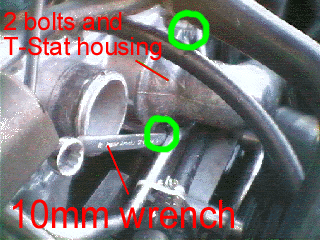 As you can
see you can get a wrench (offset wrench) on the lower bolt behnd
the fuel line. You can only turn it a few degrees at a time but
hey.....whats the rush!! (TIP...to reinstall the lower bolt i
used a pair of needle nose pliers to hold the bolt and manipulate
it into the hole)
As you can
see you can get a wrench (offset wrench) on the lower bolt behnd
the fuel line. You can only turn it a few degrees at a time but
hey.....whats the rush!! (TIP...to reinstall the lower bolt i
used a pair of needle nose pliers to hold the bolt and manipulate
it into the hole)
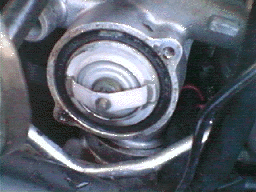
After the bolts were off i gentley pulled on the housing and the part popped/snapped away from the rubber seal. It had been there a while i think! After this is off you have a full view of the T-Stat as it sits.
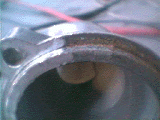
 This is
the old T-Stat....note the corrosion and crud around the fitting.
From this point you simply pull the part out! Well in my case not
so simply!! My part was stuck/fused really well in there.
Actually took a phone call to Tom at 928Intl to verify that the
T-Stat isnt bonded..screwed...or held in the housing by some
means! (thanks Tom!!) With a nice wide blade screwdriver and a
rag I gently pried the part out. It speparated from the housing
with almost a ripping sound....it had been there a while and as
Tom pointed out the coolant was probably weak allowing for some
corrosion to form and the part to stick........damn previous
owners!!!!!! NOTE THE O-RING IS ON THE
OUTSIDE!!!! A MUST TO REMEMBER WHEN INSTALLING IT LATER!!!
This is
the old T-Stat....note the corrosion and crud around the fitting.
From this point you simply pull the part out! Well in my case not
so simply!! My part was stuck/fused really well in there.
Actually took a phone call to Tom at 928Intl to verify that the
T-Stat isnt bonded..screwed...or held in the housing by some
means! (thanks Tom!!) With a nice wide blade screwdriver and a
rag I gently pried the part out. It speparated from the housing
with almost a ripping sound....it had been there a while and as
Tom pointed out the coolant was probably weak allowing for some
corrosion to form and the part to stick........damn previous
owners!!!!!! NOTE THE O-RING IS ON THE
OUTSIDE!!!! A MUST TO REMEMBER WHEN INSTALLING IT LATER!!!
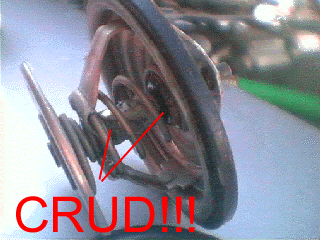 close up of the old
T-Stat..old O ring and the cause of my sticky T-stat!
close up of the old
T-Stat..old O ring and the cause of my sticky T-stat!
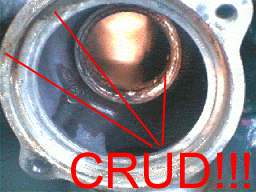
 before and
after!!!!....This is where the T-stats sits. I ended up cleaning
the deposits off with a wire brush on my Dremel tool....she was
all nice and polished and smooth when i was done!!
before and
after!!!!....This is where the T-stats sits. I ended up cleaning
the deposits off with a wire brush on my Dremel tool....she was
all nice and polished and smooth when i was done!!
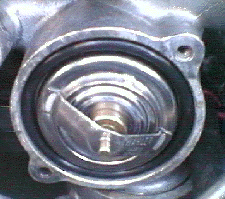 here is the
the new one installed (NOTE THE O RING)
here is the
the new one installed (NOTE THE O RING)
 all shined up and
installed!!
all shined up and
installed!!
After the T-stat was installed i premixed up the antifreeze to a 50-50 solution with distlilled water in a large bucket and slowly poured it in the expansion tank. After it settled i ended up getting just over 3 gal in it. After this i started the car, leak checked it, check the temp gauage and ended up adding a bit more coolant as the air pockets were slowly expelled. With a quick high speed run out to Red Rock here in vegas the guage never budged from the horizonatal and my radiators slow leak apparantly has stopped!! Time will tell...but if anything i have peace of mind knowing that my coolant is fresh and the water pump is being taken care of (sure that will be the next thing to go...you watch!!) Next item is to add some REDLINE Water Wetter.
I hope all this helps those that need it. Please feel free to email me and let me know if something is in error or if you have a better tip for doing someof these things.