"COMB
FLAP" Behind the center vent
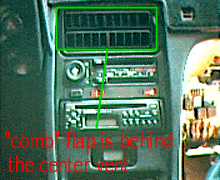
 The "comb flap" is located behind the
center vent and it looks like a big comb..hence the name. The
actuator for the flap is behind the center console, just below
the right corner of the green box in the picture. To get at it
and have unrestricted access i removed the center console. Once
the console is removed getting at the actuator is easy. It is
getting to the actuators arm that connects to the flap that is
the tougher part!!! To get the arm off the flap i separated the
acctuator halfs, leaving the bottom still attached to the center
vent area. I then took the top half and gentley twisted and
rotated it side to side. With a little patience the arm easliy
came off the link inside which is out of view. All you have to do
then is pull the whole arm through the hole in the bottom half of
the actuator.
 NOW....The tricky part of the operation is
placing the new actuators arm back on the link it came off!
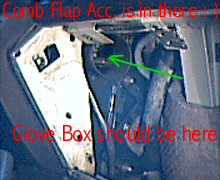
<evil grin> To do this i removed the glove box and the tube
that connects the center vent to the arm vents on the door. Then
using a mirror, a mini maglite and a socket and extension I
manipulated the new arm over the link and gently pushed it back
on with the socket extention.
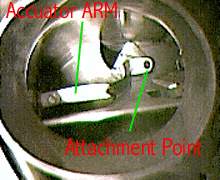
 I took this picture with the camera held up to
the hole by the center vent area. It shows the actuators arm and
the link which it attaches to on the flap. This is the same view
I got when I used the mirror to view it. The goal is to get the
hole in the actuator arm OVER the attachment link on the flap.
Once you get it on there, just apply gentle pressure with the
socket extension and push it on. The hard part is just
manipulating the link as you view the operation via a mirror!
Once you get use to that, it will be on in a few minutes.
Remember, once its all together check the new actuator for
leaks!!!!
This is the way i did it....but if all
else fails.....IMPROVISE......I hope this all helps a bit.
***BACK HOME***
 The "comb flap" is located behind the
center vent and it looks like a big comb..hence the name. The
actuator for the flap is behind the center console, just below
the right corner of the green box in the picture. To get at it
and have unrestricted access i removed the center console. Once
the console is removed getting at the actuator is easy. It is
getting to the actuators arm that connects to the flap that is
the tougher part!!! To get the arm off the flap i separated the
acctuator halfs, leaving the bottom still attached to the center
vent area. I then took the top half and gentley twisted and
rotated it side to side. With a little patience the arm easliy
came off the link inside which is out of view. All you have to do
then is pull the whole arm through the hole in the bottom half of
the actuator.
 NOW....The tricky part of the operation is
placing the new actuators arm back on the link it came off!
<evil grin> To do this i removed the glove box and the tube
that connects the center vent to the arm vents on the door. Then
using a mirror, a mini maglite and a socket and extension I
manipulated the new arm over the link and gently pushed it back
on with the socket extention.
 I took this picture with the camera held up to
the hole by the center vent area. It shows the actuators arm and
the link which it attaches to on the flap. This is the same view
I got when I used the mirror to view it. The goal is to get the
hole in the actuator arm OVER the attachment link on the flap.
Once you get it on there, just apply gentle pressure with the
socket extension and push it on. The hard part is just
manipulating the link as you view the operation via a mirror!
Once you get use to that, it will be on in a few minutes.
Remember, once its all together check the new actuator for
leaks!!!!