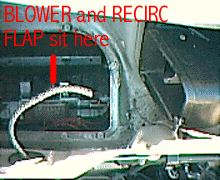
Air recirculation
flap
The Air recirculation flap is used to basically
choose the source of air for the cabin...either outside or
inside. The flap is located under the dash in the passenger
footwell area and consists of a simple flap that opens or closes
via .....yes...... vacuum operation and directs the source of
incoming air. The flap in my car was "frozen" shut. The
foam seal around the edge of the flap was fused to the plastic
grate and didnt allow the flap to move. The vacuum actuator also
had a leak.When I forced it open there were leaves twigs other
dirt and debris in there. I dont know how long the flap was INOP
but it isnt any more.!!
 This shows the blower assembly that
sits under the plastic tray under the hood. I removed the blower
when I repaired the flap and cleaned it out as well. The vanes on
the fan were caked up and the motor needed a cleaning. I cleaned
the motor with electrical contact cleaner and it seemed to made
noticeable difference in its speed! While I had the motor out i
checked the general conditon of it , cleaned the connections and
appeared like it had plenty of life left.
This shows the blower assembly that
sits under the plastic tray under the hood. I removed the blower
when I repaired the flap and cleaned it out as well. The vanes on
the fan were caked up and the motor needed a cleaning. I cleaned
the motor with electrical contact cleaner and it seemed to made
noticeable difference in its speed! While I had the motor out i
checked the general conditon of it , cleaned the connections and
appeared like it had plenty of life left.
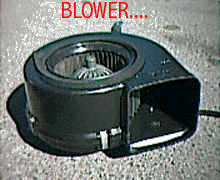 Heres a good
shot of the blower after it was removed.
Heres a good
shot of the blower after it was removed. 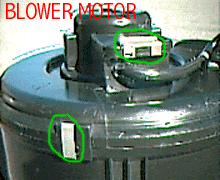 This photo shows the clips that hold the blower
assembley together, Once you "pop" these off you have
easy access to the motor itself. While its out...you might as
well clean it and all the wiring and contacts.
This photo shows the clips that hold the blower
assembley together, Once you "pop" these off you have
easy access to the motor itself. While its out...you might as
well clean it and all the wiring and contacts.
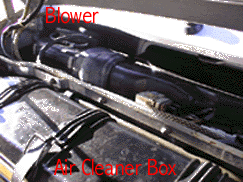
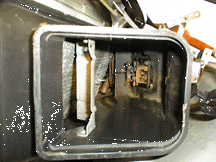
 You are
looking down from hood area into the pax footwell where the
recirculation flap sits inside the grate assembly...under the
blower. The fuse panel was lowered to get easier access to the
bolts holding the grate in place. (DISCONNECT
THE BATTERY!!) You will find that the grate is also sealed
with a sticky compound to help make a seal. With a little
pressure the sealant does give way.
You are
looking down from hood area into the pax footwell where the
recirculation flap sits inside the grate assembly...under the
blower. The fuse panel was lowered to get easier access to the
bolts holding the grate in place. (DISCONNECT
THE BATTERY!!) You will find that the grate is also sealed
with a sticky compound to help make a seal. With a little
pressure the sealant does give way.
 While I had the blower out this area was exposed. This is where
all the air eventually passes before it enters the cabin. The
fins on the evaporator ( I believe thats the term) were
"caked up" with a thick layer of lint, very similar to
what you would find in your dryer at home except a bit oilier. I
used a toothbrush and gently cleaned the fins with an up and down
motion as to not damage them. They are very delicate and are the
same in appearance as the ones on the front of the radiator. Once
the lint was brushed off I used the shop vac to suck it all out.
It looks new now. I cant wait to feel the difference in flow!!!
While I had the blower out this area was exposed. This is where
all the air eventually passes before it enters the cabin. The
fins on the evaporator ( I believe thats the term) were
"caked up" with a thick layer of lint, very similar to
what you would find in your dryer at home except a bit oilier. I
used a toothbrush and gently cleaned the fins with an up and down
motion as to not damage them. They are very delicate and are the
same in appearance as the ones on the front of the radiator. Once
the lint was brushed off I used the shop vac to suck it all out.
It looks new now. I cant wait to feel the difference in flow!!!
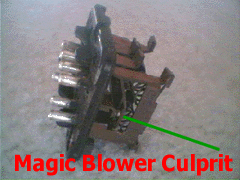
 This
is the the resistor pack that many people talk about. This part
is usually responsible for "the magic blower syndrome"
and is located in the area you see above, way back in there. To
help you locate it, you will find a 7 pin connector on the outide
of the blower tunnel that is anchored by 2 screws. This is the
part.
This
is the the resistor pack that many people talk about. This part
is usually responsible for "the magic blower syndrome"
and is located in the area you see above, way back in there. To
help you locate it, you will find a 7 pin connector on the outide
of the blower tunnel that is anchored by 2 screws. This is the
part.
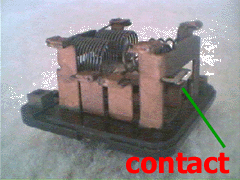
There is a small, normally open contact on the
part that is atached to a strip made of two different metals. As
the air over the pack gets too hot the metal strips bend and
cause the contact to close and the blower to come on for no
apparent reason.....BLOWING HOT AIR!!. The quick fix was, for me
atleast, was to increase the space between the contact by a few
MM. So far so good. It will also be a good time to clean all the
post and contacts on the part. As you can see mine are all shiny
again!!
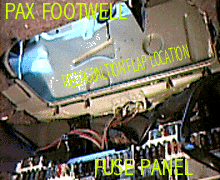 This is a
view from the passenger footwell at the area where the grate and
flap are located. The fuse panel has been lowered and the grate
drops down from this area.
This is a
view from the passenger footwell at the area where the grate and
flap are located. The fuse panel has been lowered and the grate
drops down from this area.
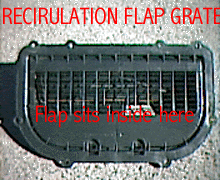 This is the grate that sits in
the area above...all clean !! The flap sits inside here.
This is the grate that sits in
the area above...all clean !! The flap sits inside here.
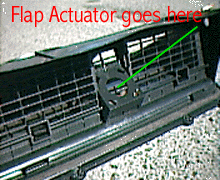 This shows
where the actuator is attached to the grate. The arm from the
actuator connects to the flap inside and moves it back and forth.
This shows
where the actuator is attached to the grate. The arm from the
actuator connects to the flap inside and moves it back and forth.
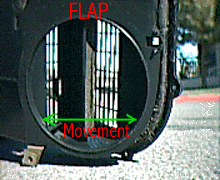 This shows the flap itself. In operation the flap
is either OPEN or CLOSED. I postioned this so you can see the 2
intake options for the air.
This shows the flap itself. In operation the flap
is either OPEN or CLOSED. I postioned this so you can see the 2
intake options for the air.
The removal of all this stuff and the repair is
very easy. When all this is being done you will find areas of the
car that have accumulated alot of "crud" ....now is a
good time to clean it out.
BACK HOME