Well, it seemed like a good project to tackle during Christmas break from work. Unfortunately, Monday night, Dec 26, I had a computer meltdown that involved bad disk sectors appearing right smack in the middle of my registry file. After many fruitless attempts to get my backups restored, I found that the tapes were riddled with errors; an early casualty in the registry had knocked my backup software out of kilter and all of my recent(enough) backups were useless.
After much headbanging

 I managed to restore the bad sectors and the data on them, fix the few bytes in the registry that were actually scrambled, and get it all back. The only losses were two pics from my site, which I just re-downloaded from the site. So, you may ask, why all this talk about computers? Well.. I had planned to start this project on Tuesday, but I HAD to have the computer working ASAP, certainly before returning to work.
It took me till Thursday night to get it back shipshape, which is why this project started on the 30th.
 Also, having burned so much time with the computer, I felt rushed and didn't take as many pics as I would have liked.
So anyway, the problem was, when I filled the fuel tank all the way up, some gas would dribble out from the nether regions of the fuel system, where I couldn't see. From the drips on the right rear corner of the tank, I hoped the problem was just the breather hose that goes through the frame of the car, connecting the top of the tank to the filler neck so that the tank can be filled without trapping air.
Some words of caution are in order here IMHO:
- Do NOT attempt to remove any of the hoses from the plastic barbs/nipples while the parts are on the car. The plastic is too easy to snap while torquing on the lines, and you need max accessibility to get them off without damage. Just cut the hoses(not the high pressure hoses!) and sort it out later.
- Be very careful not to score or scratch the plastic fittings. Yes, you can cut the hose to get it off, but if you score the plastic you WILL have a leak there.
- Also be careful removing hose clamps -- with rust and age, they may take more force to break free than the plastic fittings can withstand. Use penetrating oil and hold the body of the clamp with pliers if needed to prevent straining the fittings.
- If you have a steady hand and a sharp(read: new) utility knife blade, I recommend removing hoses from fittings by cutting about halfway through the wall of the hose where it meets the fitting, along the length of the hose and in 4 or more locations around the circumference of the hose. Don't cut all the way through, just enough to weaken the hose so it will slide over the barb easier.
- If you add up all the lengths of hose in PET, items 20, 21,and 22, it adds up to 1.74 meters, and what you get when you order it is a length of hose of approximately this length that you cut to fit. Well, no matter how much I cut it to fit, there wasn't going to be enough so I picked up about a foot of 3/8" fuel line which I used to replace section 20, which is pretty easily accessible.
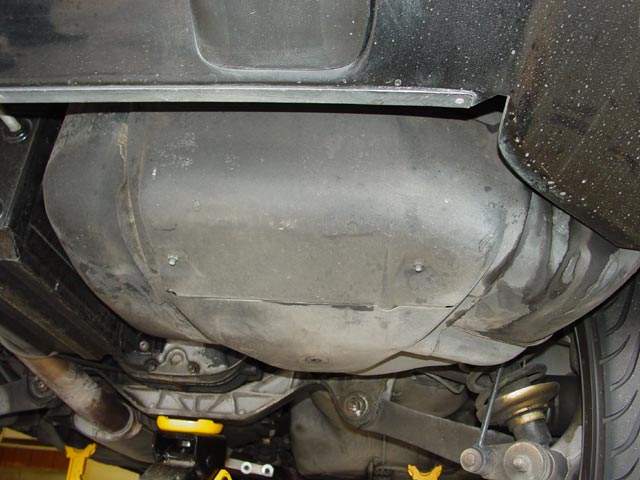
Step Two came a few days later -- I jacked up the car and put it on jackstands, then removed the right rear wheel. You can see below where it had been dripping, and you can see the two nuts that hold the rubber fuel pump standoffs to the thin metal plate(31)* that wraps around the bottom rear edge of the tank. These don't actually hold the plate in place, but they must be removed before you remove the plate. Remember, this is a 1978 car, other years vary. I think on at least 87+ the plate comes off leaving the pump and filter in place. Next, there are two nuts(17)* between the bumper cover and the tank that hold the plate in place, in conjunction with a lip at the bottom that hooks to the strap assembly or cradle(35). PET refers to it as a "Tank Covering", some call it a "strap" but I think cradle is a more accurate description. The seam where it hooks in place can be seen just forward of the nuts holding the fuel pump in.
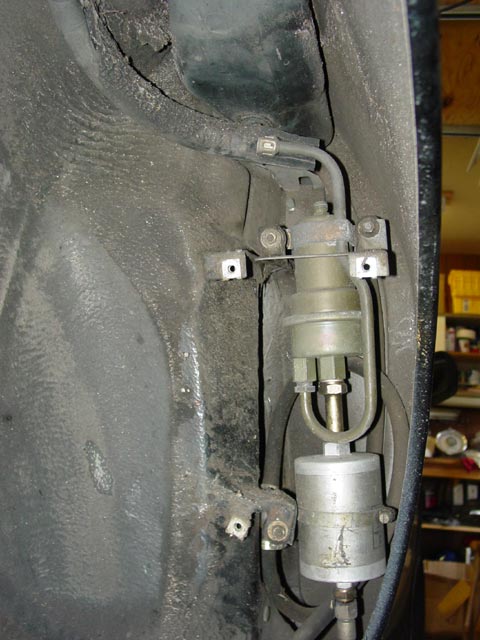
With the cover off, the primary fuel pump just hangs from the hoses.
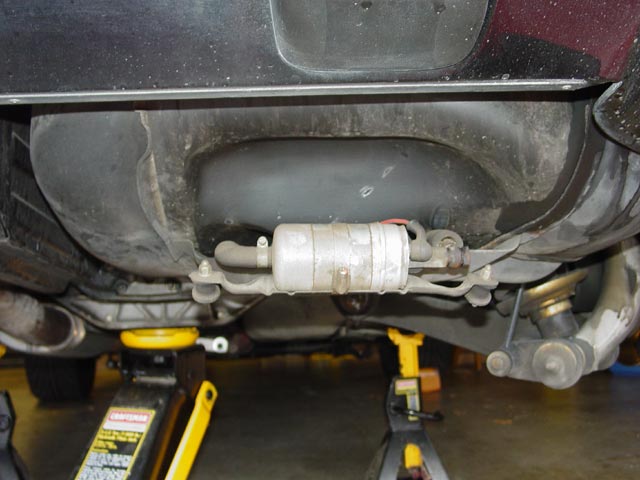
Here is a better view. On the left is the suction hose; count on replacing it. Mine must have been replaced at some point; it was in excellent shape, though a bit dusty. In this pic you can see the outlet fitting on the tank. This screws into place in a plastic boss that is welded to the tank. Ideally, you're better off not touching it if you can help it. I removed the fuel sending unit and was able to shine a flashlight into the tank and inspect the strainer. Mine seemed to be in perfectly OK condition, and a mild poke with a welding rod indicated that it wasn't hardened; it still seemed pliable. Apparently someone had replaced it at some point, as I expected it to be yellowed and hard as a rock.
You can see in this pic and the one above that the banjo fitting on the high pressure side of the pump had been seeping. The hose checked out fine though, aside from dust and gunk from seepage the plating on the swaged end was still shiny, the hose underneath the protective sleeve was soft and pliable. In the end it turned out that I only needed new crush washers to make it right.
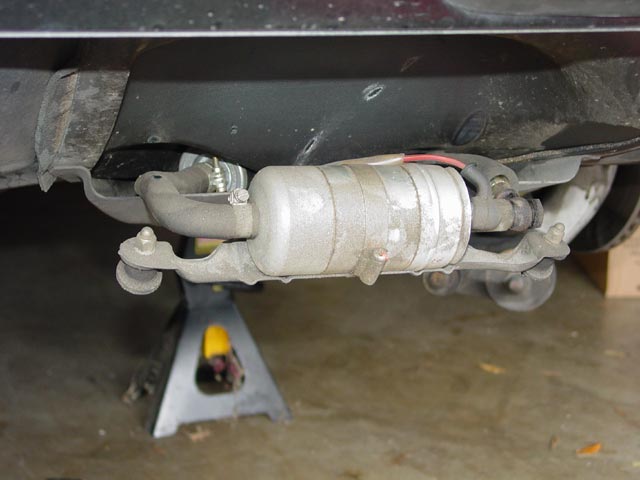
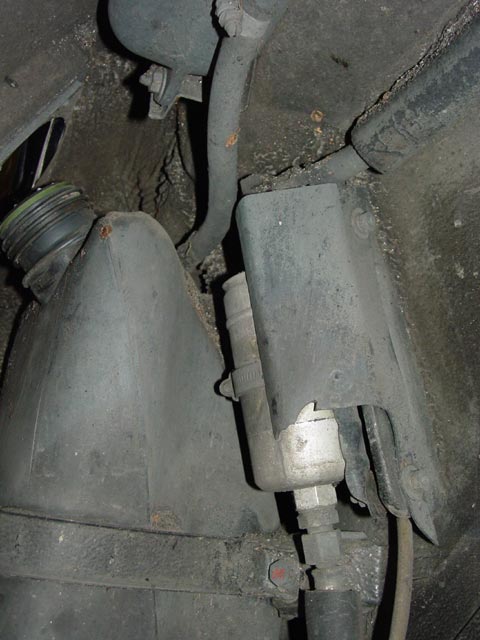
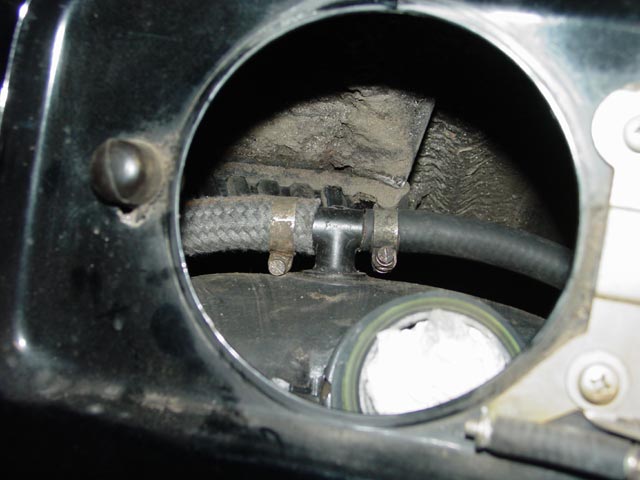
From there, the high pressure line runs directly to the secondary pump, which lives in the passenger rear wheel arch alongside the fuel filler neck. Beyond the pump you can see the tail end of the expansion tank and the vent line that leads to it. This pump needs to be dismounted and moved aside, though it shouldn't be necessary to disconnect wires or fittings unless you have some other reason to do so. Just support the pump so it doesn't put undue stress on the fuel lines -- the two lines that connect to it are NLA and would have to be rebuilt(Update: Rebuilt mine). While securing the secondary fuel pump, keep in mind that it has to be able to move clear of the filler neck as it comes down, and that the line between the two pumps will be supported solely by the fitting on the secondary pump after you lower the cradle(35).
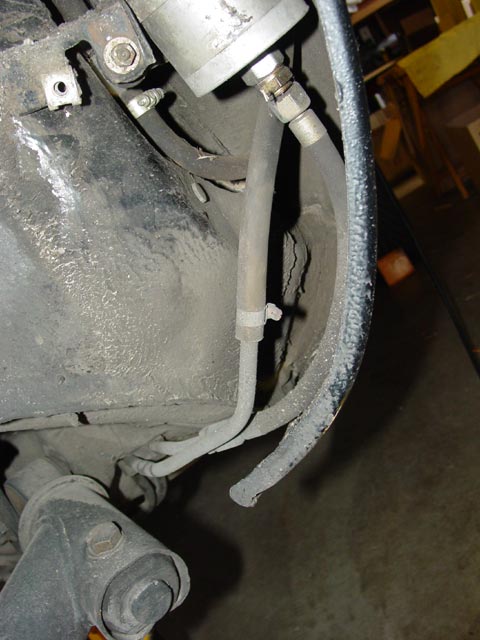
Here's another view, showing the two nuts that have to be removed to get the pump out of the way, my cracked splash shield, and the(dry, thankfully) banjo fitting that goes from the outlet of the secondary pump to the accumulator. In this pic as well as the one above, you can see the strap and bolt that secures the filler neck, and the rear bolt that holds the expansion tank. In the pic below I have removed the grommet that goes between the body and the filler neck. It was starting to crack a bit, so I replaced it. Go ahead and remove the bolt for the strap around the filler neck whenever it's convenient -- just be sure to do it before loosening the cradle that holds the gas tank in place, and keep track of the rubber spacer block(28) that goes between the filler neck and the body. For reassembly, I used some weatherstrip adhesive to hold the rubber block to the body.
The next few steps don't have accompanying pics, so I'll describe as best I can:
- Drained the tank by disconnecting the feed line to the primary pump and directing the fuel into a gas can. 2 gallons came out, plus I figured half a gallon burned after the "low fuel" light came on, for a total of ~2.5 gallons available when the light comes on. There was still fuel in the tank, maybe a quart or slightly more, but IMHO that doesn't count because it can't get to the pump.
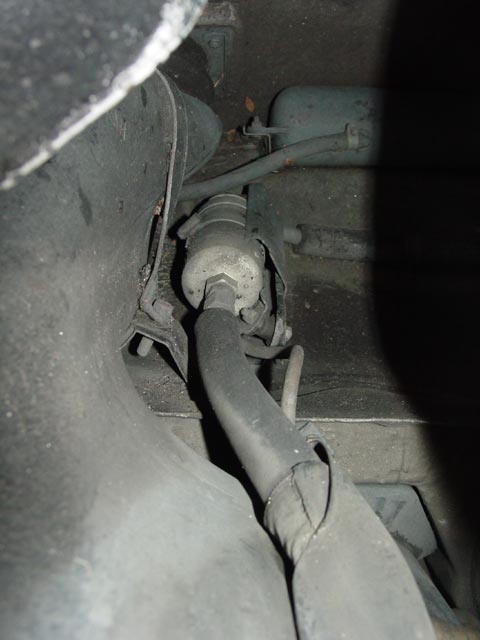
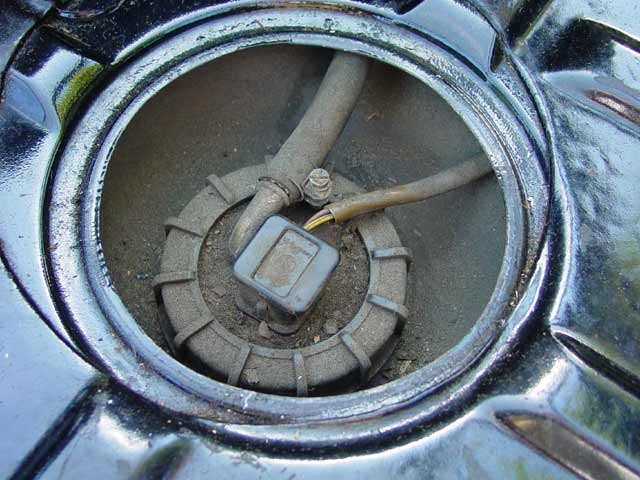
- Disconnected the wires and the fuel return line from the fuel tank. Here is a picture of that area that I took while working on a previous project. There was no layer of crud this time, since I cleaned the area last time around. This is what lives under the round plug in the cargo area floor:
- I have heard many horror stories about how easy it is to snap the vent fittings off of the tank, so I made no attempt to undo the fittings while the fuel tank or the expansion tank was on the car. My next step was to cut the vent line(20) to the expansion tank.
- Next, I loosened the strap around the filler neck(it doesn't come all the way off, just remove the bolt)
- Around this time I removed the grommet(4) that seals around the filler neck. It's very simple really, just begin by pulling on the little flap of vinyl that hangs out(7), toward the center of the opening. This will unseat the metal ring(6) that holds the grommet in place in the body opening. Just go carefully, so it doesn't spring free and end up scratching your paint. Once the metal ring is out, just pull any edge of the grommet toward the center of the opening so that it disengages from the body opening, then once you have it started it pops right out. Nothing to it, really. If there is a lot of crud in this area, consider plugging the gas filler or leaving the gas cap on so the crud doesn't get in the tank. If you leave the cap on you may have to cut the grommet, though I bet on most cars it's falling apart. I assume mine was replaced at some point in time, because it was just beginning to crack.
- Later cars may have a mounting bolt(32) that you can access once you have the grommet out. Mine didn't have a mounting point here, but make sure that if your car does have one, you remove the bolt before going to the next step.
- Then I loosened the four bolts that hold the fuel tank cradle(35) to the body. I actually unscrewed them all the way, then put them back in about three turns(one at a time). Be sure the tank is well supported, because if you let it hang by the hoses you stand a good chance of snapping off one of the fittings.
- With the cradle a bit loose I was able to jockey the tank around and reach up between the bumper and the tank to cut the large hose that goes through the frame.
- I then reached up on the filler neck side and pulled the hose through the frame so it hung free.
- What I should have done at this point is removed the side marker light. The tiny bit of extra room I gained from doing this would have made the next step a lot shorter.

- So at this point, with a little help from a neighbor and some huffing and puffing, I removed the four bolts on the cradle and dropped the tank out. It sounds a lot easier than it is, because it's a tight fit past the fender and bumper. You have to get it at just the right angle to come out. I spent several minutes fighting it, then after removing the side marker it came out in less than a minute.
Sorry I don't have a pic of the expansion tank removed from the car. I thought I did, but apparently not.

Below is a screenshot from PET6 showing the fuel tank and parts I don't have pics of, but that figure into this project.
*When you see a number in parenthesis on this page, it refers to an item in the exploded drawing above. For example, "Fuel Tank(1)"
- The next step toward getting the expansion tank out was to get the accumulator/filter assembly out of the way. It was a bit of a jigsaw puzzle, where I had to remove the fuel line at the bottom of the filter(and catch the fuel that ran out), remove the band clamp from around the fuel filter, remove the nut that holds the bracket for the band clamp in place, and remove the two nuts holding the accumulator standoffs in place.
- Remove front and rear mounting nuts for expansion tank, and remove it. be prepared to cut the front vent line (21). In the pic below, it's the second rubber hose from the right if you look in the area between the filter & accumulator; it leads to the check valve(18) and then to the hard line(24) to the front of the car. You may have noticed this looks nothing at all like the PET drawing...

- Carefully remove the upper hose from the check valve. Without removing this, you will never be able to pull the check valve down through it's mounting grommet. Essentially, one barb on the check valve pushes upward through a grommet mounted to the body, then the hose attaches on the barb to hold it in place. Be very careful removing this hose, as the plastic may have become brittle with age.
- Now remove the check valve by pulling it down through the grommet, and remove the other end of the vent hose from the hard line. Don't lose track of which way the check valve is oriented! Well, al right... in case you do lose track, the tapered end goes down, and connects to the top of the expansion tank.
Below you can just see the white plastic check valve through the gap between the fuel filter bracket and the body. The connection that you see, the bottom one, goes to the expansion tank.
- Unscrew the fuel filter from the accumulator(if you are changing it). You will want to crack the fitting right at the aluminum filter body. There is a copper washer sealing this connection, and it's a different size than the ones for the banjo fittings. Make sure you have this ahead of time... I was stuck with having to anneal and lap my old washer for reassembly.
- At this point everything is out, that needs to be out. My next step was to remove all of the rubber hoses from the plastic fittings, which took a while as I was being very careful.
- Next I cleaned up all parts that I hadn't already -- the expansion tank, primary pump assembly, cradle, etc to prepare for reassembly.
- Next, I attached the large breather hose to the fitting on the main tank. I used bulk 15mm fuel rated vent hose, bought locally.
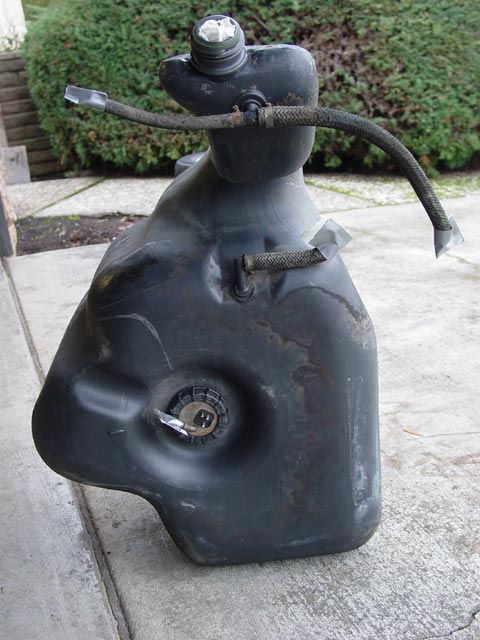
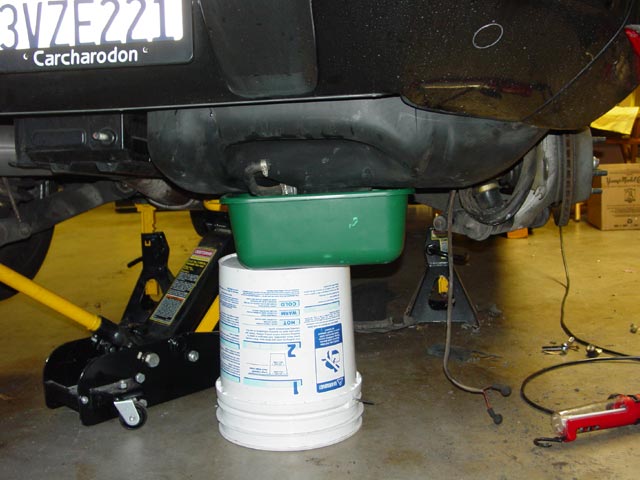
- Then, feeding the free end of the 15mm hose through the frame of the car, I jockeyed the tank into position and propped it in place(pic below) while I double-checked the routing of the vent line, maneuvering it so there was no stress on it.
- I replaced all of the foam strips that had been between the tank and the cradle with 1/8" closed-cell neoprene foam that is sold in large sheets at the local hardware store, priced by the square foot. I attached it to the cradle with 3M Super Weatherstrip Adhesive and trimmed the excess.
- Satisfied with the initial routing of the vent line, I attached the cradle, taking care to route the wiring for the fuel pump & the high pressure line properly through the cradle. I also had to pay attention to the wires for the sender unit and the return line, to make sure I would be able to reach them and reattach them through the hole in the cargo area. I only threaded the bolts in two or three turns, so that I would be able to shuffle the tank into position and reach around it.
- Next, I reinstalled the expansion tank, after attaching the top hose(21). At this stage of the game I had not cut the hose yet, I just wanted that connection in place so I could screw the tank firmly in place.
- Next, I cut the hose to the length I needed to reach around to the bottom of the check valve without kinking.
- I then attached the hose to the check valve, and pushed the top fitting of the check valve through the grommet.
- Next, I attached the hose to the top barb of the check valve, pushing it tight so it held against the grommet.
- From the top of the check valve, I again curved the hose around the minimum radius I could without it kinking or flattening the hose, and connected it to the hard line that goes forward. Actually, it was at this point that I realized that if I cut the hose to the minimum length that would not compromise it's function, I would only have about 3 inches left over for the hose leading to the tank(20) so instead I left the extra hose on there to make for a gentler bend, and decided to use fuel line on the other hose(20).
- Next I installed the new fuel filter on the accumulator, and coaxed the assembly back into place -- "reverse of disassembly".

- The next step was to connect up the line between the expansion tank and the fuel tank(20).
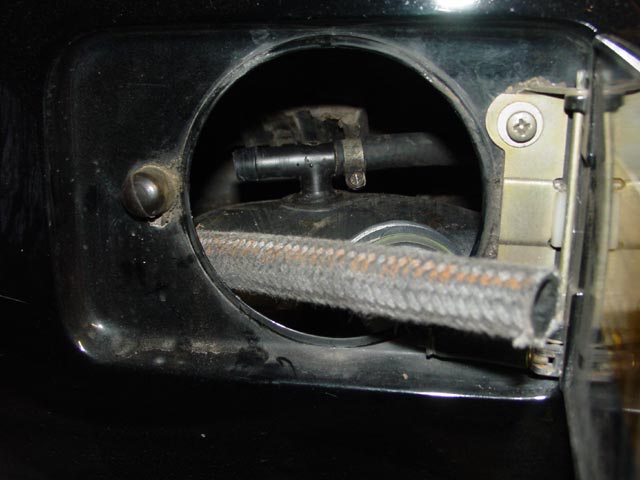
- Next, I routed the 15mm vent line up from the hole in the frame to the filler door in the body, making sure it wasn't twisted or stressed. The pic below shows it as I was estimating how much to cut off -- I removed about 3" after this pic was taken. The last picture below shows it attached.
- In the pic below you can see the rubber block that I mentioned above. It wraps around the steel bracket that it lives on, but I glued it in place to be sure it wouldn't slip out.
- Next I tightened up the cradle bolts, pushing the tank up into position first to be sure it was where it belonged.
- I made one final check of the 15mm hose routing before proceeding, as well as pump/sender wires, high pressure line, and return line.
- Then I put the strap back around the filler neck and tightened it down.
- Next, I re-mounted the secondary fuel pump.
- Next, I re-plumbed the primary fuel pump, putting new sealing washers on the banjo fitting and cleaning the electrical contacts before adding Stabilant and re-connecting.
- Now I reattached the sending unit wires and return hose.
- At this point, I put fuel back in the tank and checked for leaks. Then, I jumpered the fuel pump and let it run for about 20 minutes while I had a beer and watched for leaks.
- Satisfied, I reattached the fuel pump to the cover plate(38) and reinstalled the cover plate.
- I put the cover back over the fuel sender, then reinstalled the carpet and floormat.
- Last, I reinstalled the wheel and put the car back on the ground.
As soon as I got myself cleaned up, I went out to the gas station and filled up. Normally I stop when the nozzle first shuts off, but this time I was in the mood for a little torture... I kept filling until the fuel level was about 1/4" above the insert in the filler neck with the little door in it, then put the cap on. I drove the mile and a half home accelerating and braking as hard as I reasonably could, and swerving and taking corners hard and jerky to get the fuel to slosh around as much as possible. With the car back in the garage, I checked at the fuel sender and all of the hose connections for any signs of fuel leakage and found none. I then closed up the garage and went on about a few other things around the house, periodically going out in the garage and smelling for gas. After a couple hours, I was convinced -- no leaks, mission accomplished! All that was left were the two steps mentioned below, and of course drive, drive, drive!

- Reinstalled the front fender liner
- Next I installed the new grommet around the gas cap(4) and the retaining ring and flap(6 & 7), then the gas cap itself.