Porsche 928 S4 Service
John Pirtle, November 11, 2001
http://members.rennlist.org/pirtle
Motor Mounts
The easiest test for bad motor mounts is to raise the hood, start the engine and give
it a couple of good revs. An engine with good mounts will rock from side to side. A stable
engine means all the movement and vibrations are being transmitted to the chassis. The two mounts
can be visually inspected from underneath the car - the mount housing "hooks" will have
a large gap if the mounts have collapsed, perhaps a finger-width or more.
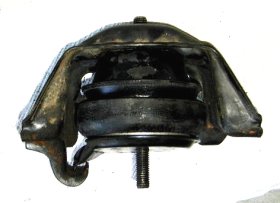
Thanks to enthusiasts Ray Wach and Chuck Bos, a pair of alternative mounts has been
discovered. These mounts are used in several Ford trucks - mostly 4-cylinder Rangers
but also in the 6-cylinder 4.9L F-350. Commonly found at most parts stores, this
hydraulic mount is made by
Anchor Industries, carries part
number 2698, and costs approximately $50/each. More information can be found in my
email keepers.
The workshop manuals do not necessarily cover the motor mounts, but the procedure for the
steering rack is on pg. 48-5, and lower control arm information is in section 40.
Some considerations: this is an excellent time to replace the steering rack, and replace
the oil pan gasket (and install the GTS oil baffle). While this procedure uses a bottle jack to
raise the engine from below, any oil pan work will require hoisting the engine from above.
It is not necessary to remove the oil filter but it is
highly recommended for the additional working space. Plan for a tiring eight hours.
Items needed:
- oil change items
- motor mounts
- 10, 13, 17, 19mm sockets and wrenches
- a breaker bar or pipe can be very helpful
- bottle jack and thick wood support for oil pan
- vise for removing upper motor mount nut
Procedure:
- Disconnect the battery ground strap (in rear of hatch).
- Raise the front end as high as possible.
- Remove the front wheels.
- Remove the belly pans if you have them.
- Position the drain pan, loosen the 15mm oil pan drain plug and stay clear of the hot oil.
- Remove the oil filter being careful not to spill oil or burn yourself. (The Porsche oil
filter removal tool needs a 27mm socket.)
- Replace the drain plug using the new gasket - tighten to
50Nm (36lb/ft).
- Remove the 10mm bolt from the wiring harness and position harness away.
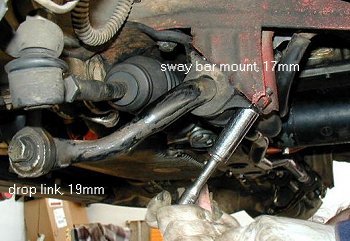
- Loosen the 19mm bolts connecting the front sway-bar to the drop links.
- Remove the 17mm sway-bar mounts and allow bar to swing freely.
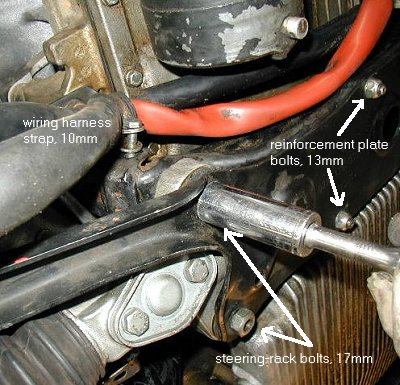
- Loosen the four 13mm nuts holding the steering rack reinforcement plate to the cross member.
- Remove the 17mm bolt from the left of the reinforcement plate.
- Remove the four 17mm steering rack nuts. The bolts can be counterheld by wedging an
Allen wrench between the bolt head and the cross member.
- Remove the 13mm nuts and lower the rack plate.
- Pull steering rack down and maneuver away.
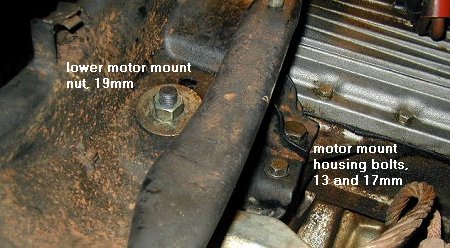
- Loosen 19mm nuts at bottom of motor mounts (located in the cross member).
- Each mount housing is fastened to the engine with a 17mm and 13mm bolt on each side. Remove
these.
- Remove air box.
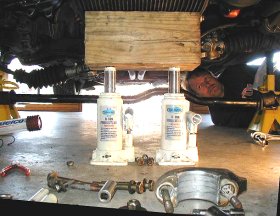
- Position wood pad beneath oil pan with a jack and lift engine about an inch. Watch
clearance for the oxygen sensor.
- Remove the lower motor mount nuts.
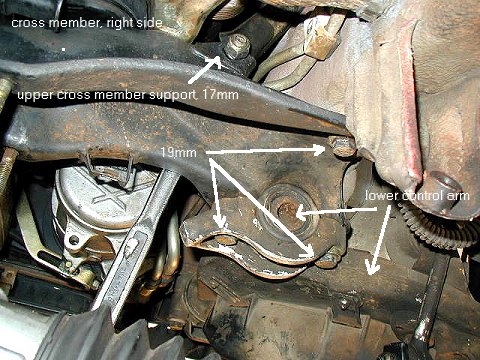
- The cross member has an upper support at the top of each end. Remove the 17mm bolt. On
the left side the nut may be counterheld from above (down through the engine bay).
A screwdriver and hammer might be needed to drive the bolt through.
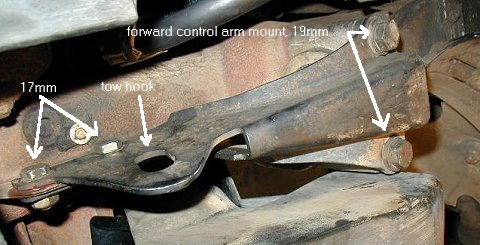
- At the front of each side of the chassis is a guard (see pg. 40-7) which also houses the
front tow hooks. Loosen the front 17mm nut and bolt. Remove the second set.
- Remove the two 19mm bolts at the rear of the guard (forward control arm mount)
and allow the tow hook to swing free.
- Remove the two 19mm bolts at the rear of the control arm mounts.
- Remove the 19mm bolt at each end of the cross member.
- Maneuver the crossmember, lower control arm, and steering rack so that each motor mount
and housing can be extracted.
- Take a break!

New Anchor 2698 mount vs collapsed Porsche mount

- Snug all the oil pan bolts (10mm).
- Remove the upper motor mount 19mm nut from each housing. A vise is very helpful.
- Install the new mounts in the housings.
- Position the motor mounts and housings and maneuver the cross member into the lower
motor mount bolts. If you install the Anchor mounts add one or two wide washers
at the bottom of the mount to shim to the same height as the originals (more info in the
email keepers).
- Tighten the 19mm and 17mm bolt sets on the motor mount housings.
- Finger-tighten the lower motor mount nuts.
- Position the lower control arm and finger-tighten the bolts for the control arm
supports (fore and aft) including the guard.
- Replace the bolts at each end of the cross member, but do not tighten.
- Replace the bolts in the upper cross member support and tighten (17mm). Tighten the
control arm and cross member bolts as necessary to help position the cross member with
the upper support. Again, that hammer might be your friend.
- Tighten the 19mm bolts (probably 62 ftlb) at each end of the crossmember.
- Tighten both control arm mounts (19mm - 62 ftlb).
- Replace/tighten the 17mm bolts (33 ftlb) in the front of the guards (tow hooks).
- Lower the engine and remove the bottle jack.
- Tighten the lower motor mount nuts (19mm - probably 62 ftlb).
- Maneuver the steering rack into place and fit the reinforcement plate, finger-tightening
the four 13mm nuts.
- Tighten the four 17mm steering-rack bolts to 33 ftlb (important due to the bushings!).
- Tighten the 17mm bolt on the left of the reinforcement plate.
- Tighten the 13mm reinforcement plate bolts.
- Position the wiring harness and tighten the strap (10mm).
- Wipe a little fresh oil on the new oil filter gasket.
- Hand spin the new oil filter on and simply snug it.
- Position the sway bar on the mounts (this is a good time to grease the bushings) and
tighten the 17mm bolts.
- Tighten the 19mm sway bar drop links.
- Replace the wheels and tighten the lug nuts to 96 ftlb.
- Lower the car to a level surface.
- Pour in 8 quarts of oil.
- Allow a couple of minutes for the oil to drain to the pan, and check the dipstick level.
The level should be between the low and high marks (the difference between the marks is
approximately 1.5 liters, or 1.58 quarts).
- Replace the oil filler cap.
- Reconnect the battery ground strap.
- Remove the fuel pump fuse (#42 on my '87) and hit the ignition. Allow the engine to spin for
several seconds and circulate the oil, build pressure, and fill the oil filter.
- Replace the fuse and check for leaks.
- Start the engine, watch the engine rock, and check for leaks.
- Go for a drive, enjoy the smooth engine, and check for leaks.
- After the engine cools, check the oil level and add if necessary.
928 S4 Page
John Pirtle
November 13, 2001