Porsche 928 S4 Service
John Pirtle, May 7, 2003
http://members.rennlist.com/pirtle
Air-conditioning
During a Spring get-to-together of area 928 owners
(details) we learned about R-12 to
R-134a conversions. Our host mechanic Joel Roeder provided some history of the
changes to refrigerant, and told how the newer oils are improving R-134a
compatibility with our older R-12 systems. In short since my a/c was warm and
the site-glass was full of bubbles indicating very little R-12, he recommended
I do the following:
- install a new receiver/drier
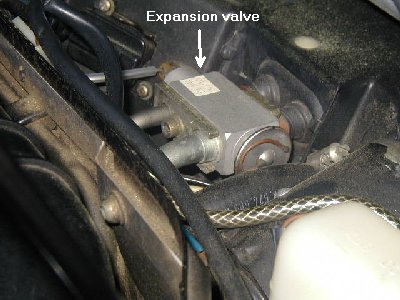
- install a new expansion valve
- install new quick-release fittings on the system valve ports
- change o-rings along the way
- remove the a/c compressor and replace the oil
- come back to his shop for a fill of R-134a
- adjust the temperature mixer flaps
System conversion
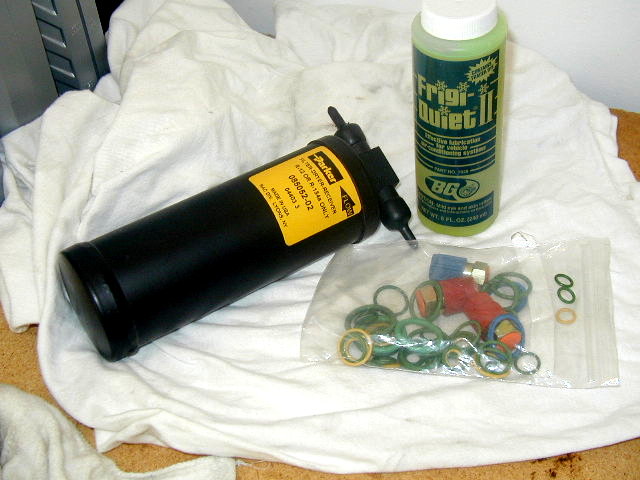
Joel had sent me home with a bag of assorted o-rings and port fittings,
and also a bottle of Frigi-Quiet II (made by
BG Products, Inc.).
I called
928 Specialists
and learned that the Porsche receiver/drier
is relatively expensive. "However..." they sell an alternate (about one-third
of the cost) that is a similar fit and I had no problem whatsoever (this unit
is a bit narrower so I added a piece of rubber between it and the bracket
to keep a snug fit).
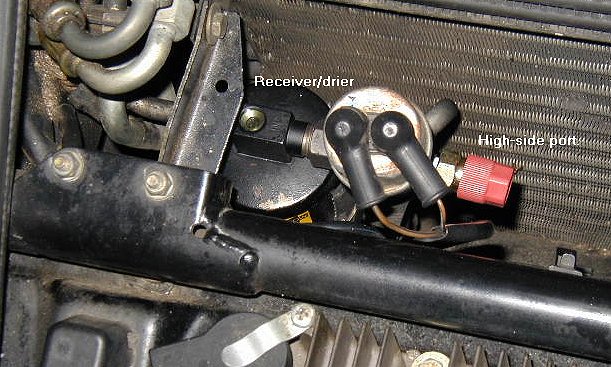
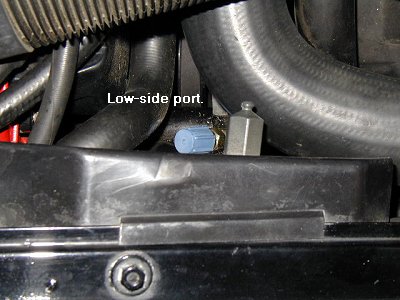
- Remove the caps from both the high-side and low-side valve ports.
Take a
 screwdriver and push in each valve to release any refrigerant (mine lightly hissed for
only a few seconds). Unless your refrigerant has leaked to the extent mine had, you
should have the system evacuated properly.
screwdriver and push in each valve to release any refrigerant (mine lightly hissed for
only a few seconds). Unless your refrigerant has leaked to the extent mine had, you
should have the system evacuated properly.
- Remove the shrader valve from the existing port (the shrader valve is the
pushpin valve). A pair of needle-nosed pliers may work, but a shrader
valve tool is probably necessary for the tight confines of the low side port.
- The quick-release valves screw on top of the valve ports.
Use teflon tape to help seal the fitting.
- The nuts on the receiver/drier are 19mm - mine were not tight. An oily
residue around any of the fittings may indicate a leak. When changing the o-rings
coat them with the new oil.
This is a squashed o-ring -

- Use a *good* allen wrench on the expansion valve to help avoid stripping
the bolt. Under the visible 5mm bolt are two smaller 3mm bolts for the rear brace.
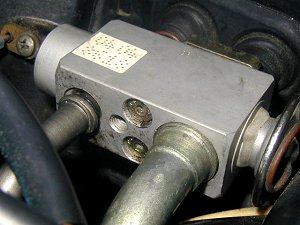 The most difficulty is moving the
hard metal lines back enough to pull the expansion valve out.
One end at a time seemed to work.
The most difficulty is moving the
hard metal lines back enough to pull the expansion valve out.
One end at a time seemed to work.
- Disconnect the a/c compressor electrical wire - usually found in front of the
right cam belt cover.
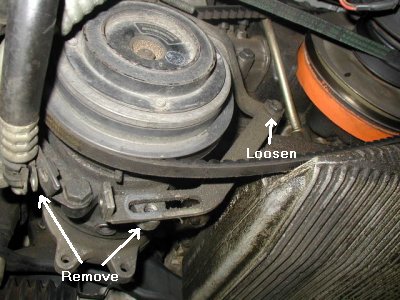
- Remove the two 10mm bolts holding the a/c hoses to the compressor.
Remove the a/c compressor belt tension bolts, and loosen the 13mm bolt
at the adjustment bracket pivot.
- The a/c compressor is mounted with two 17mm bolts at each end on top. A
stubby wrench helps on the front bolt.
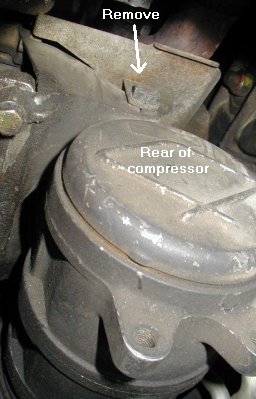 Neither of these bolts needs to be completely removed - just withdrawn
sufficiently to permit the compressor to drop.
Neither of these bolts needs to be completely removed - just withdrawn
sufficiently to permit the compressor to drop.
- The hoses can only be removed with the compressor lowered, so support the
compressor carefully. I used some light hammer taps to get the nuts loosened - they
are large 27-28mm.
- Pull the compressor out, turn it over and empty the oil. Refill with 4 ounces
of the new oil.
- Change o-rings.
- Reconnect the lines.
- Bolt in the compressor.
- Tension the compressor belt.
- Reconnect the compressor electrical wire.
- Go have your system filled with R-134a.
From the manual page 87-01:
Refrigerant capacity is:
950 g
(The manual is not clear but this appears to be the capacity
for model years through 1983.)
From the manual page 87-90:
Refrigerant R12 volume up to July 1988 is:
1050 g
1200 g for cars with rear a/c
As of July 1988, the R12 volume is:
950 g
1150 g for cars with rear a/c
In converting from R12 to R134a, fill the system with 80% of the
amount specified for R12. So for a 1987 model with rear a/c:
1200 g x .80 = 960 g = 2.12 lb of R134a
There are many other o-rings in the system, especially if you have
rear a/c. Joel recommended servicing the parts in the hot engine compartment
that are most susceptible to decay and then dig into the interior later if
necessary. The rear a/c uses the same expansion valve, and there are also hose
fittings beneath the right seat.
Temperature mixer flaps
The flaps came from the factory with a foam seal around the edges. Over the
years the foam disintegrates leaving a gap which permits air to flow through
the heater core, warming up the a/c. These adjustments
should be made with the temp on maximum cold - the engine does not have to
be running but the ignition should be on.
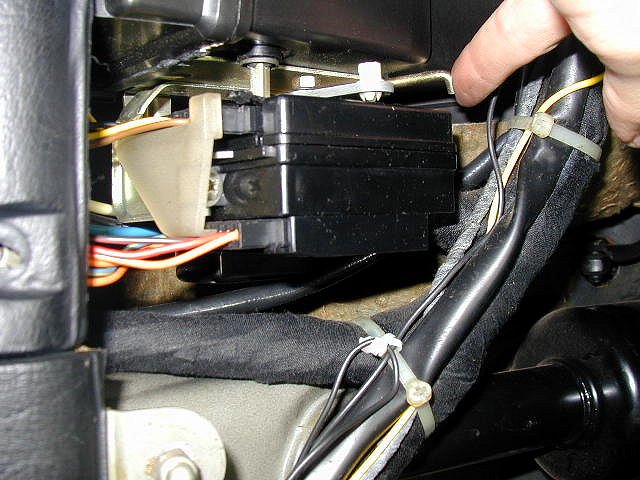
- Looking up from the left footwell (driver side in US cars) there is
the electronic temperature mixer motor. Moving the temp slider switch from full cold
to full hot will cause the motor to raise and lower the link.
Disconnect the flap linkage arm from the motor.
- Pull the arm down as far as possible with the temp set to full cold.
If it pulls down further than the
connector at the motor then a gap is being left in the flaps. The top end
of the arm is a screw fitting, so turn the arm to adjust the length until it
matches with the motor, and reconnect. Some cars may have a locknut at
the top of the arm which will require removing the instrument pod.
- The other mixer flap adjustment is on the right side of the HVAC housing. On US
cars the glovebox must be removed (see procedure for Interior - Center console). The
linkage on his side of the housing connects the upper flap to the lower flap so
that they both close off airflow to the heater core.
- Again, moving the temp slider switch from full cold to full hot will
move this flap linkage. The upper arm is connected to the same flap as the link at the
temp mixer motor - at full cold this arm will be at the bottom of it's travel.
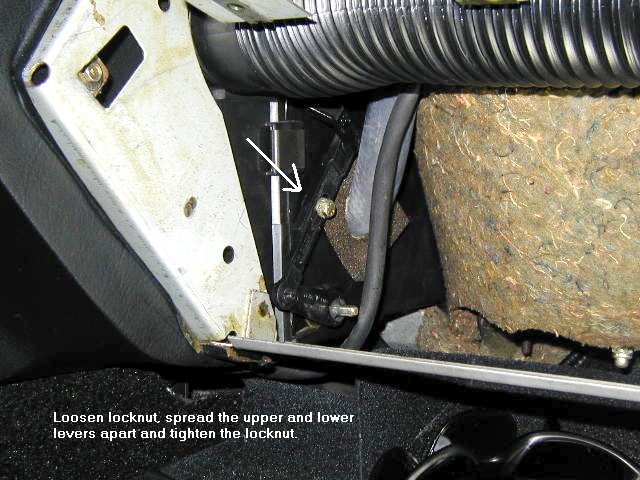
Loosen the locknut connecting the two flap arms. With the temp full cold pull
the lower arm forward. This will spread the ends apart. Be sure to keep the linkage
at a "comfortable" fit. If the linkage is stretched too far apart a gap could be left
at the upper flap.
(Info on page 87-115 of the workshop manual.)
928 S4 Home