Recently Tony Harkin of Las Vegas posted a procedure to keep the heater valve from opening when the engine was turned off by drilling a hole in the arm of the Heater Valve vacuum motor, then using a tie wrap to mechanically keep the heater valve closed. He indicated it made a significant difference in AC effectiveness in the desert heat of Las Vegas.
The concept of removing this heat load from the AC system whenever the engine is shut off was very intriguing to me. After seriously considering TonyÆs approach, I decided it wasnÆt exactly what I wanted for two reasons. (1) Occasionally the temperature is cool for a few days in the late spring, early fall, and even some summer periods. Thus IÆd like to be able to conveniently have heat to the cabin at those times. And, (2) I drive my car in DriverÆs Ed events at tracks 12-18 days a season. When ambient temperatures are high, and the speeds/engine loads are high, it is advantageous to be able to use the heating system to minimize overheating the engine.
Thus, I felt a system that allowed convenient changeover from the as designed system for using the heater/AC to a system that maintained the heater valve in the closed position would be the most attractive for my needs. I posed the problem to my friend, neighbor, and 928 guru Earl Gillstrom. Earl promptly said ōof course that is possible to achieveö and outlined the changes needed. The following procedure accomplishes it beautifully, it only takes about 20 minutes to make the modification, and the cost is probably about $10. Earl has modified his Æ91 GT and IÆve modified my Æ88 S4 as outlined. IF anyone can come up with a 3 way valve for our system, that would simplify the changeovers even further!
MATERIALS/TOOLS Needed:
Four to five feet of 4 mm plastic vacuum tubing (available from The Big Three 928 suppliers, P/N N.020.139.1 ~$3.00/meter or most German automobile dealer parts dept)
One ōTö for a vacuum system, in 4mm or 5/32nds (available from automobile suppliers such as Pep Boys, etc.
Two rubber connectors (the minimum, you might find 4-5 useful) for connecting the 4mm tubing (available from same source as the tubing (I preferred to use a length of 3/32nd vacuum hose from a foreign automobile parts shop - a lot of flexibility for cutting to the lengths needed).
One rubber connector for 4 mm tubing that is in the shape of a ōUö (or V) Porsche calls this a "hose" in PET, DR calls it a "Vacuum - rubber elbow" P/N 928.574.717.02. I have always called it an "EL", pluming slang for elbow. It's interesting it has a 928 P/N, since it is obviously generic on all German cars.One rubber ōcapö to close off the end of a 4mm vacuum tube (same suppliers).
An easily remembered identification system for the three different pieces of tubing you will have when this modification is complete (I used pieces of Red, Blue, and Green electrical tape)
PROCEDURE
First, locate the vacuum tube that comes from the HVAC Control in the console through the firewall (about the center, below the air filter housing) and snakes over to the vacuum connection at the Heater Valve. (Heater Valve is behind the right side of the engine valley, and is connected to the engine coolant system by a short hose). Remove the ōUö shaped rubber connector from the Heater valve (and from the 4mm plastic vacuum hose). Set the rubber connector aside.
Now, snake this tube to wherever you want your easy access for the changeover of the heater/AC system (or toward, as you may need to use a rubber connector and some additional 4 mm tubing to get there). I chose the left side of the engine bay, between the brake fluid reservoir and the front shock mount as a convenient place. The pictures; show this as the changeover location. Put a temporary label on this piece of tubing identifying it as Heater Valve Control (masking tape with HVC?).
Take the length of new 4 mm tubing and route it from wherever you decided youÆd like the changeover location to the Heater Valve. Use the ōUö shaped connector you just removed to attach this piece of tubing to the vacuum port on the Heater Valve. Label this tube at the changeover site as Heater Valve (HV?)
Near the brake booster there is a 4-way vacuum connector. One of the vacuum connections to this 4-way is a 4 mm vacuum tube similar to the one that you just re-routed from the Heater Valve, and also goes into the firewall. This connection provides vacuum to the HVAC control valve system. Remove this connection from the 4 way, and insert the vacuum ōTö between the 4 way connector and this tube using a rubber connector for the tubing and a rubber connector with a short piece of the new 4 mm tubing for the 4-way or plug the "T" directly into the 4 way.
On the open connection of the ōTö connect a length of the 4 mm tubing (using a rubber connector) and route it to the changeover location. Label this tubing as Vacuum (V?).
Cut all three of these tubes so they terminate at the same place in the changeover location.
Now, you are done, except for deciding how you want to permanently mark the 3 pieces of tubing for identification, and whether you now want the Heater Valve always closed (Summer), or functional for heating (Heater usable for the cabin).
IF you want the Heater Valve closed, use the ōUö shaped connector to connect the tubing labeled Vacuum to the tubing labeled Heater Valve. Put the ōcapö on the tubing labeled Heater Valve Control. Now, whenever there is vacuum in the vacuum tank your Heater Valve will stay in the ōclosedö position. On my car, this connection keeps the Heater Valve closed for days, even if the engine is not started.
IF you want heat (winter, cool season, track driving, etc.) use the ōUö connector to connect the tubing labeled Heater Valve to the tubing labeled Heater Valve Control. Put the ōcapö on the tubing labeled Vacuum. You have restored the vacuum system to the factory setting. Now, whenever the engine is stopped or the climate control system requires heat, the Heater Valve will automatically open.
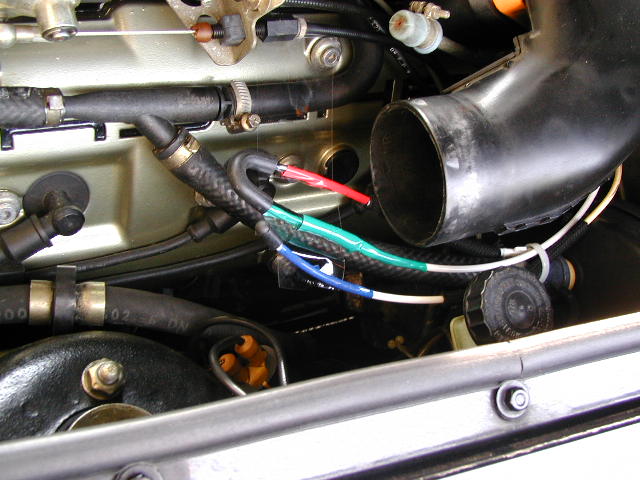
For ease in remembering which tubes I should have connected and which one I should have capped, I selected a ōwinter/summerö labeling. I wrapped a short piece of Green electrical tape around the tube labeled Heater Valve. The ōUö shaped connector is ALWAYS connected to this Green Heater Valve tube. I wrapped a piece of Red electrical tape around the tube labeled Vacuum, as that is the tube to have inserted into the ōUö connector in summer. I wrapped the tube labeled Heater Valve Control with a piece of Blue electrical tape to indicate the winter connection.
Changeover from summer to winter operation now takes about 30 seconds. I remove the ōUö connector from the Red tubing, remove the ōcapö from the Blue tubing, connect the open end of the ōUö to the Blue tubing and put the ōcapö on the Red tubing. Again, the ōUö connector is never disconnected from the Green tubing.
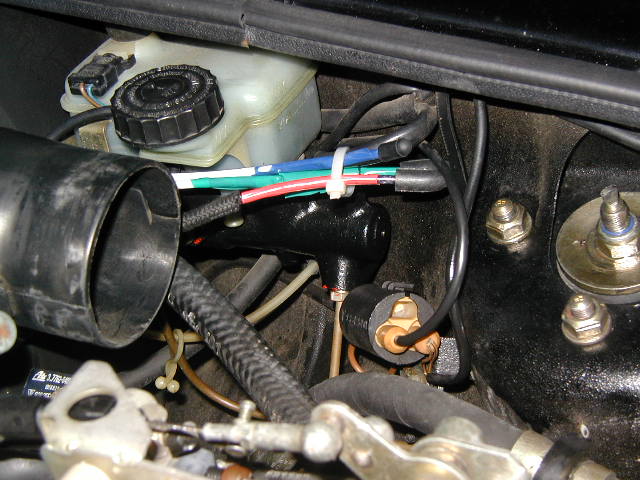
Picture 1 shows the color labeled tubes, and Picture 2 shows the tubing held in place between the brake fluid reservoir and the shock tower with a white tie wrap.
As an aside, if you have a well functioning MightyVac, you may want to use it to verify that all of the components of your system hold vacuum while you are doing this modification, and/or when youÆve completed it. When I completed my modification it did not function well. I had used pieces of 5/32nds rubber tubing for connectors and when I checked with the MightyVac, I found these connections all leaked badly. I replaced them with 3/32nds rubber tubing and all vacuum systems held full vacuum. The modification then worked exactly as expected and described
Gary Knox